
First, for testing purposes I will create the same state as on the customer's system.
Adding new hard drives on VM and creating volume group
NOTE: You can skip this part, I have added this in order to recreate the same setup I had on customer's system.
I have created a new VM server, which currently has a sda disk with storage capacity of 30G. I want to add new disks, so I will shut down the machine, navigate to Settings -> Storage -> choose Controller SATA and click on button like on the screenshot below to add new hard disk
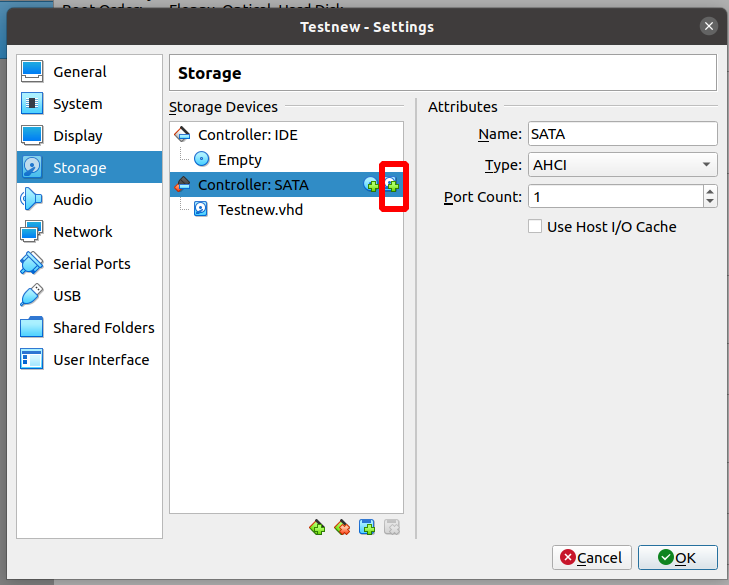
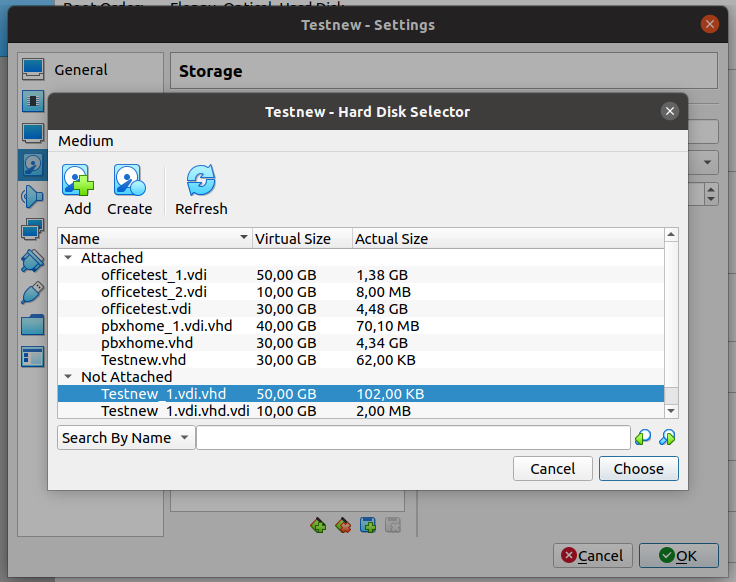
Click on Create button and create new disk, assign the storage anc click on Create button. For testing purposes, I will add two disks, one of 50G and the other one of 10G.
They will be show in Not Attached disks, to add them click on Choose button.
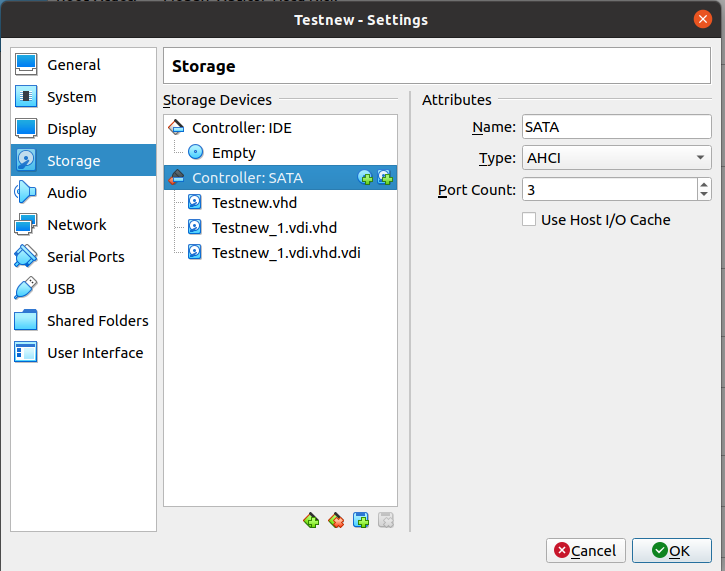
After that, they will be shown in the list under Controller SATA, click OK to save changes.


I will start the VM now.
The current state of the VM is like this:
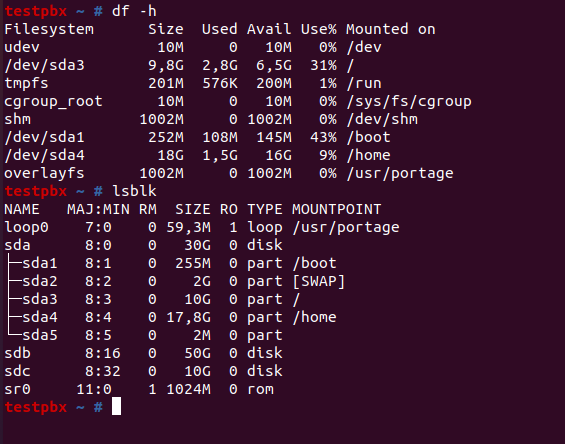
In my case, as I need to recreate the same state as on the customer’s system, I will create a volume group of sdb and sdc.
In order to complete that, first we will need to create physical volumes on sdb and sdc
pvcreate /dev/sdb /dev/sdc
Next, create a volume group (VG) that includes both physical volumes. You can name the volume group anything you like; for this example, we'll call it my_vg.
vgcreate my_vg /dev/sdb /dev/sdc
You can verify that the volume group was created and includes the two disks by using the vgdisplay or vgs command.
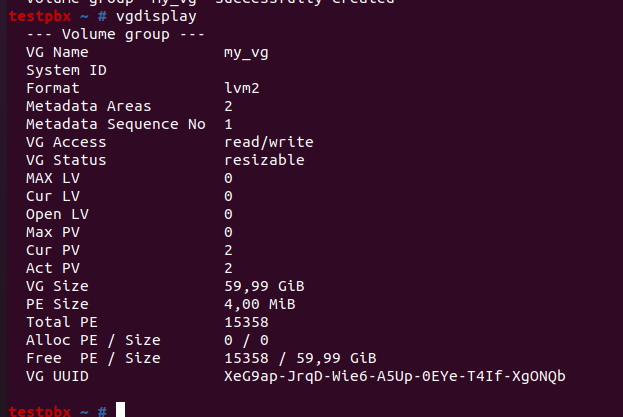
Now, I will create logical volume for this volume group:
lvcreate -l 100%FREE -n my_lv my_vg
Finally, if you created a logical volume, you can format it and mount it as needed.
mkfs.ext4 /dev/my_vg/my_lv
mount /dev/my_vg/my_lv /mnt
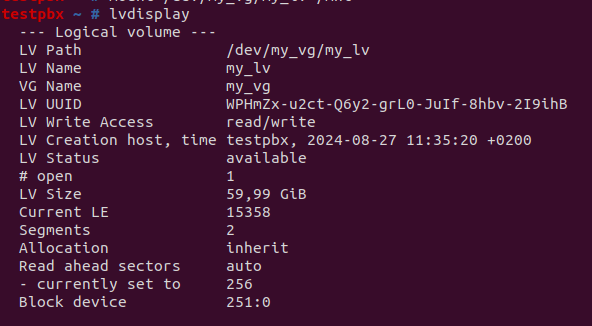
Let’s check the state of the storage now:
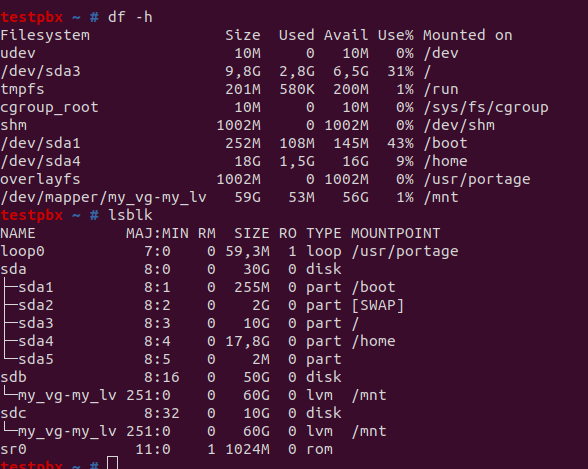
I have created now the same state like on customer’s system and I can now start with the procedure.
Increasing the storage capacity on VM instance by using volume group
The current state on the system is like this:
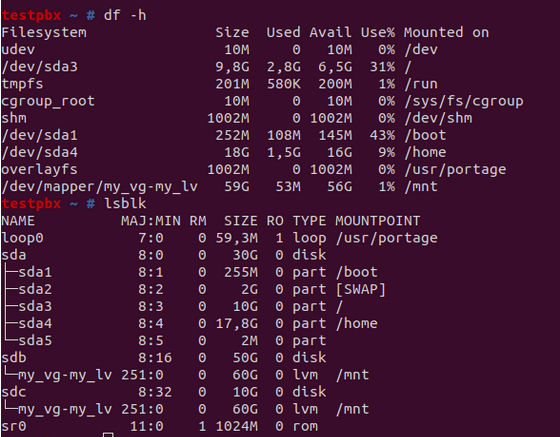
To check the volume group and logical volume group, use commands:
vgdisplay
lvdisplay
First, I will need to delete the existing logical volume group and volume group, which are currently created by sdb and sdc, as I will need to add sdb1 into a new volume group with sda4.
To delete existing volume group follow next steps:
Unmount the logical volume
umount /mnt
Remove the logical volume
lvremove /dev/my_vg/my_lv
Remove the volume group
vgremove my_vg
Check with lvdisplay and vgdisplay if they are successfully removed.
When we check it now with lsblk, we can see this:
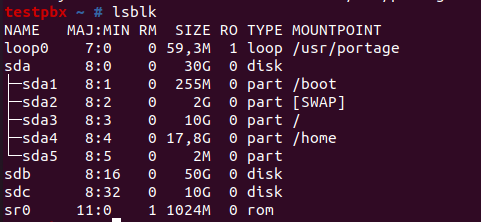
Now, when the volume group is removed, we will need to merge sda and sdc into new volume group.
I will first create a partition for sdb by using fdisk command.
fdisk /dev/sdb
Create a New Partition:
Type n to create a new partition.
Choose p for primary partition.
Select the default partition number (likely 1).
Accept the default values for the first and last sectors to use the entire disk.
Write Changes:
Type w to write the partition table and exit fdisk.
Example:
testpbx ~ # fdisk /dev/sdb
Welcome to fdisk (util-linux 2.33).
Changes will remain in memory only, until you decide to write them.
Be careful before using the write command.
The old LVM2_member signature will be removed by a write command.
Device does not contain a recognized partition table.
Created a new DOS disklabel with disk identifier 0x7a22bb1f.
Command (m for help): n
Partition type
p primary (0 primary, 0 extended, 4 free)
e extended (container for logical partitions)
Select (default p): p
Partition number (1-4, default 1): 1
First sector (2048-104857599, default 2048):
Last sector, +/-sectors or +/-size{K,M,G,T,P} (2048-104857599, default 104857599):
Created a new partition 1 of type 'Linux' and of size 50 GiB.
Now, we will create Physical volume on sdb1:
pvcreate /dev/sdb1
Create a Volume Group which will be used to merge disk volumes:
vgcreate vg_home /dev/sdb1
Create a Logical Volume (LV) using the space from sdb1:
lvcreate -l 100%FREE -n lv_home vg_home
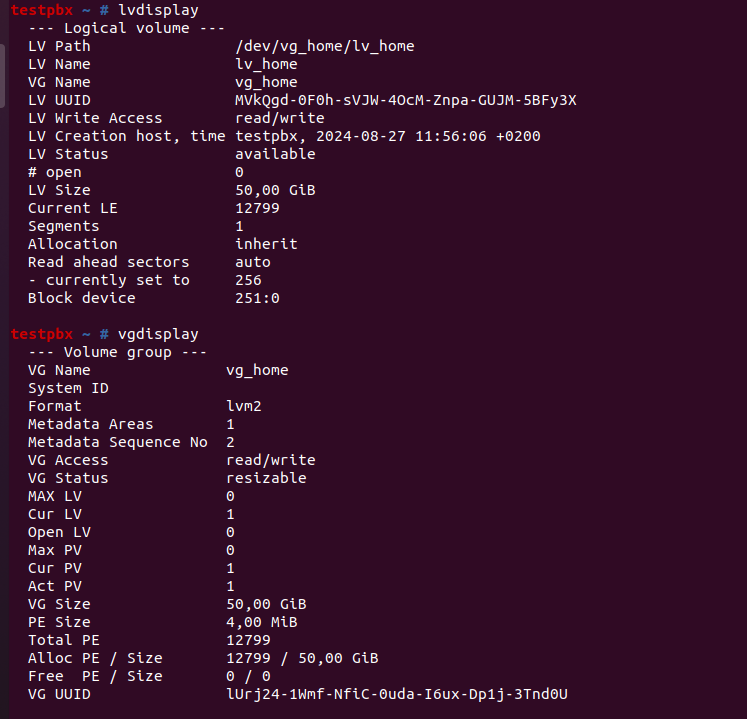
Now, format the new logical volume with the ext4 filesystem:
mkfs.ext4 /dev/vg_home/lv_home
Note: Copy the filesystem UUID as it will be needed later.
EXAMPLE: Filesystem UUID: ae800f54-0c52-433a-a5a2-cba22e4e2841
Next, we will need to move the new logical volume to a temporary location:
mkdir /mnt/new_home
mount /dev/vg_home/lv_home /mnt/new_home
This command will mount the logical volume lv_home from the volume group vg_home to the directory /mnt/new_home.
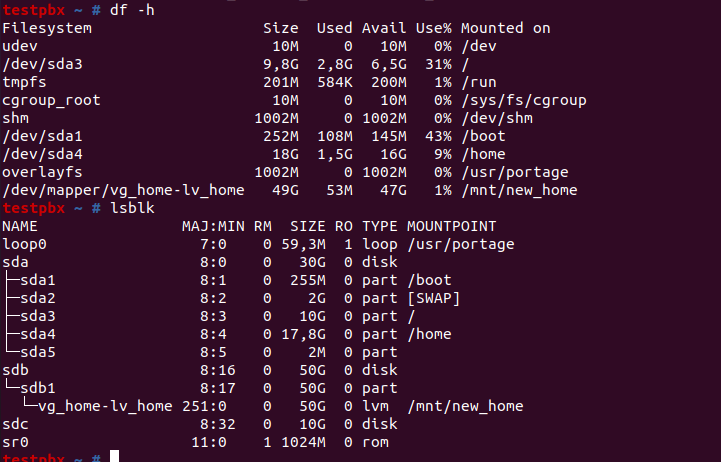
Now, we will stop PBXware services as all services which are running on /home partition should be stopped in order to complete rsync of the home directory.
After services are stopped, use rsync to copy all data from the current /home (on sdaX. example /dev/sda4) to the new logical volume.
rsync -avx /home/ /mnt/new_home/
Depending on the amount of data, this will take some time.
Once it is completed, we will update the /etc/fstab file to mount the new logical volume as /home at boot:
nano /etc/fstab
Comment out the old UUID of previously mounted /home and add the new UUID:
Example:
#UUID=ea6e3c07-d5eb-4970-bcab-731d8b4853d7 /home ext4 errors=remount-ro 0 2
(old one which I have commented out)
UUID: ae800f54-0c52-433a-a5a2-cba22e4e2841 /home ext4 defaults 0 2
(new one, I have used the UUID which I got when I created new logical volume with the ext4 filesystem)
We will unmount the current /home
umount /home
And mount it now by using the new logical volume
mount /home
/home should now be mounted on the volume group (vg_home) which was previously created with the sdb disk, to check it use df -h command
testpbx ~ # mount /home
testpbx ~ # df -h
Filesystem Size Used Avail Use% Mounted on
udev 10M 0 10M 0% /dev
/dev/sda3 9,8G 2,8G 6,5G 31% /
tmpfs 201M 584K 200M 1% /run
cgroup_root 10M 0 10M 0% /sys/fs/cgroup
shm 1002M 0 1002M 0% /dev/shm
/dev/sda1 252M 108M 145M 43% /boot
overlayfs 1002M 0 1002M 0% /usr/portage
/dev/mapper/vg_home-lv_home 49G 1,6G 45G 4% /home
testpbx ~ #
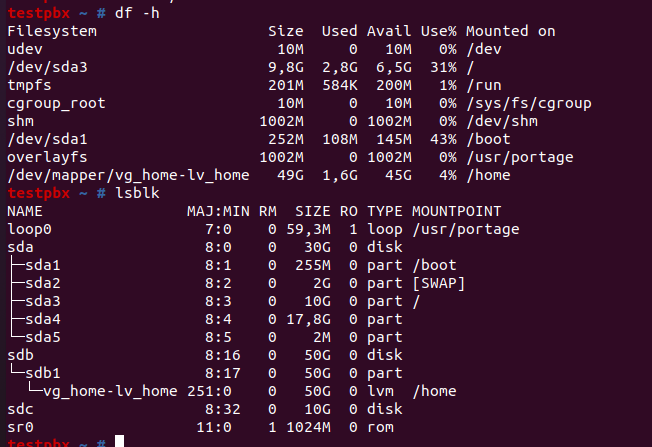
Next, we will add sda4 to the volume group. First we will need to unmount /home temporarily.
umount /home
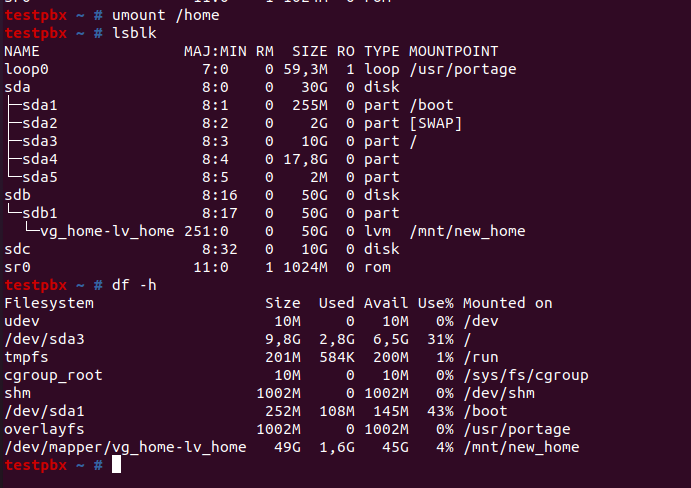
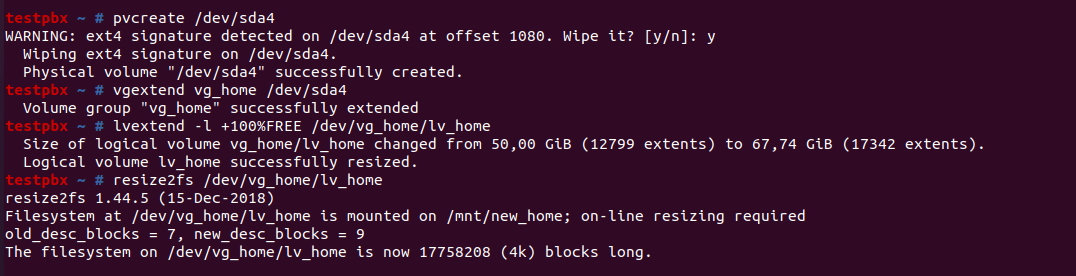
Next, we will create the partition /dev/sda4 as a physical volume that can be used in LVM setup, which will prepare /dev/sda4 so it can be added to a volume group. . After running this command, /dev/sda4 will be recognized by LVM as a potential storage area for logical volumes.
pvcreate /dev/sda4
Now, we will add /dev/sda4 to the existing volume group named vg_home
vgextend vg_home /dev/sda4
This command extends the storage capacity of the vg_home volume group by incorporating the newly created physical volume /dev/sda4. This increases the total available space in vg_home that can be allocated to logical volumes.
Now, extend the Logical Volume to use the new space:
lvextend -l +100%FREE /dev/vg_home/lv_home
Resize the Filesystem:
resize2fs /dev/vg_home/lv_home
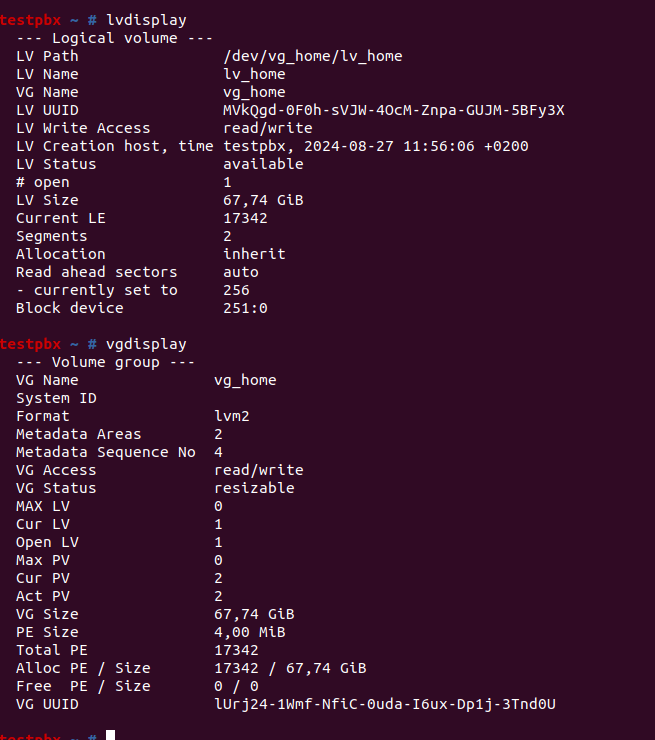
Mount /home on the extended logical volume:
mount /home
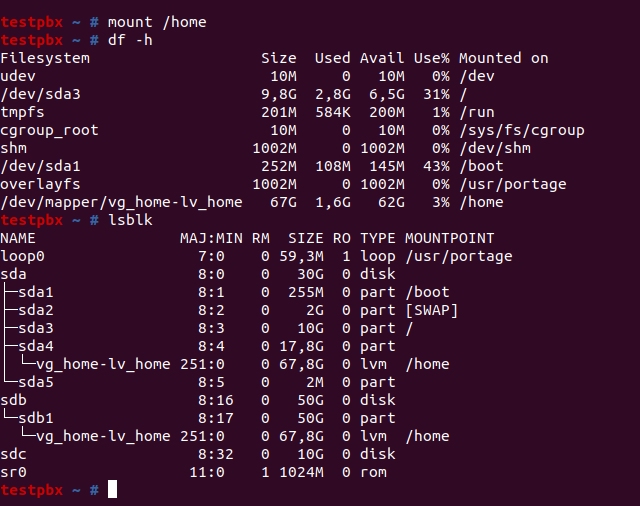
Finally, start PBXware services.