The following article will explain how to add a spare disk in SERVERware cluster/mirror edition in one example.
Note: All commands should be adjusted according to the specific requirements
In this example, the customer has a cluster edition of SERVERware, where every server in mirror has 12 disks. They always need to have 2 spare disks (1 on primary and 1 on secondary). One of the disks on the secondary server failed and the spare disk replaced the failed disk. Now, they have added the new disk on the secondary server and it is needed to add that disk into the pool as a spare disk.
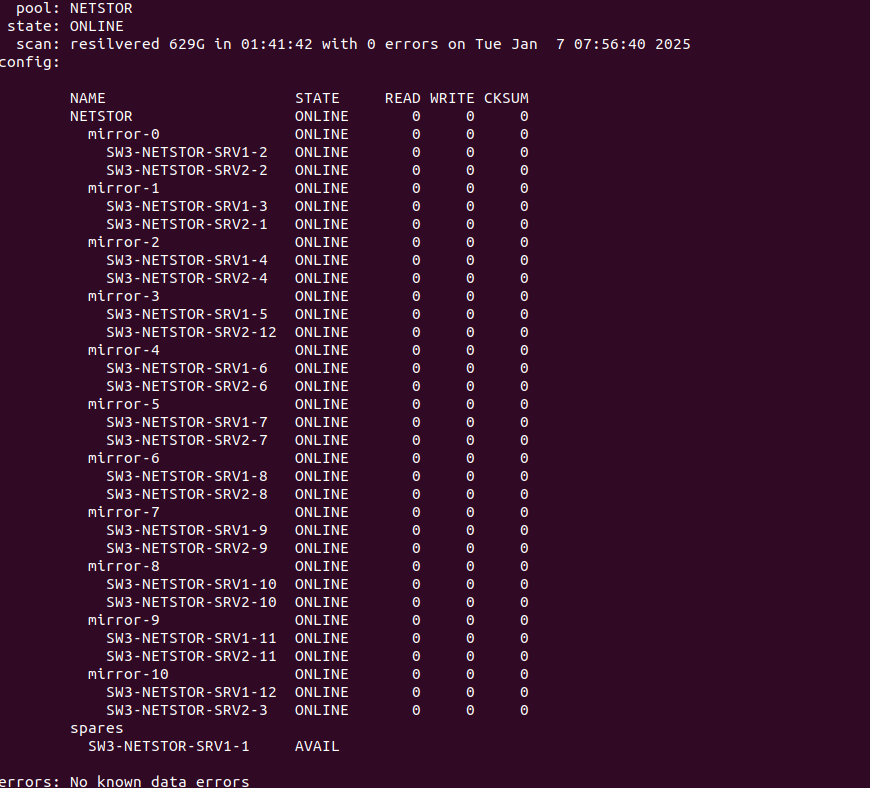
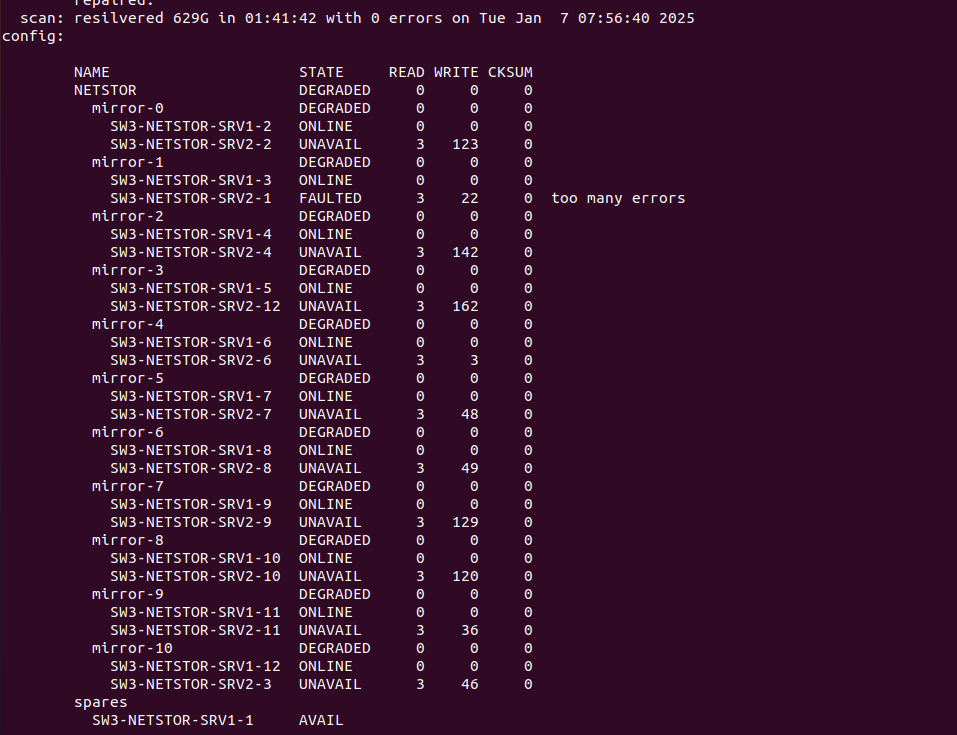
The current state of the NETSTOR pool is like this:
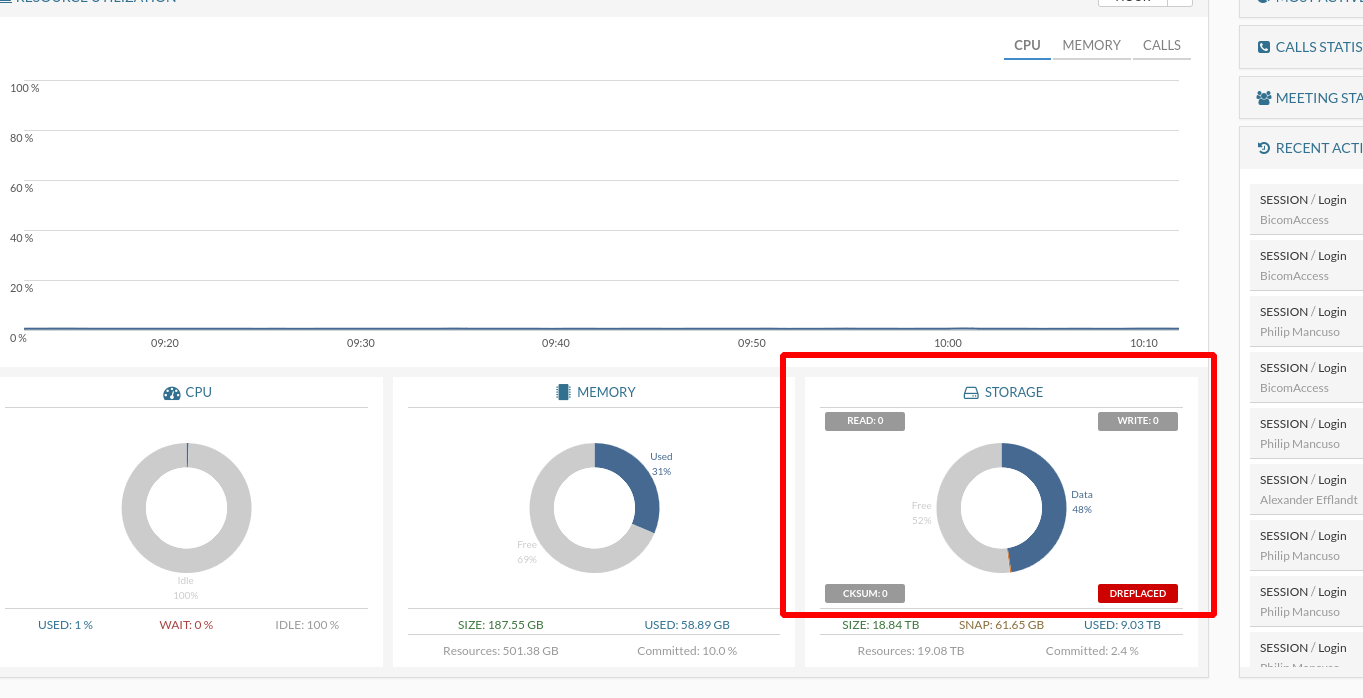
In GUI we would see that mirror is greyed out and in the Dashboard page storage will be shown as DREPLACED as spare disk is missing.

SSH into primary server and execute command ls -lah /dev/disk/by-* to list disks:
xrwxrwx 1 root root 10 Dec 19 15:44 SW3-NETSTOR-SRV1-1 -> ../../sdb1
lrwxrwxrwx 1 root root 10 Dec 19 15:44 SW3-NETSTOR-SRV1-10 -> ../../sdk1
lrwxrwxrwx 1 root root 10 Dec 19 15:44 SW3-NETSTOR-SRV1-11 -> ../../sdl1
lrwxrwxrwx 1 root root 10 Dec 19 15:44 SW3-NETSTOR-SRV1-12 -> ../../sdm1
lrwxrwxrwx 1 root root 10 Dec 19 15:44 SW3-NETSTOR-SRV1-2 -> ../../sdc1
lrwxrwxrwx 1 root root 10 Dec 19 15:44 SW3-NETSTOR-SRV1-3 -> ../../sdd1
lrwxrwxrwx 1 root root 10 Dec 19 15:44 SW3-NETSTOR-SRV1-4 -> ../../sde1
lrwxrwxrwx 1 root root 10 Dec 19 15:44 SW3-NETSTOR-SRV1-5 -> ../../sdf1
lrwxrwxrwx 1 root root 10 Dec 19 15:44 SW3-NETSTOR-SRV1-6 -> ../../sdg1
lrwxrwxrwx 1 root root 10 Dec 19 15:44 SW3-NETSTOR-SRV1-7 -> ../../sdh1
lrwxrwxrwx 1 root root 10 Dec 19 15:44 SW3-NETSTOR-SRV1-8 -> ../../sdi1
lrwxrwxrwx 1 root root 10 Dec 19 15:44 SW3-NETSTOR-SRV1-9 -> ../../sdj1
lrwxrwxrwx 1 root root 15 Jan 7 05:31 SW3-NETSTOR-SRV2-1 -> ../../nvme0n1p1
lrwxrwxrwx 1 root root 16 Jan 7 05:31 SW3-NETSTOR-SRV2-10 -> ../../nvme0n10p1
lrwxrwxrwx 1 root root 16 Jan 7 05:31 SW3-NETSTOR-SRV2-11 -> ../../nvme0n11p1
lrwxrwxrwx 1 root root 16 Jan 7 06:14 SW3-NETSTOR-SRV2-12 -> ../../nvme0n12p1
lrwxrwxrwx 1 root root 15 Jan 7 05:31 SW3-NETSTOR-SRV2-2 -> ../../nvme0n2p1
lrwxrwxrwx 1 root root 15 Jan 7 05:31 SW3-NETSTOR-SRV2-3 -> ../../nvme0n3p1
lrwxrwxrwx 1 root root 15 Jan 7 05:31 SW3-NETSTOR-SRV2-4 -> ../../nvme0n4p1
lrwxrwxrwx 1 root root 15 Jan 7 05:31 SW3-NETSTOR-SRV2-6 -> ../../nvme0n6p1
lrwxrwxrwx 1 root root 15 Jan 7 05:31 SW3-NETSTOR-SRV2-7 -> ../../nvme0n7p1
lrwxrwxrwx 1 root root 15 Jan 7 05:31 SW3-NETSTOR-SRV2-8 -> ../../nvme0n8p1
lrwxrwxrwx 1 root root 15 Jan 7 05:31 SW3-NETSTOR-SRV2-9 -> ../../nvme0n9p1
We can see that SRV2-5 is missing, like we could see with zpool status command as well.
As newly added disk is on secondary server, let’s ssh into secondary server now and check the list of disks available there:
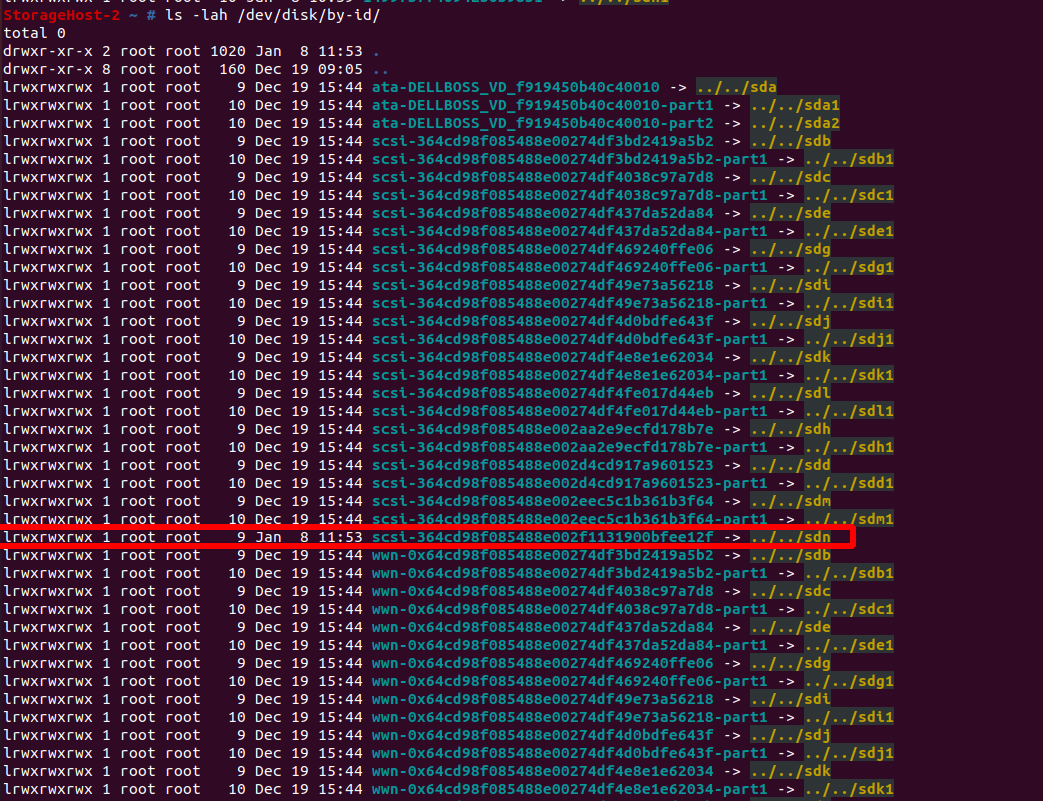
Here we can notice that sdn is not partitioned, that would be the newly added disk which we should add as a spare disk.
With command ls -lah /dev/disk/by-partlabel we can again confirm that disk sdn is missing.
total 0
drwxr-xr-x 2 root root 300 Jan 8 10:39 .
drwxr-xr-x 8 root root 160 Dec 19 09:05 ..
lrwxrwxrwx 1 root root 10 Dec 19 15:44 SW3-NETSTOR-SRV2-1 -> ../../sdb1
lrwxrwxrwx 1 root root 10 Dec 19 15:44 SW3-NETSTOR-SRV2-10 -> ../../sdk1
lrwxrwxrwx 1 root root 10 Dec 19 15:44 SW3-NETSTOR-SRV2-11 -> ../../sdl1
lrwxrwxrwx 1 root root 10 Dec 19 15:44 SW3-NETSTOR-SRV2-12 -> ../../sdm1
lrwxrwxrwx 1 root root 10 Dec 19 15:44 SW3-NETSTOR-SRV2-2 -> ../../sdc1
lrwxrwxrwx 1 root root 10 Dec 19 15:44 SW3-NETSTOR-SRV2-3 -> ../../sdd1
lrwxrwxrwx 1 root root 10 Dec 19 15:44 SW3-NETSTOR-SRV2-4 -> ../../sde1
lrwxrwxrwx 1 root root 10 Dec 19 15:44 SW3-NETSTOR-SRV2-6 -> ../../sdg1
lrwxrwxrwx 1 root root 10 Dec 19 15:44 SW3-NETSTOR-SRV2-7 -> ../../sdh1
lrwxrwxrwx 1 root root 10 Dec 19 15:44 SW3-NETSTOR-SRV2-8 -> ../../sdi1
lrwxrwxrwx 1 root root 10 Dec 19 15:44 SW3-NETSTOR-SRV2-9 -> ../../sdj1
lrwxrwxrwx 1 root root 10 Dec 19 15:44 grub -> ../../sda1
lrwxrwxrwx 1 root root 10 Dec 19 15:44 zfs -> ../../sda2
Let’s check now output of sw-nvme show command:
StorageHost-2 ~ # sw-nvme show
Subsystem: sw-mirror
Status: ONLINE
IP Address: 192.168.25.52
Port: 4420
Initiator:
IP Address: 192.168.25.51
Total Connections: 65
Namespaces:
NSID: 1
device: /dev/disk/by-id/scsi-364cd98f085488e00274df3bd2419a5b2
enabled: true
Namespaces:
NSID: 10
device: /dev/disk/by-id/scsi-364cd98f085488e00274df4e8e1e62034
enabled: true
Namespaces:
NSID: 11
device: /dev/disk/by-id/scsi-364cd98f085488e00274df4fe017d44eb
enabled: true
Namespaces:
NSID: 12
device: /dev/disk/by-id/scsi-364cd98f085488e002eec5c1b361b3f64
enabled: true
Namespaces:
NSID: 2
device: /dev/disk/by-id/scsi-364cd98f085488e00274df4038c97a7d8
enabled: true
Namespaces:
NSID: 3
device: /dev/disk/by-id/scsi-364cd98f085488e002d4cd917a9601523
enabled: true
Namespaces:
NSID: 4
device: /dev/disk/by-id/scsi-364cd98f085488e00274df437da52da84
enabled: true
Namespaces:
NSID: 5
device: /dev/disk/by-id/scsi-364cd98f085488e00274df452026cb7a7
enabled: true
Namespaces:
NSID: 6
device: /dev/disk/by-id/scsi-364cd98f085488e00274df469240ffe06
enabled: true
Namespaces:
NSID: 7
device: /dev/disk/by-id/scsi-364cd98f085488e002aa2e9ecfd178b7e
enabled: true
Namespaces:
NSID: 8
device: /dev/disk/by-id/scsi-364cd98f085488e00274df49e73a56218
enabled: true
Namespaces:
NSID: 9
device: /dev/disk/by-id/scsi-364cd98f085488e00274df4d0bdfe643f
enabled: true
ACL:
76f044253aa1e28cebc2aa02ef19c665
Output is showing here true for all. So, to confirm which disk id is the one which should be replaced I have compared the disk ids from sw-nvme show command and ls -lah /dev/disk/by-id command and I noticed that the one which should be replaced is scsi-364cd98f085488e00274df452026cb7a7
To confirm this, execute:
StorageHost-2 ~ # ls -l /dev/disk/by-id/scsi-364cd98f085488e00274df452026cb7a7
ls: cannot access '/dev/disk/by-id/scsi-364cd98f085488e00274df452026cb7a7': No such file or directory
We can see that this is the old disk which should be replaced with the new one, in my case sdn.
As the disk is not partitioned, we need to partition the disk. To do that use commands:
parted /dev/disk_in_question --script -- mktable gpt
Explanation and Effect:
parted: This is a command-line utility used for partitioning disks.
/dev/disk_in_question: This specifies the disk you want to work on. Replace disk_in_question with the actual disk name (e.g., /dev/sda, /dev/nvme0n1).
--script: This option suppresses interactive prompts, ensuring the command runs without asking for confirmation.
--: Separates options from commands or arguments, ensuring there’s no confusion for parted.
mktable gpt:
mktable: Creates a new partition table on the specified disk.
gpt: Specifies the type of partition table to create (GUID Partition Table).
Effect:
This command will delete all existing data, partitions, and file systems on the disk and replace the partition table with a new GPT partition table.
This action is irreversible, and all existing data on the disk will be lost.
Warning:
Be absolutely sure that you want to proceed, and double-check the disk name (/dev/disk_in_question) to avoid accidentally wiping the wrong disk.
Next:
parted /dev/disk_in_question --script -- mkpart "SW3-NETSTOR-SRV2-X" 1 -1
Explanation:
parted: Command-line utility for disk partitioning.
/dev/disk_in_question: The disk you are working on (e.g., /dev/sda, /dev/nvme0n1). Replace this with the actual disk name.
--script: Suppresses interactive prompts, making the command run non-interactively.
--: Separates options from commands or arguments.
mkpart "SW3-NETSTOR-SRV2-5" 1 -1:
mkpart: Creates a new partition.
"SW3-NETSTOR-SRV2-5": This is the label (name) for the partition. It can be any string.
1: Specifies the start of the partition in megabytes (MB) from the beginning of the disk.
-1: Specifies the end of the partition as the last available sector of the disk.
Effect:
This command creates a new partition on the disk named "SW3-NETSTOR-SRV2-5", starting at 1MB and extending to the end of the disk.
The partition will use the entire available disk space starting from 1MB, leaving no unallocated space.
Note:
This command does not format the partition (e.g., it doesn't assign a file system like ext4 or NTFS). You'll need to format it afterward if required.
Be cautious when running this command, as it modifies the disk and may overwrite data. Double-check the disk name (/dev/disk_in_question) before proceeding.
In my case I used:
parted /dev/sdn --script -- mktable gpt
parted /dev/sdn --script -- mkpart "SW3-NETSTOR-SRV2-5" 1 -1
To check information about the partitions, use:
parted /dev/sdn -l
For disk sdn I see now this which means the disk is partitioned correctly:
Model: DELL PERC H740P Mini (scsi)
Disk /dev/sdn: 1920GB
Sector size (logical/physical): 512B/512B
Partition Table: gpt
Disk Flags:
Number Start End Size File system Name Flags
1 1049kB 1920GB 1920GB SW3-NETSTOR-SRV2-5
And now if I execute ls -lah /dev/disk/by-partlabel/ I will see sdn1 on the list.
StorageHost-2 /home/swadmin # ls -lah /dev/disk/by-partlabel/
total 0
drwxr-xr-x 2 root root 320 Jan 14 03:59 .
drwxr-xr-x 8 root root 160 Dec 19 09:05 ..
lrwxrwxrwx 1 root root 10 Jan 14 03:59 SW3-NETSTOR-SRV2-1 -> ../../sdb1
lrwxrwxrwx 1 root root 10 Jan 14 03:59 SW3-NETSTOR-SRV2-10 -> ../../sdk1
lrwxrwxrwx 1 root root 10 Jan 14 03:59 SW3-NETSTOR-SRV2-11 -> ../../sdl1
lrwxrwxrwx 1 root root 10 Jan 14 03:59 SW3-NETSTOR-SRV2-12 -> ../../sdm1
lrwxrwxrwx 1 root root 10 Jan 14 03:59 SW3-NETSTOR-SRV2-2 -> ../../sdc1
lrwxrwxrwx 1 root root 10 Jan 14 03:59 SW3-NETSTOR-SRV2-3 -> ../../sdd1
lrwxrwxrwx 1 root root 10 Jan 14 03:59 SW3-NETSTOR-SRV2-4 -> ../../sde1
lrwxrwxrwx 1 root root 10 Jan 14 03:59 SW3-NETSTOR-SRV2-5 -> ../../sdn1
lrwxrwxrwx 1 root root 10 Jan 14 03:59 SW3-NETSTOR-SRV2-6 -> ../../sdg1
lrwxrwxrwx 1 root root 10 Jan 14 03:59 SW3-NETSTOR-SRV2-7 -> ../../sdh1
lrwxrwxrwx 1 root root 10 Jan 14 03:59 SW3-NETSTOR-SRV2-8 -> ../../sdi1
lrwxrwxrwx 1 root root 10 Jan 14 03:59 SW3-NETSTOR-SRV2-9 -> ../../sdj1
lrwxrwxrwx 1 root root 10 Jan 14 03:59 grub -> ../../sda1
lrwxrwxrwx 1 root root 10 Jan 14 03:59 zfs -> ../../sda2
StorageHost-2 /home/swadmin # ls -lah /dev/disk/by-*
/dev/disk/by-id:
total 0
drwxr-xr-x 2 root root 1.1K Jan 14 03:59 .
drwxr-xr-x 8 root root 160 Dec 19 09:05 ..
lrwxrwxrwx 1 root root 9 Jan 14 03:59 ata-DELLBOSS_VD_f919450b40c40010 -> ../../sda
lrwxrwxrwx 1 root root 10 Jan 14 03:59 ata-DELLBOSS_VD_f919450b40c40010-part1 -> ../../sda1
lrwxrwxrwx 1 root root 10 Jan 14 03:59 ata-DELLBOSS_VD_f919450b40c40010-part2 -> ../../sda2
lrwxrwxrwx 1 root root 9 Jan 14 03:59 scsi-364cd98f085488e00274df3bd2419a5b2 -> ../../sdb
lrwxrwxrwx 1 root root 10 Jan 14 03:59 scsi-364cd98f085488e00274df3bd2419a5b2-part1 -> ../../sdb1
lrwxrwxrwx 1 root root 9 Jan 14 03:59 scsi-364cd98f085488e00274df4038c97a7d8 -> ../../sdc
lrwxrwxrwx 1 root root 10 Jan 14 03:59 scsi-364cd98f085488e00274df4038c97a7d8-part1 -> ../../sdc1
lrwxrwxrwx 1 root root 9 Jan 14 03:59 scsi-364cd98f085488e00274df437da52da84 -> ../../sde
lrwxrwxrwx 1 root root 10 Jan 14 03:59 scsi-364cd98f085488e00274df437da52da84-part1 -> ../../sde1
lrwxrwxrwx 1 root root 9 Jan 14 03:59 scsi-364cd98f085488e00274df469240ffe06 -> ../../sdg
lrwxrwxrwx 1 root root 10 Jan 14 03:59 scsi-364cd98f085488e00274df469240ffe06-part1 -> ../../sdg1
lrwxrwxrwx 1 root root 9 Jan 14 03:59 scsi-364cd98f085488e00274df49e73a56218 -> ../../sdi
lrwxrwxrwx 1 root root 10 Jan 14 03:59 scsi-364cd98f085488e00274df49e73a56218-part1 -> ../../sdi1
lrwxrwxrwx 1 root root 9 Jan 14 03:59 scsi-364cd98f085488e00274df4d0bdfe643f -> ../../sdj
lrwxrwxrwx 1 root root 10 Jan 14 03:59 scsi-364cd98f085488e00274df4d0bdfe643f-part1 -> ../../sdj1
lrwxrwxrwx 1 root root 9 Jan 14 03:59 scsi-364cd98f085488e00274df4e8e1e62034 -> ../../sdk
lrwxrwxrwx 1 root root 10 Jan 14 03:59 scsi-364cd98f085488e00274df4e8e1e62034-part1 -> ../../sdk1
lrwxrwxrwx 1 root root 9 Jan 14 03:59 scsi-364cd98f085488e00274df4fe017d44eb -> ../../sdl
lrwxrwxrwx 1 root root 10 Jan 14 03:59 scsi-364cd98f085488e00274df4fe017d44eb-part1 -> ../../sdl1
lrwxrwxrwx 1 root root 9 Jan 14 03:59 scsi-364cd98f085488e002aa2e9ecfd178b7e -> ../../sdh
lrwxrwxrwx 1 root root 10 Jan 14 03:59 scsi-364cd98f085488e002aa2e9ecfd178b7e-part1 -> ../../sdh1
lrwxrwxrwx 1 root root 9 Jan 14 03:59 scsi-364cd98f085488e002d4cd917a9601523 -> ../../sdd
lrwxrwxrwx 1 root root 10 Jan 14 03:59 scsi-364cd98f085488e002d4cd917a9601523-part1 -> ../../sdd1
lrwxrwxrwx 1 root root 9 Jan 14 03:59 scsi-364cd98f085488e002eec5c1b361b3f64 -> ../../sdm
lrwxrwxrwx 1 root root 10 Jan 14 03:59 scsi-364cd98f085488e002eec5c1b361b3f64-part1 -> ../../sdm1
lrwxrwxrwx 1 root root 9 Jan 14 03:59 scsi-364cd98f085488e002f1131900bfee12f -> ../../sdn
lrwxrwxrwx 1 root root 10 Jan 14 03:59 scsi-364cd98f085488e002f1131900bfee12f-part1 -> ../../sdn1
So, we have successfully partitioned the disk and now to replace the old failed disk with newly added disk, we will edit export.json file and replace there the disk which is removed (scsi-364cd98f085488e00274df452026cb7a7 in my case) with newly added scsi-364cd98f085488e002f1131900bfee12f
nano /etc/sw-nvme/export.json
After that reload configuration with command:
sw-nvme reload-configuration -f /etc/sw-nvme/export.json
And confirm with sw-nvme show command that all disks have a true state.
StorageHost-2 /home/swadmin # sw-nvme show
Subsystem: sw-mirror
Status: ONLINE
IP Address: 192.168.25.52
Port: 4420
Initiator:
IP Address: 192.168.25.51
Total Connections: 65
Namespaces:
NSID: 1
device: /dev/disk/by-id/scsi-364cd98f085488e00274df3bd2419a5b2
enabled: true
Namespaces:
NSID: 10
device: /dev/disk/by-id/scsi-364cd98f085488e00274df4e8e1e62034
enabled: true
Namespaces:
NSID: 11
device: /dev/disk/by-id/scsi-364cd98f085488e00274df4fe017d44eb
enabled: true
Namespaces:
NSID: 12
device: /dev/disk/by-id/scsi-364cd98f085488e002eec5c1b361b3f64
enabled: true
Namespaces:
NSID: 2
device: /dev/disk/by-id/scsi-364cd98f085488e00274df4038c97a7d8
enabled: true
Namespaces:
NSID: 3
device: /dev/disk/by-id/scsi-364cd98f085488e002d4cd917a9601523
enabled: true
Namespaces:
NSID: 4
device: /dev/disk/by-id/scsi-364cd98f085488e00274df437da52da84
enabled: true
Namespaces:
NSID: 5
device: /dev/disk/by-id/scsi-364cd98f085488e002f1131900bfee12f
enabled: true
Namespaces:
NSID: 6
device: /dev/disk/by-id/scsi-364cd98f085488e00274df469240ffe06
enabled: true
Namespaces:
NSID: 7
device: /dev/disk/by-id/scsi-364cd98f085488e002aa2e9ecfd178b7e
enabled: true
Namespaces:
NSID: 8
device: /dev/disk/by-id/scsi-364cd98f085488e00274df49e73a56218
enabled: true
Namespaces:
NSID: 9
device: /dev/disk/by-id/scsi-364cd98f085488e00274df4d0bdfe643f
enabled: true
ACL:
76f044253aa1e28cebc2aa02ef19c665
StorageHost-2 /home/swadmin #
Now, we will need to ssh to primary server. If we execute zpool status now, we will see that mirror is degraded, which is expected.
We will now import configuration on primary server by using command:
sw-nvme reload-import -f /etc/sw-nvme/import.json
sw-nvme list

Execute now:
zpool clear NETSTOR
And with zpool status check the pool state:
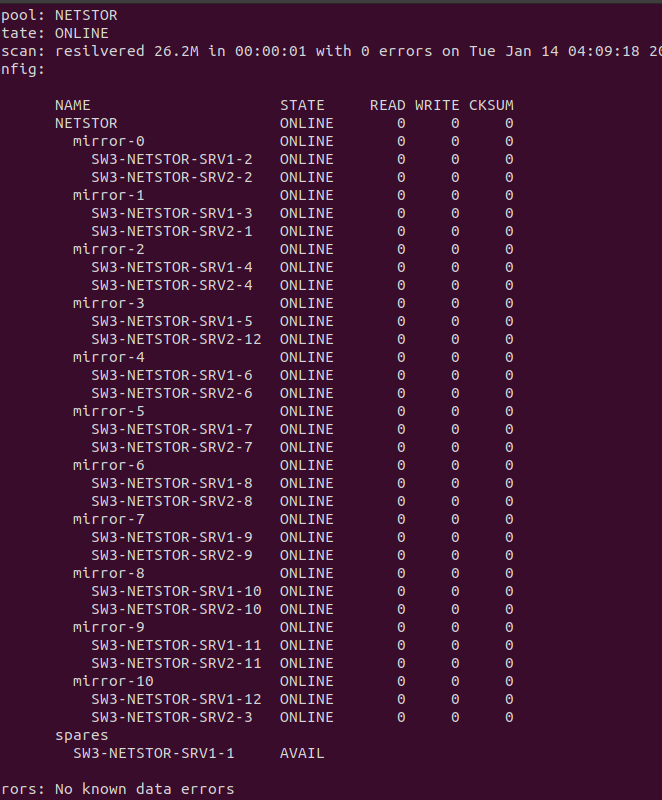
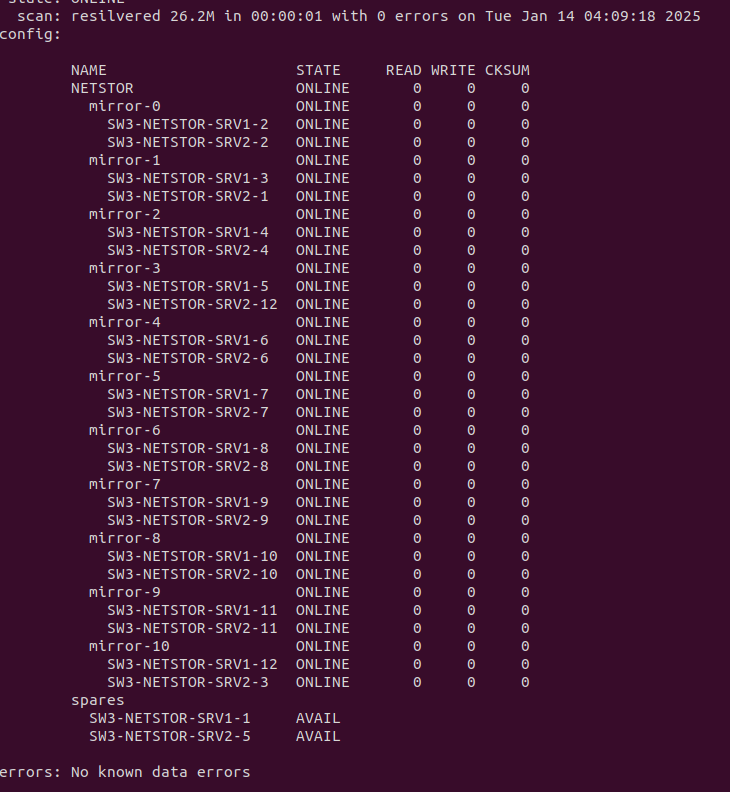
We can see that everything is online again, but the newly added disk is still not shown there. Now, we will need to add it to NETSTOR as spare disk and for that I have used command:
zpool add NETSTOR spare /dev/disk/by-partlabel/SW3-NETSTOR-SRV2-5