
Apart from MySQL, users can set ClickHouse as a database. It allows statistics to be very fast but it requires memory.
For more information on how the integration is done, please refer to the following:
All our logging systems still use MySQL, so please note that it is impossible to move ClickHouse directly. ClickHouse is designed for reading but it is not so good for writing. To have data in the ClickHouse, another application called 'mysqlreplicator' runs behind. As its name suggests, it is doing the table replication from MySQL to ClickHouse.
Currently, we are doing a replication of the following tables:
- queue_log
- erg_log
- ext_log
How Does Replication Work?
Replication is done in a way that it periodically reads from MySQL and inserts into ClickHouse. When users start an application, they first need to do a full sync (if necessary). When doing so, users may notice a small load on the system. The application is configured to move chunks of data, so RAM usage should be small.
NOTE: The application will also use the MySQL pbxware database for recording sync progress.
Integration
ClickHouse is integrated into all PBXware editions, and the details regarding the configuration can be accessed in the GUI. It is a part of the Setup Wizard but only accessible through the PBXware admin site page. Statistics by default use MySQL, in order to change, ClickHouse needs to be configured.
ClickHouse can run locally or remotely. Because of high memory usage, we recommend running ClickHouse on another instance of PBXware.
The minimum system requirements are as follows:
- CPU sse4_2 support
- 10GB RAM minimum
NOTE: ClickHouse is only meant for Statistics usage.
NOTE: By default, Statistics uses MySQL. To change this, ClickHouse needs to be configured.
Configuration
For Clickhouse to be usable, two services need to run:
- clickhouse-server
- mysqlreplicator
Please note that clickhouse-server is a database instance that will run in the background.
As mentioned above, 'clickhouse-server will not run by default. Statistics will use MySQL. To use ClickHouse, users need to enable the connection, which can be done in the following way; 1. Navigate to 'Admin Settings' 2. Click the 'Statistics Database' section 3. Enter the password to access the 'Setup Wizard' page

Once here, users will be presented with the 'Database' field where they can select either 'MySQL' or 'ClickHouse'. Please refer to the screenshot.
NOTE: Please note that Statistics can use both 'MySQL' or 'ClickHouse', however, some of the statistics like ERG will only work with ClickHouse.
ClickHouse can be configured in three modes:
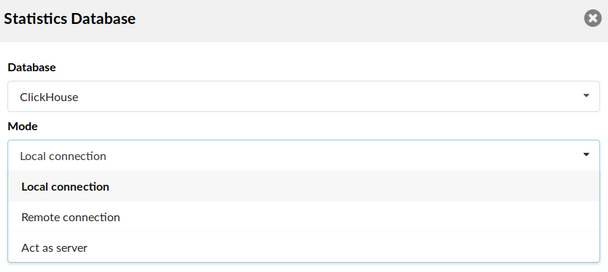
1.Local connection - ClickHouse and replication will be started locally. Statistics will use a local server to fetch data. If a system has less than 10 GB of RAM, a warning message will be displayed showing that this can cause system instability.
2. Remote connection - ClickHouse is running on another PBXware. Replication is done on the remote instance. Statistics will use a remote server to fetch data.
3. Act as server - ClickHouse will run on the current PBXware. It will be used only as a server for other instances of PBXware.
NOTE: Users cannot use multiple PBXware instances to connect to a single ClickHouse. The presented configuration will only enable 1-to-1 connection, which is a limitation of the GUI.
In case users want to use multiple PBXware instances, they would need to use a script for this kind of configuration.
Local Connection
This is an example of a successfully configured 'Local connection'. Once saved, ClickHouse and replication are started in the background. Users can expect some small load on their system in this case.

Remote Connection
This is an example of a successfully configured 'Remote connection'. Once saved, replication is started in the background. Data from local MySQL is copied to a remote ClickHouse.

Act as Server
This is an example of a successfully configured 'Act as server'. Once saved, ClickHouse is started in the background. At this point, there is no replication running, since users are just hosting a server for other PBXware.

NOTE: Changing from ClickHouse local to remote or remote to local will cause data loss. A warning message was added to remind users about this action.

Multiple PBXware Instances & One ClickHouse
Users can have multiple PBXware instances and one of them can run a ClickHouse database. In order to configure this properly, users need to follow the rule: "one user - one database", meaning that each PBXware instance has to have its own user that will be associated with the database.
There is a script inside PBXware chroot that will do it for users.
NOTE: It is highly recommended not to do it manually.
If users utilize the same user for multiple PBXware instances, they can end up with corrupt data, or simply, failed replication. This could happen because replicators will try to push data in the same table under the same database.
Script Usage
The script that helps users configure ClickHouse easily is located on the following path:
/opt/httpd/sh/clickhouse_manager
The commands are as follows:
- adduser <username> <password>
This command adds an additional user into ClickHouse and creates a database as “pbxware_<username>”. The user is associated only with that database.
NOTE: By utilizing a new user, it is possible to configure another instance of PBXware.
EXAMPLE: Creating a ClickHouse user
/opt/httpd/sh/clickhouse_manager action="adduser" username="John" password="test123"
- deluser <username>
This command removes the user from ClickHouse.
NOTE: The database is not deleted in this case, so it is possible to recreate the same user again.
EXAMPLE: Deleting a ClickHouse user
/opt/httpd/sh/clickhouse_manager action="deluser" username="John"
To set up multiple PBXware instances with one ClickHouse, do the following steps:
1. Create a VPS where PBXware is running and set up ClickHouse to act as a server as shown in the screenshots, so the IP address to listen should be '0.0.0.0'.
NOTE: It can be PBXware with a free license.
2. A VPS where ClickHouse is running should block IP addresses that do not belong to the users.
NOTE: This is a security issue.
3. SSH to PBXware where the ClickHouse server is running and do the following:
/opt/httpd/sh/clickhouse_manager action="adduser" username="Username" password="Password"
If users want to connect a PBXware remote instance to ClickHouse that is acting as a server, they should navigate to that PBXware system and set up ClickHouse to act as a remote connection with the IP address of the ClickHouse system, username, and password that they chose in step 3.
IMPORTANT NOTICE: Please note that changing the ClickHouse's mode (from local to remote) will cause data loss. For example, if users utilize ClickHouse in the local connection mode for a month and then decide to switch the mode to a remote connection mode, their data from last month will be lost. To avoid this, please make sure to set up ClickHouse properly from the beginning and be notified that changing connection modes from local to remote should be avoided.