
1.What is BSSUP?
In order to prevent any potential security issues when sharing a root password, Bicom has developed a solution called BSSUP.
BSSUP is a service created by Bicom Systems that allows secure access to a customer’s system without requiring them to share their root password.
This method ensures a safer and more controlled environment for customers, reducing the risks associated with
exposing sensitive login credentials.
The BSSUP system utilizes a sophisticated certificate-based authentication mechanism that involves multiple components working together to ensure secure access while maintaining the highest security standards.
2.BSSUP Architecture Overview
The BSSUP system consists of several key components:
• Request Portal - Web interface for submitting certificate requests
• Certificate Authority (CA) Server - Generates and signs certificates
• BSSUP Service - Runs on customer systems (ServerWare/PBXWare)
• Downloads Server - Distributes certificates and public keys
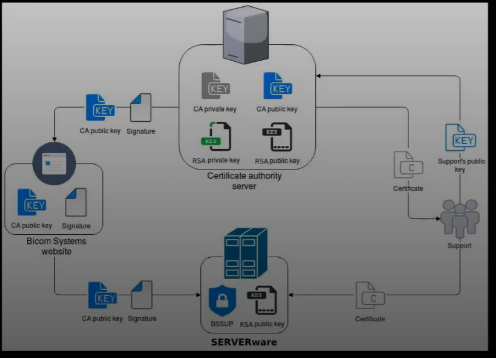
3.Certificate Authority Process
3.1 Overview of the CA System
The Certificate Authority system is the core component of BSSUP security. It operates on a dedicated VPS server in the Bicom office and manages the entire certificate lifecycle.
The CA server maintains two key pairs:
• CA Key Pair: CA private key and CA public key used for certificate signing
• RSA Key Pair: RSA private key and RSA public key used for signature verification
3.2 Certificate Request Workflow
The certificate request and approval process follows these detailed steps:
1. Initial Request Submission
• Support personnel access the request portal at http://10.1.30.8:8888/
• The portal is only accessible locally within the Bicom network
• Users fill out the request form and submit their SSH public key (bssup.pub)
2. Administrative Review
• Administrators access http://10.1.30.8:8888/admin to view pending requests
• The admin interface displays a list of all submitted certificate requests
• Each request contains detailed information about the person requesting the certificate
3. Request Transfer to CA Server
• Approved requests are manually transferred to the Certificate Authority server
• All requests are stored in /etc/bssup/cert requests/
• This folder contains all currently signed requests
4. Certificate Generation
• The administrator executes the command:
bssup-authc --addkey AlenMahmutovicRequest.json
• The system unmarshals the JSON request file
• The public key within the JSON is signed using the CA private key located in /etc/bssup/ca keys/
• A certificate is generated after the signing process
5. Certificate Distribution
• The generated certificate is automatically sent to the user’s email
• The certificate is also uploaded to the downloads server
• Each certificate is valid for one month plus 3 additional days of the following month
3.3 Certificate Verification Process
The verification process ensures that only valid certificates can access customer systems:
1. CA Public Key Distribution
• The Signature is signed using the RSA private key
• Both the CA public key and its signature are uploaded to the downloads server
2. BSSUP Periodic Updates
• BSSUP services on ServerWare/PBXWare instances periodically pull the CA public key and signature
• The system does not immediately use the downloaded public key
3. Signature Verification
• Using the RSA public key on PBXWare or ServerWare (which is identical to the one on the CA server), the signature of the CA public key is read and verified.
• The signature is decoded and checked to ensure that the content matches the content of the CA public key.
• If the signature matches, the CA public key is accepted for authentication
4. Certificate Authentication
• When a user attempts to connect, BSSUP verifies that the certificate and CA public key originate from the same private key
• This ensures the integrity of the entire authentication chain
4.How to Set Up BSSUP
To allow Bicom support employees to access a customer’s system securely using BSSUP, follow these steps:
1. Generate an SSH key pair:
• Each support engineer must first generate a dedicated SSH key pair to use with BSSUP.
• Run the following command in your terminal:
ssh-keygen -t ed25519 -f ˜/.ssh/bssup
• This will create two files:
– /.ssh/bssup – your private key (keep this secure!)
– /.ssh/bssup.pub – your public key (to be shared with the BSSUP admin)
2. Submit your public key:
• To register your public key for BSSUP access, open the following URL in your
browser:
http://10.1.30.8:8888/
• Follow the instructions on the page to submit your /.ssh/bssup.pub file.
• This request will be reviewed and approved by the administrator before you are granted access.
3. Retrieve your officekey:
• After submitting your public key, you will receive an email with your officekey.
• This email is sent to your Bicom address and is often filtered into the Spam folder, so please check there.
• The email looks similar to the example below:
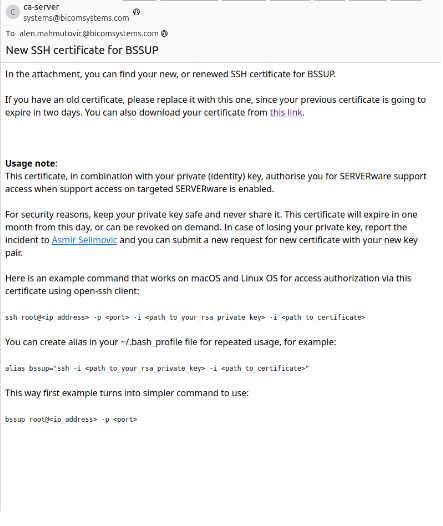
• Save the officekey securely, as it will be used in your BSSUP connection alias
4. Download your officekey:
• You will receive an email with a link to download your officekey.
• The filename usually looks like this:
id rsa-cert-YourName-officeKey-xxxxxxxx-xxxx-xxxx-xxxx-xxxxxxxxxxxx.pub
• This is the public key that will be used for access through the BSSUP system.
• After downloading the officekey, place it in the .ssh folder on your local machine.
5. Create a config file in your .ssh folder with this:
HostkeyAlgorithms +ssh-rsa
PubkeyAcceptedAlgorithms +ssh-rsa
6. Create a BSSUP alias:
• Open your bash configuration file in an editor:
nano ˜/.bashrc
• Add the following alias at the end of the file (replace YourName and the x’s accordingly):
alias bssup=’ssh -i .ssh/bssup -i .ssh/id rsa-cert-YourName-officeKey-xxxxxxxx-xxxx-xxxx-xxxxxxxxxxxxxxxx.pub’
• Save and exit the editor, then reload the bash configuration with:
source ˜/.bashrc
5 Key Management and Security
5.1 Understanding Key Roles
The BSSUP system uses multiple keys for different purposes:
• Private key in SSH path ( /.ssh/bssup): Used locally to prove that the public key from which the officekey was created belongs to this private key
• Office key certificate: The signed certificate that grants access to customer systems
5.2 Monthly Key Rotation
Important: At the beginning of each month, a new officeKey is sent to your email.
This rotation ensures ongoing security and follows these principles:
• Certificates expire after one month plus 3 days
• New certificates are automatically generated and distributed
• Users must replace their old officeKey file with the newly received one
• The old certificate will stop working after the expiration period
6 Connecting to a Customer’s System Using BSSUP
The BSSUP service uses port 2244 for secure communication.
To enable a successful connection, the customer must open port 2244 on their system. For convenience, a detailed guide is available on Freshdesk that explains the steps required to open this port specifically for BSSUP access.
Once port 2244 is properly opened, you can connect to the customer’s system from your local machine using the following command: bssup root@customer-system-ip -p2244
Make sure to replace customer-system-ip with the actual IP address of the customer’s system.
7 Troubleshooting Common Issues
7.1 Connection Problems
• Port 2244 blocked: Ensure the customer has opened port 2244
• Certificate expired: Check if you need to update your officekey
• Key mismatch: Verify that your private key corresponds to the certificate
7.2 Certificate Issues
• Email not received: Check spam folder for certificate emails
• Invalid certificate: Contact administrator for certificate regeneration
• Verification failed: Ensure CA public key is properly synchronized
8 System Administration
8.1 CA Server Management
The CA server components are located in:
• /opt/ca-server/bin - CA server binaries and scripts
• /etc/bssup/cert requests/ - Signed certificate requests
• /etc/bssup/ca keys/ - CA key pairs for certificate generation