
CUSTOMER PORTAL GUIDE
Managing Your Account, Billing, and Licenses
Table of Contents
1. Introduction
2. Dashboard Overview
3. The My Account Section
3.1 Account Settings
3.2 Account Members and Permissions
4. Editing Subscriptions and Purchasing New Extensions
4.1 About the New Billing Platform
4.2 Locating Your License
4.3 Increasing PBXware Multi-Tenant Extensions
4.4 Adding gloCOM Licenses
4.5 Increasing Contact Center Extensions
4.6 Re-Licensing Your PBXware System
5. Purchasing a New License
6. Invoices and Payments (Billing)
6.1 Viewing Invoices
6.2 Invoice Details and Adjustments
6.3 Credit Notes
6.4 Statements
6.5 Payment Methods
7. Contacting Support and Viewing Tickets
7.1 Opening a Support Ticket
7.2 Opening a Support Chat
8. Quick Reference
9. Troubleshooting
1. Introduction
This guide explains how to manage your account, monitor billing, control access for your team, and administer your subscriptions and licenses through the Bicom Systems Customer Portal. It is intended for account holders and account members who are responsible for user administration, billing, and license management on behalf of their organization.
By the end of this guide, you will be able to:
Read your Dashboard to check your account balance, subscriptions, and license status at a glance.
Navigate the My Account section and update your account details.
Add account members and configure their access permissions.
Increase PBXware Multi-Tenant, Contact Center, and gloCOM/Communicator license quantities.
Purchase a brand-new license through your Partner Success representative.
View and manage invoices, credit notes, statements, and payment methods.
Contact Bicom Systems Support and track your tickets.
Resolve common access and permission errors.
NOTE
Screenshots in this guide reflect the current Customer Portal interface. Field labels and menu positions may be refined over time; if your screen differs slightly, the underlying workflow remains the same.
2. Dashboard Overview
The Dashboard is the first page you see after logging in. It gives you a real-time, at-a-glance summary of your account so you don't need to visit multiple sections just to check your standing.
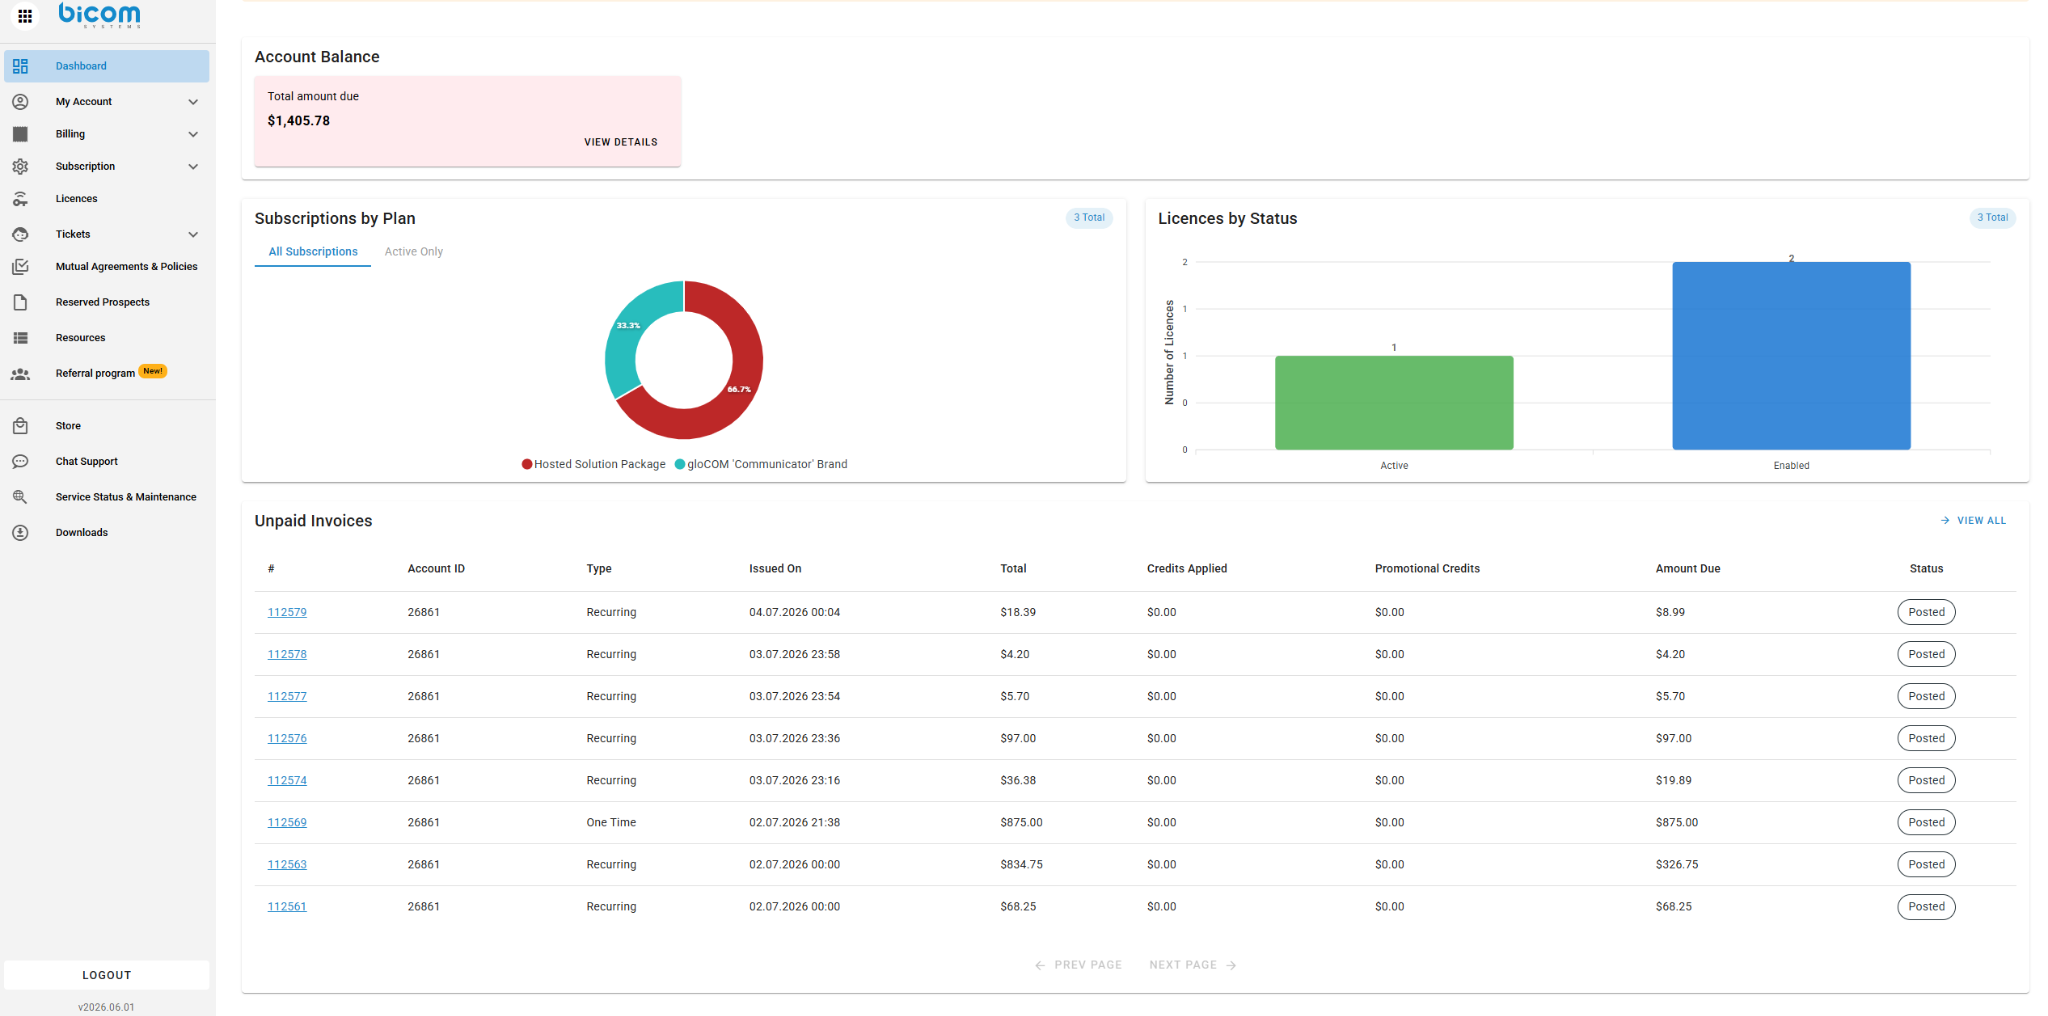
Figure 1 — The Dashboard, showing account balance, subscription distribution, license status, and unpaid invoices.
The Dashboard is organized into four key widgets:
Account Balance — displays the total amount currently due on your account. Click VIEW DETAILS to jump straight to your invoices.
Subscriptions by Plan (donut chart) — visualizes how your active subscriptions are distributed across plans, such as Hosted Solution Package or gloCOM 'Communicator' Brand.
Licences by Status (bar chart) — displays the total number of licenses grouped by status (for example, Active or Enabled).
Unpaid Invoices — lists outstanding invoices with their number, account ID, type, issue date, amounts, and status, so you can see immediately what needs to be paid. Click VIEW ALL to open the full invoice list, or click any invoice number to open that invoice directly.
NOTE
The figures shown on your Dashboard are specific to your account and update automatically as subscriptions, licenses, and invoices change.
3. The My Account Section
The My Account section is your central hub for managing personal account details and controlling who else in your organization can access the Customer Portal. It contains two pages: Account Settings and Account Members.
3.1 Account Settings
Account Settings stores the information tied to your organization's account, such as company details, contact information, preferences, and password. To open it:
Log in to the Bicom Systems Customer Portal.
In the left-hand navigation menu, click My Account to expand the section.
Select Account Settings.
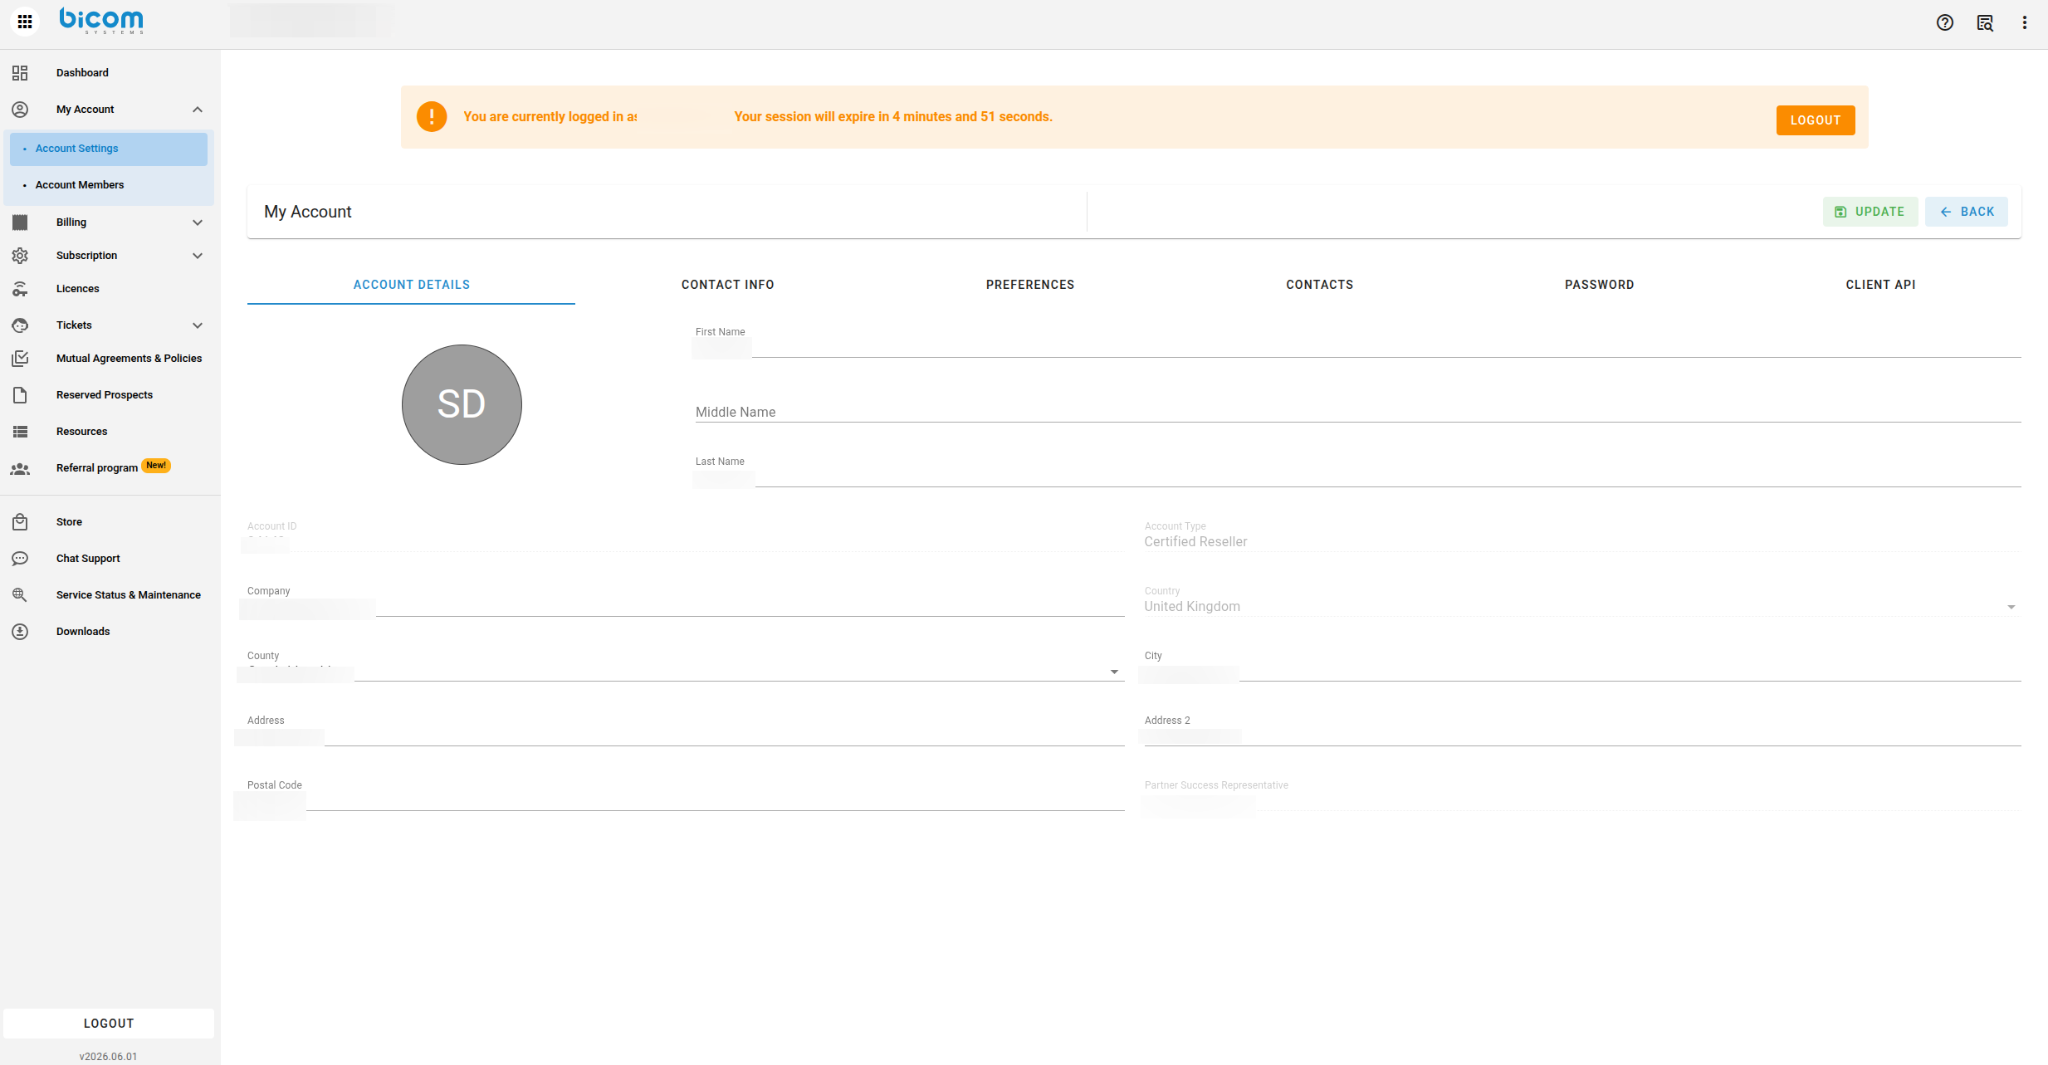
Figure 2 — The Account Settings page, showing the Account Details tab.
The Account Settings page is organized into tabs across the top of the screen: Account Details, Contact Info, Preferences, Contacts, Password, and Client API. Use these tabs to:
Account Details — view or update your company name, address, country, and assigned Partner Success Representative.
Contact Info — manage the primary contact details associated with the account.
Preferences — configure account-level preferences such as notifications.
Password — change your login password and manage two-step verification.
Client API — manage API access credentials, if applicable to your account.
After making changes on any tab, click UPDATE in the top-right corner to save them.
3.2 Account Members and Permissions
The Account Members page lists every user who has been granted access to your Customer Portal account, along with their role type and status. To view it, go to My Account > Account Members.
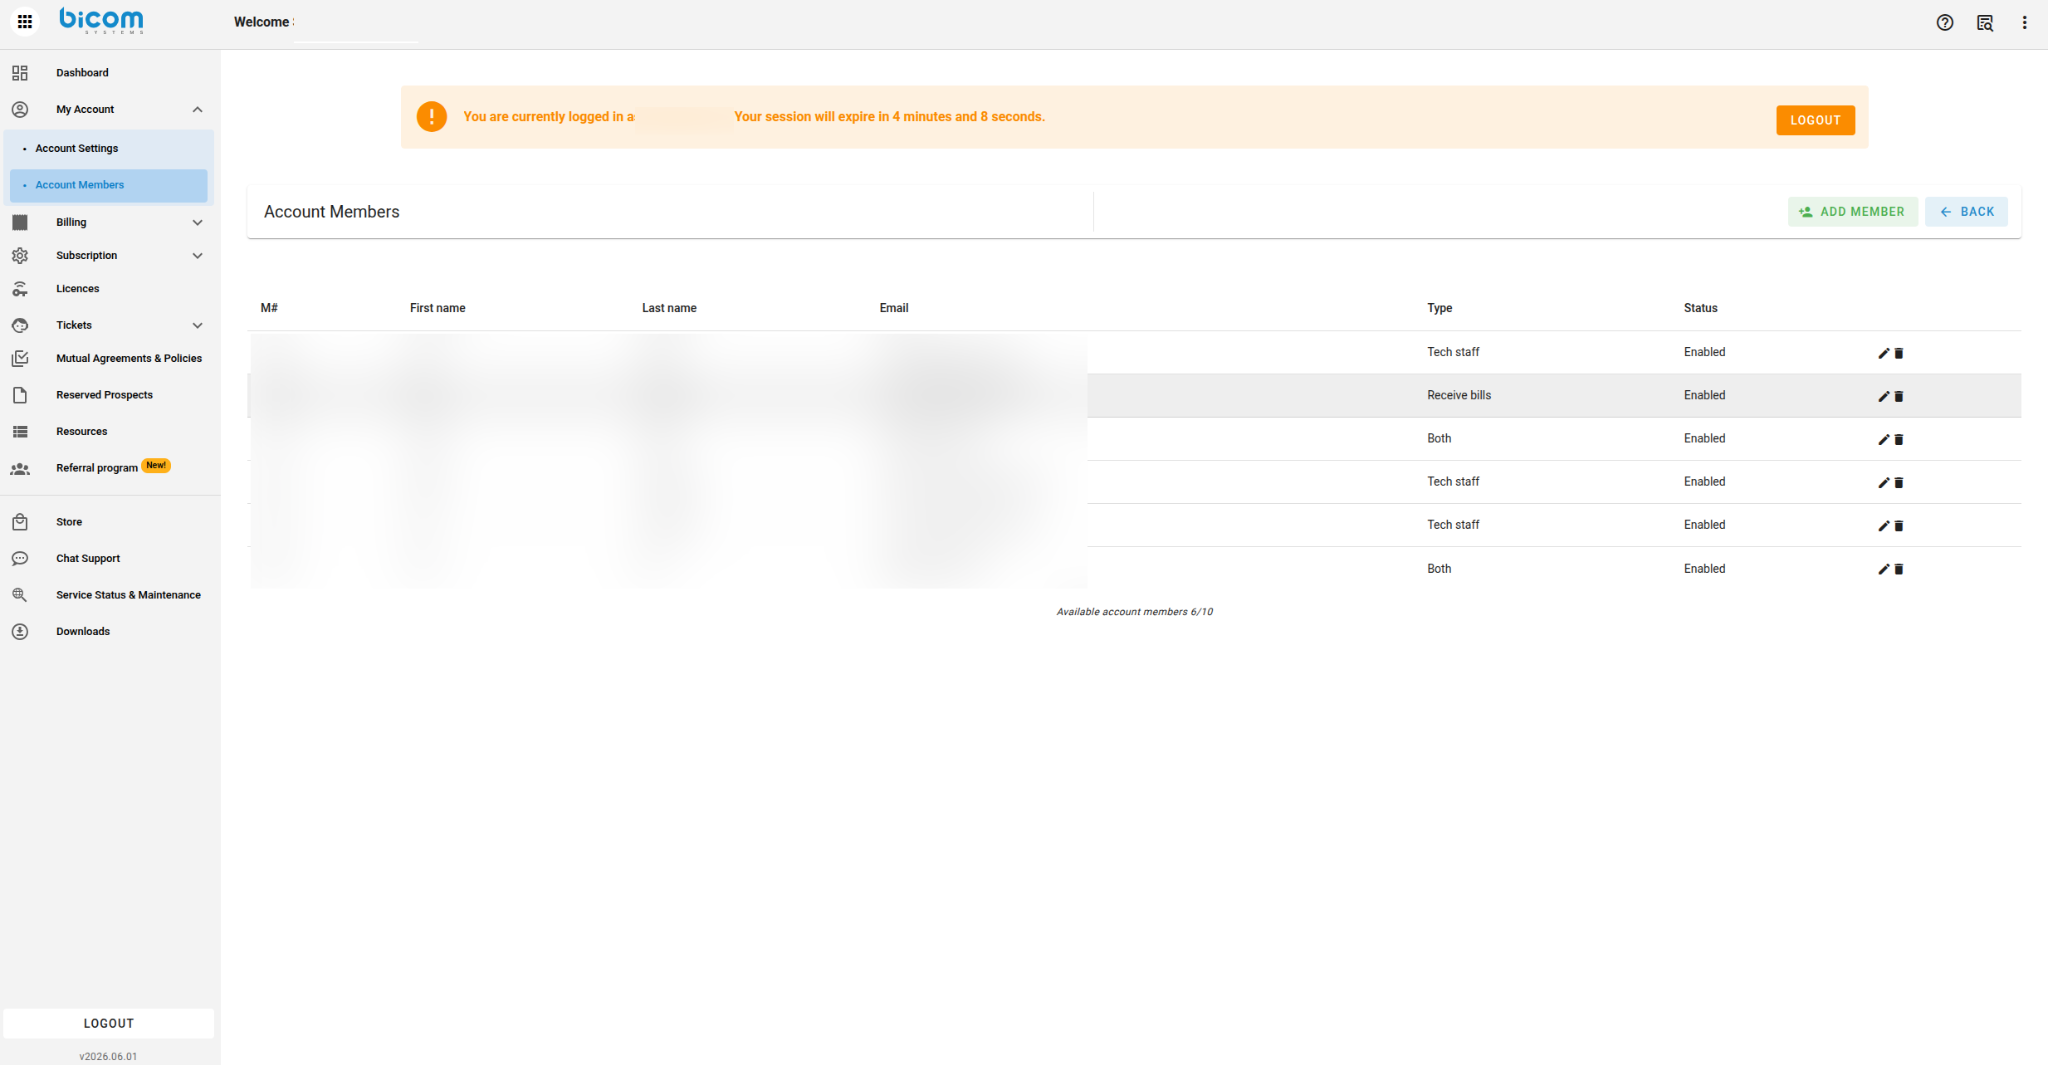
Figure 3 — The Account Members page, listing existing members, their access type, and status.
Each entry shows the member's name, email address, access Type (for example, Tech Staff, Receive Bills, or Both), and current Status (Enabled or Disabled). The counter below the table (for example, "Available account members 6/10") shows how many member seats your account currently uses.
3.2.1 Editing a Member's Permissions
Click the pencil (edit) icon next to a member's row to open their profile. From here you can update their contact details, role, timezone, and — most importantly — the specific permissions that control what they can do inside the portal.
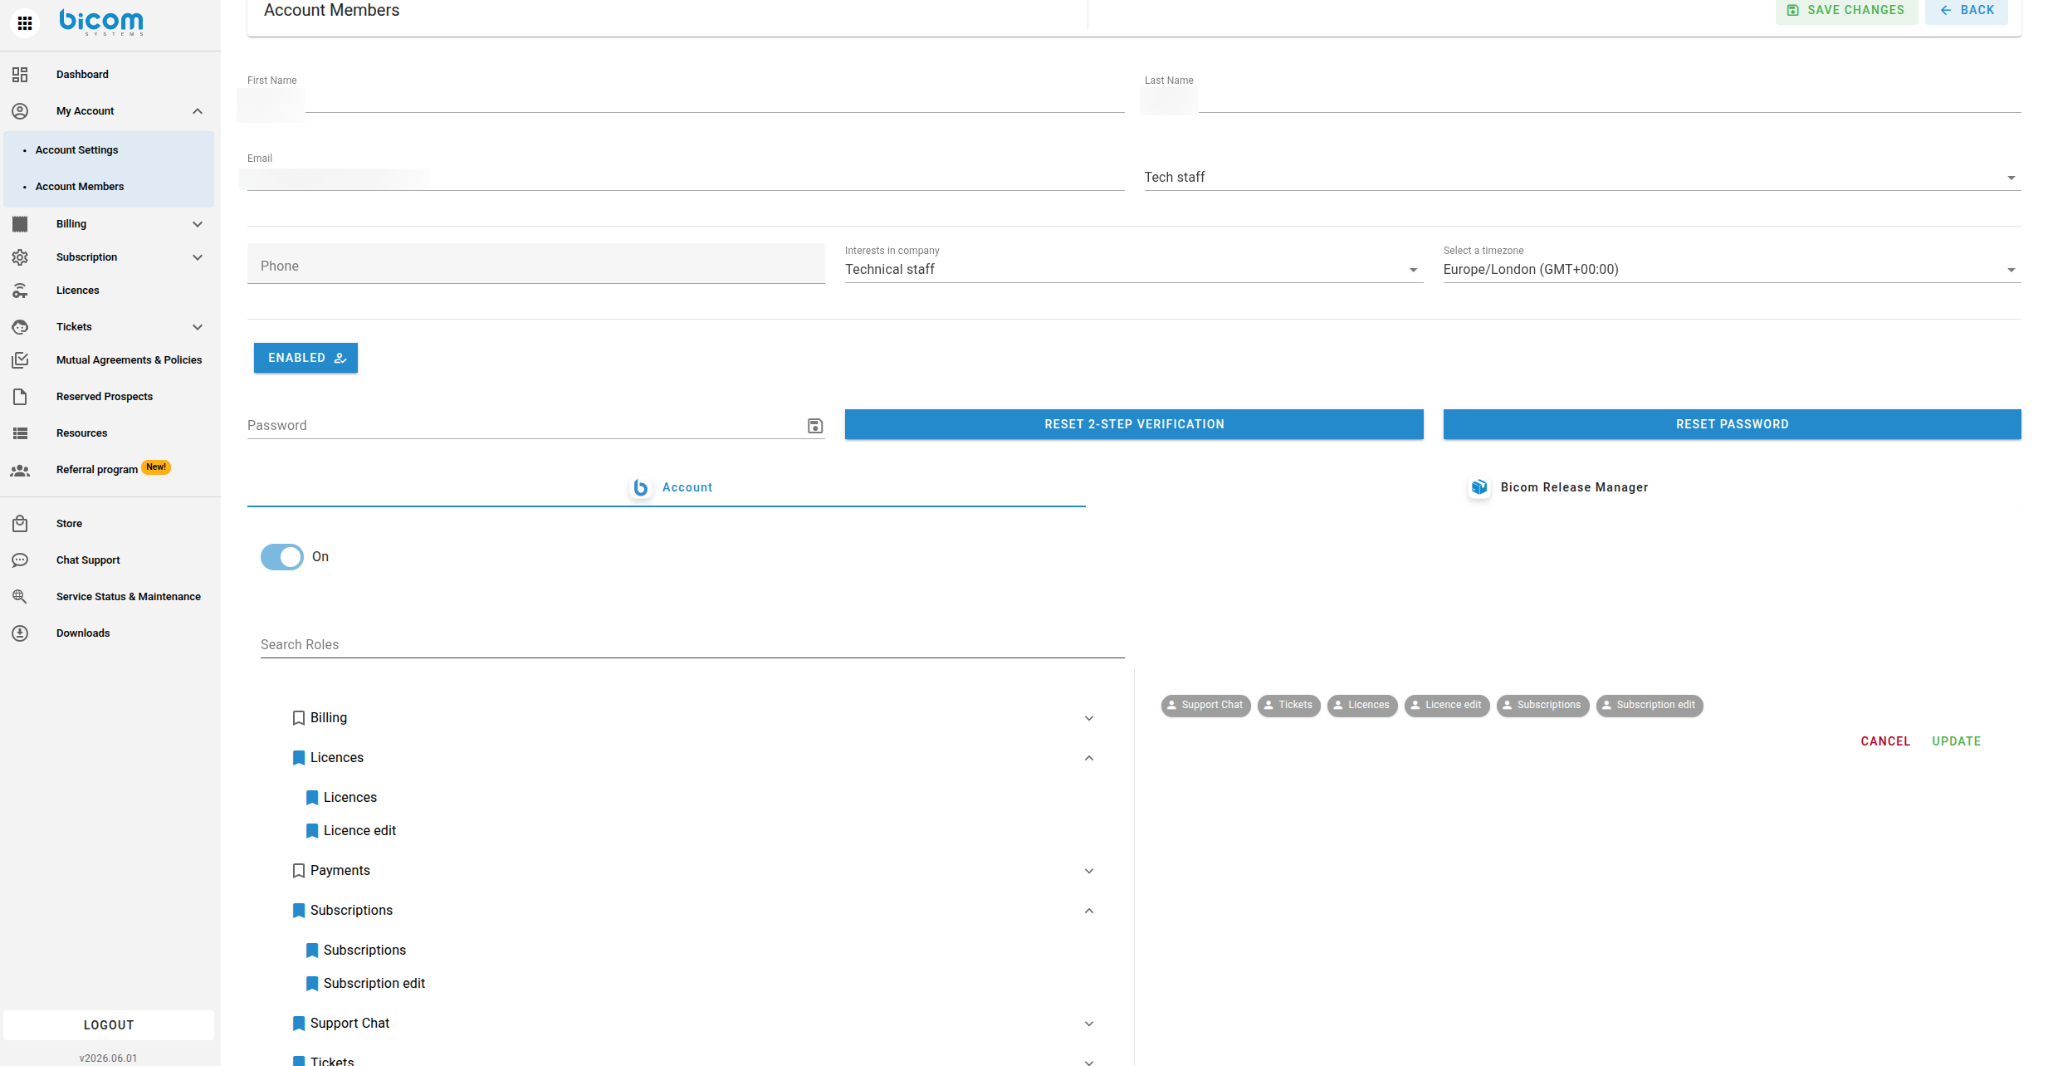
Figure 4 — Editing an account member's profile and role-based permissions.
Permissions are organized into expandable categories (Billing, Licences, Payments, Subscriptions, Support Chat, Tickets, and others). Each category can be expanded to reveal individual permissions, which are enabled using the checkboxes on the left.
IMPORTANT
For an account member to edit an existing subscription or purchase new extensions or licenses, both the Licences and Subscriptions permissions must be checked in that member's settings. Missing either permission will block access to licensing actions described later in this guide.
If a member attempts to open a subscription or license without the correct permissions, the portal displays an Access Denied page and directs them to contact their account holder for access. See Section 9, Troubleshooting, for more detail.
4. Editing Subscriptions and Purchasing New Extensions
This section covers Hosted/Rented and gloCOM/Communicator subscriptions — the two subscription types most commonly adjusted by customers to add capacity for new users.
4.1 About the New Billing Platform
Bicom Systems has migrated away from the legacy billing system. As a result, the Store option previously used to purchase licenses is no longer functional. All license purchases and subscription edits are now performed directly within the Customer Portal, using the workflow described below.
4.2 Locating Your License
To begin, navigate to the Licences section in the left-hand menu.
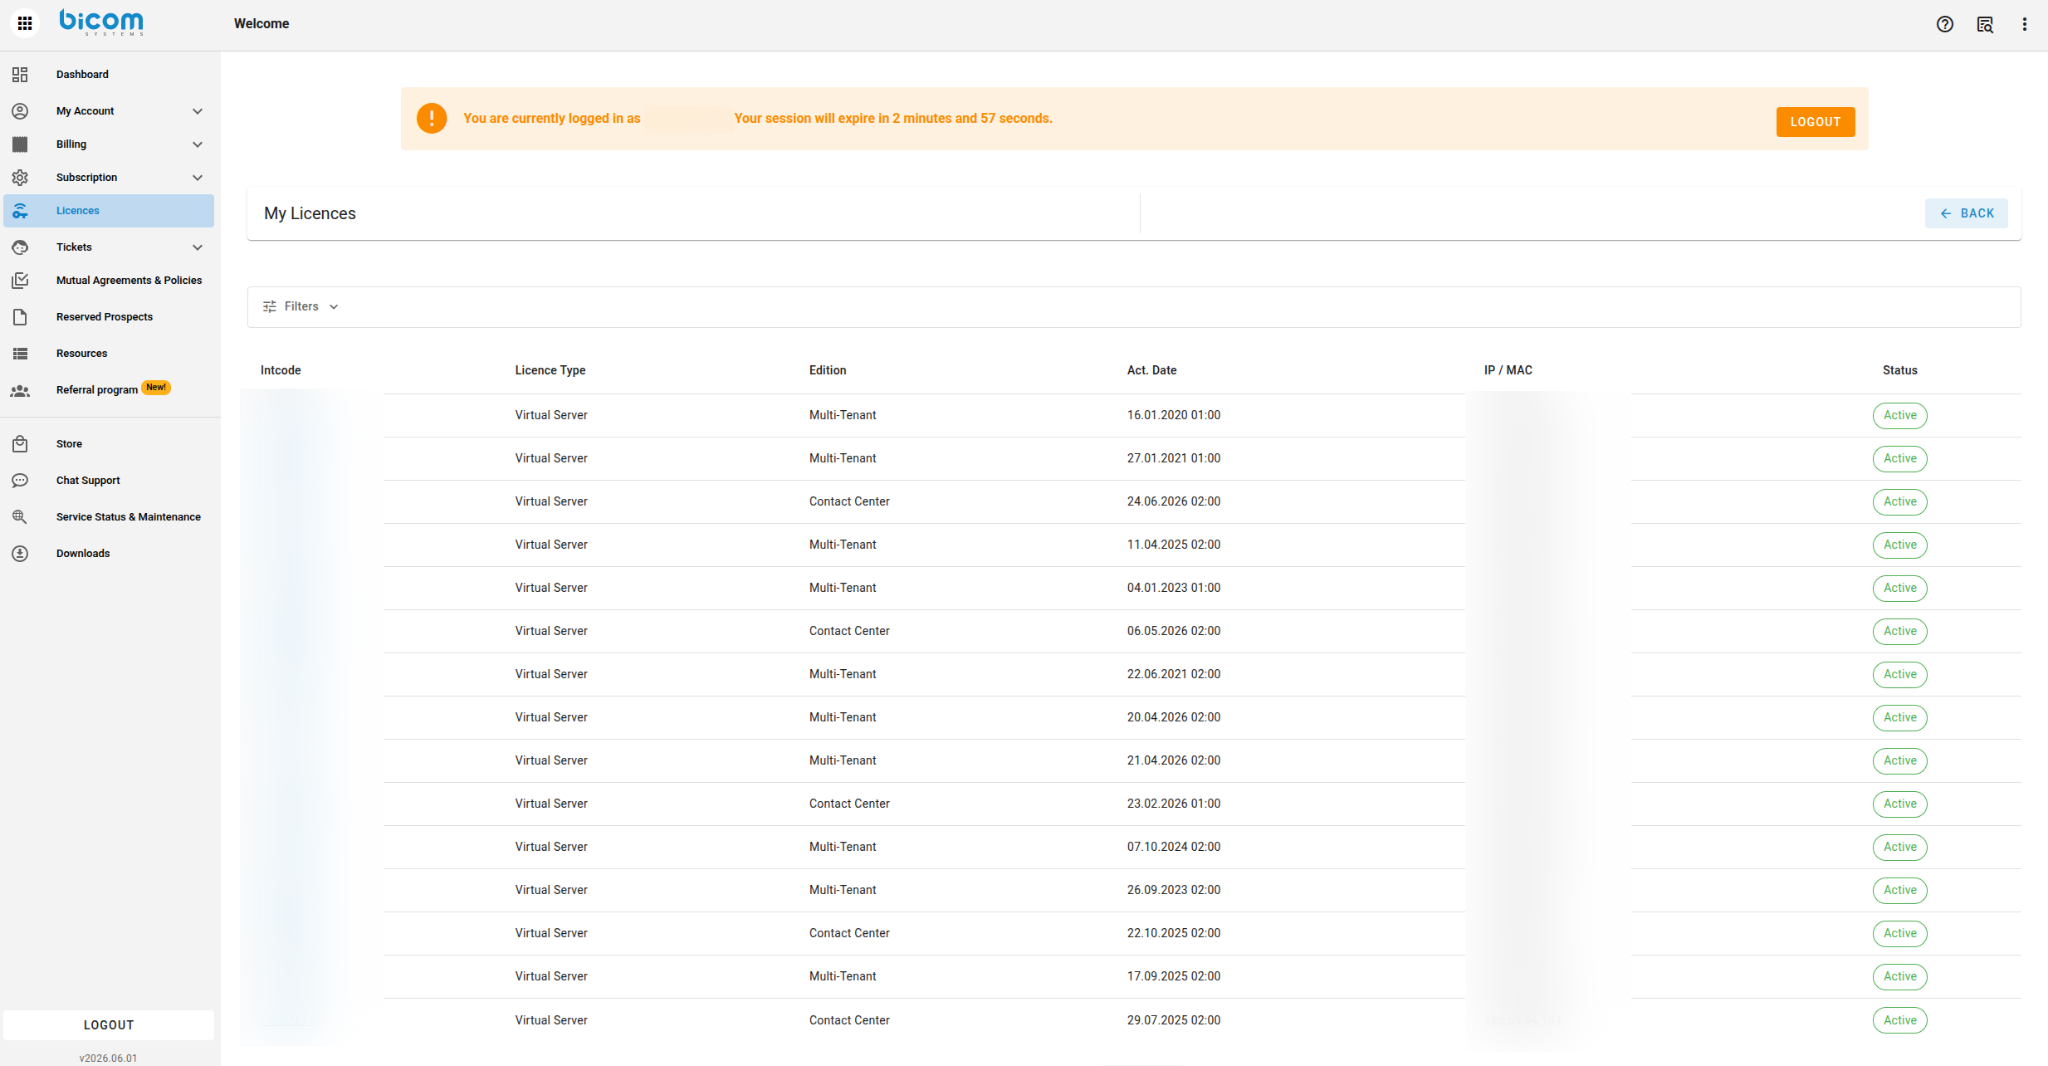
Figure 5 — The My Licences page, listing all licenses associated with the account.
Locate the license you want to modify and click on it to open its License Details page.
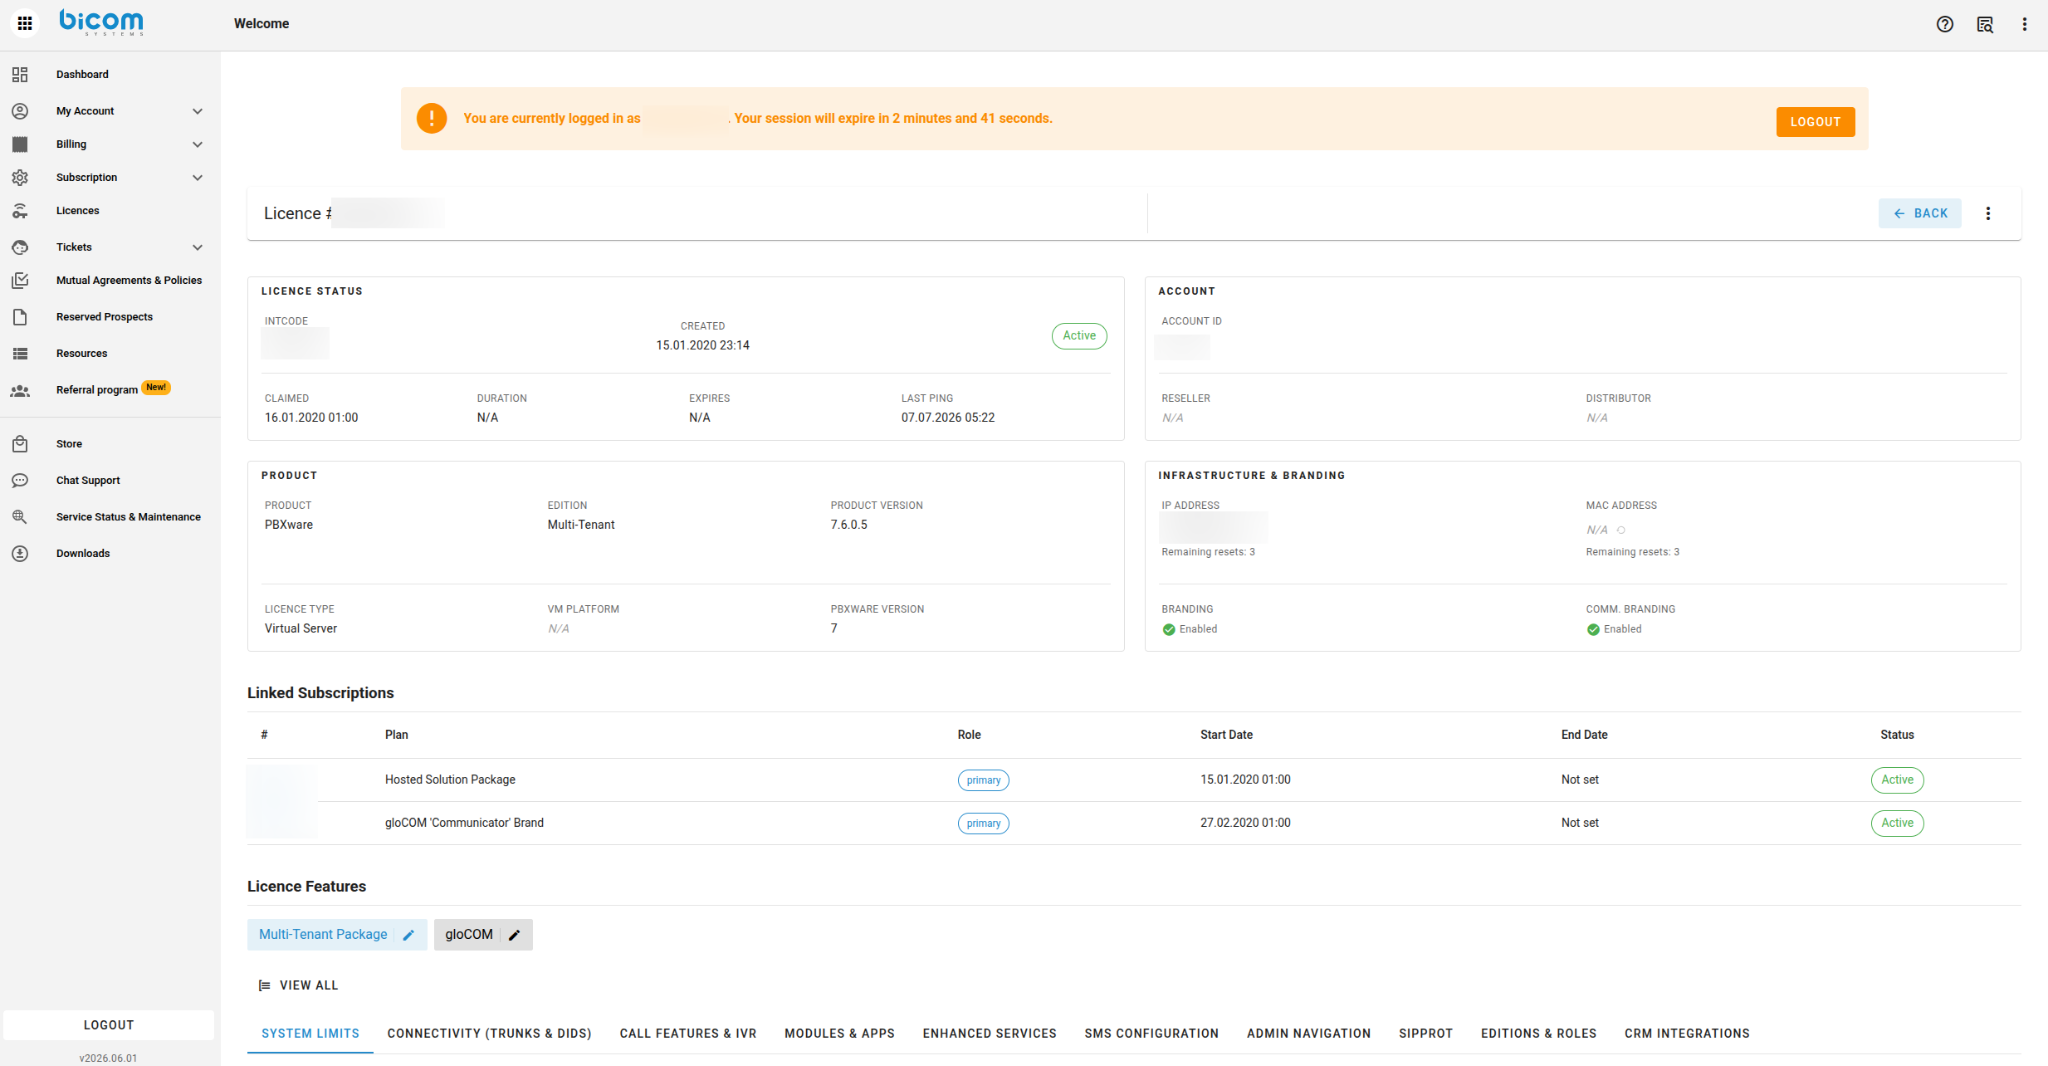
Figure 6 — License Details for a Multi-Tenant license, including linked subscriptions and license features.
The License Details page shows the license status, product and edition, infrastructure details, and — under Linked Subscriptions — every subscription plan tied to this license (for example, a Hosted Solution Package and a gloCOM 'Communicator' Brand subscription).
NOTE
Every license should have at least one subscription associated with it. If your subscription type is not Hosted, Rented, gloCOM, or Communicator, please contact your Partner Success (PS) representative to edit your license quantity. If you do not know who your PS representative is, you can find their name under My Account > Account Settings > Account Details.
4.3 Increasing PBXware Multi-Tenant Extensions
In this example, we will edit a Hosted subscription linked to a Multi-Tenant PBXware license. From the License Details page, click the linked subscription you want to edit.
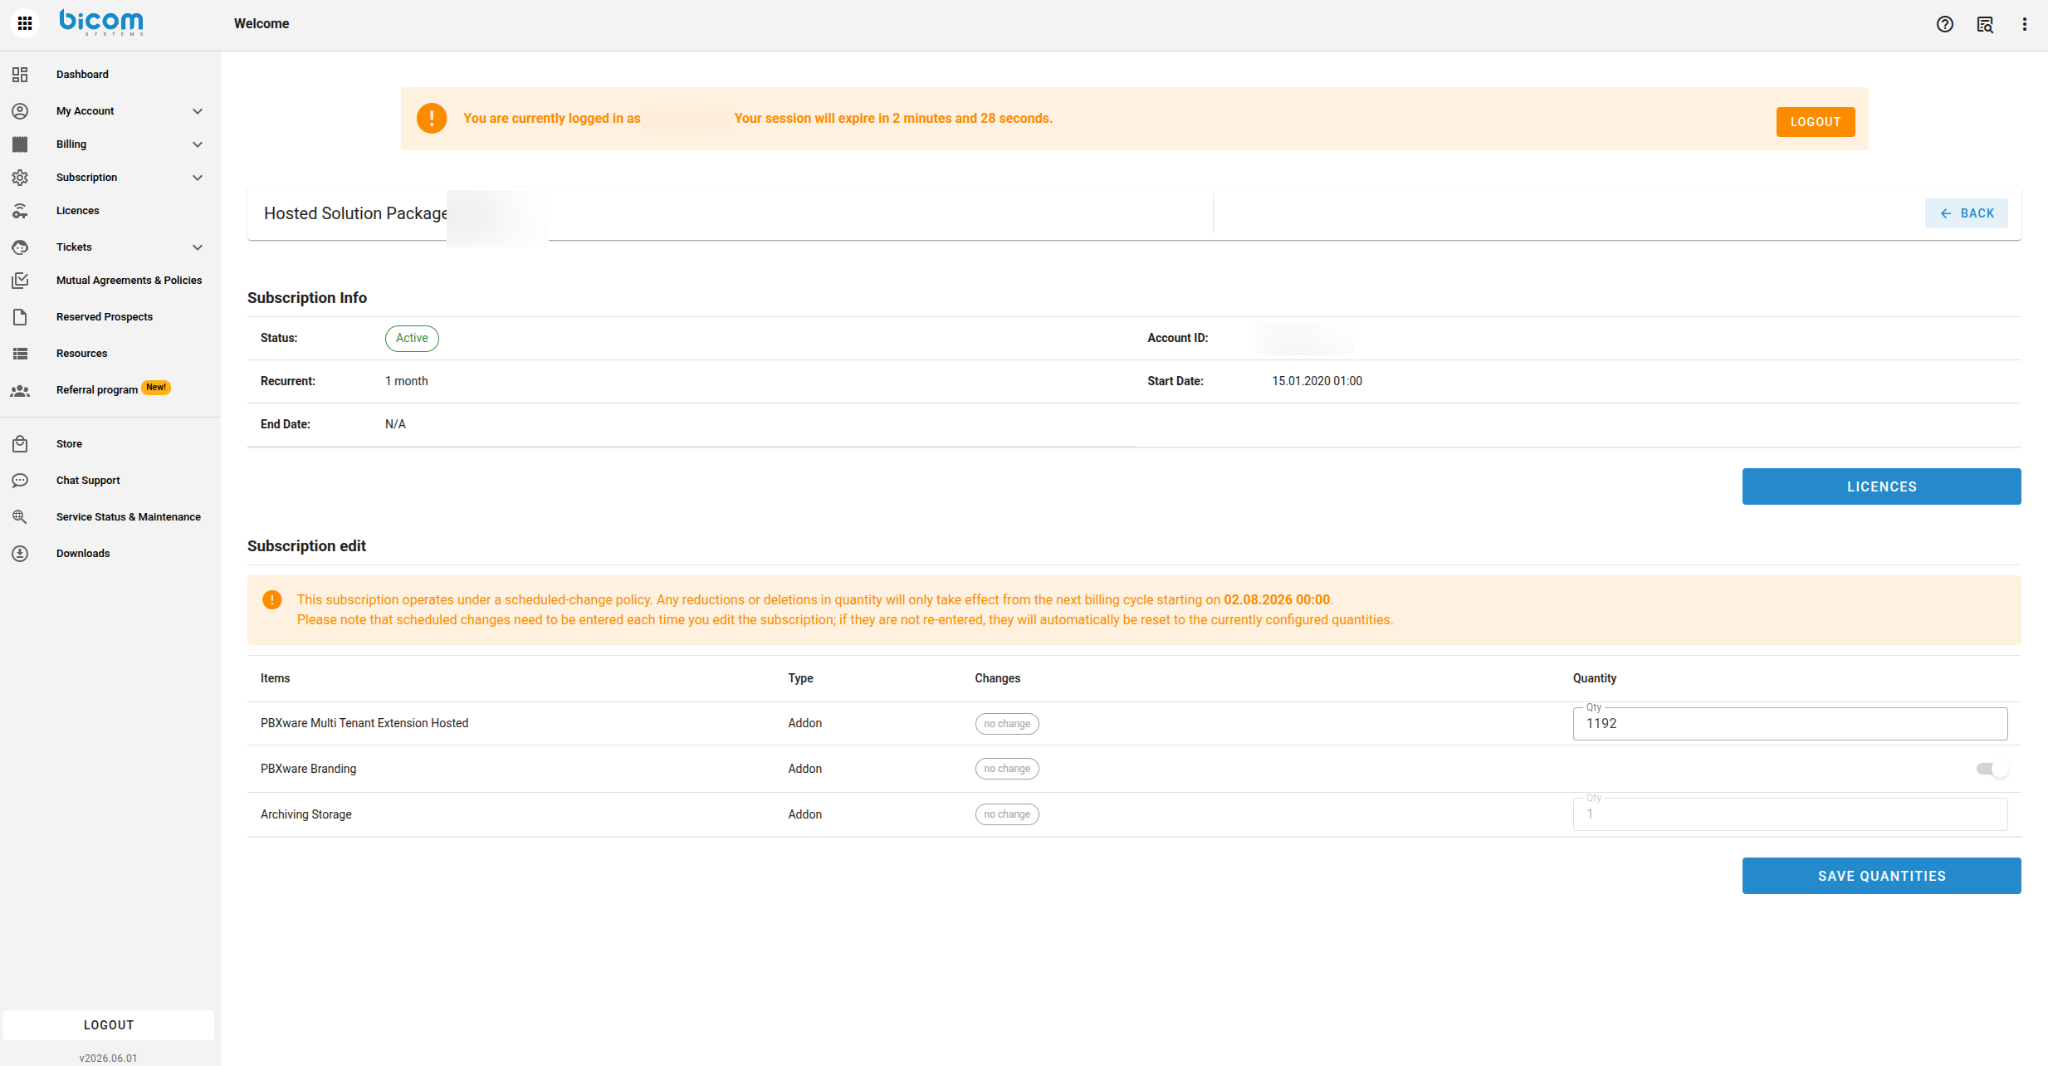
Figure 7 — Editing quantities on a Hosted Solution Package subscription.
On the subscription page, locate the PBXware Multi Tenant Extension (or equivalent) line item under Subscription edit.
Update the value in the Qty field to the new number of business extensions required.
Click SAVE QUANTITIES to submit the change.
IMPORTANT
This subscription operates under a scheduled-change policy. Reductions or deletions in quantity only take effect from the start of the next billing cycle. Scheduled changes must be re-entered every time you edit the subscription — if a pending change is not re-entered, it will automatically reset to the currently configured quantity.
Once saved, the change is applied to your subscription. To confirm the update, return to the Licences page, reopen the license you edited, and check the Business Extensions field under the System Limits tab of the License Features section.
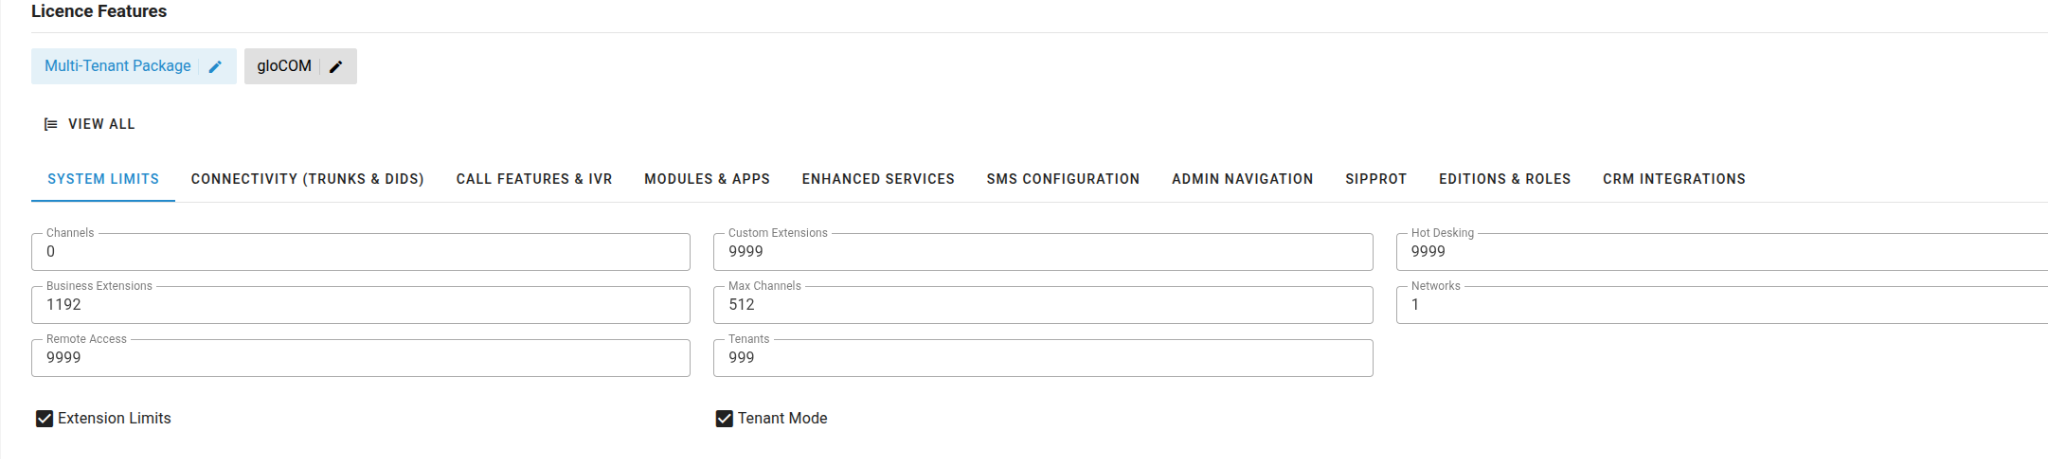
Figure 8 — The Business Extensions field under License Features > System Limits, confirming the new quantity.
IMPORTANT
After increasing extensions, you must re-license your PBXware system for the change to take effect on the server. See this guide to re-licensing your PBXware system.
4.4 Adding gloCOM Licenses
gloCOM/Communicator licenses are managed through the subscription linked next to your Hosted, Rented, or other primary subscription.
From the License Details page, click the gloCOM 'Communicator' Brand subscription (or equivalent) linked to your license.
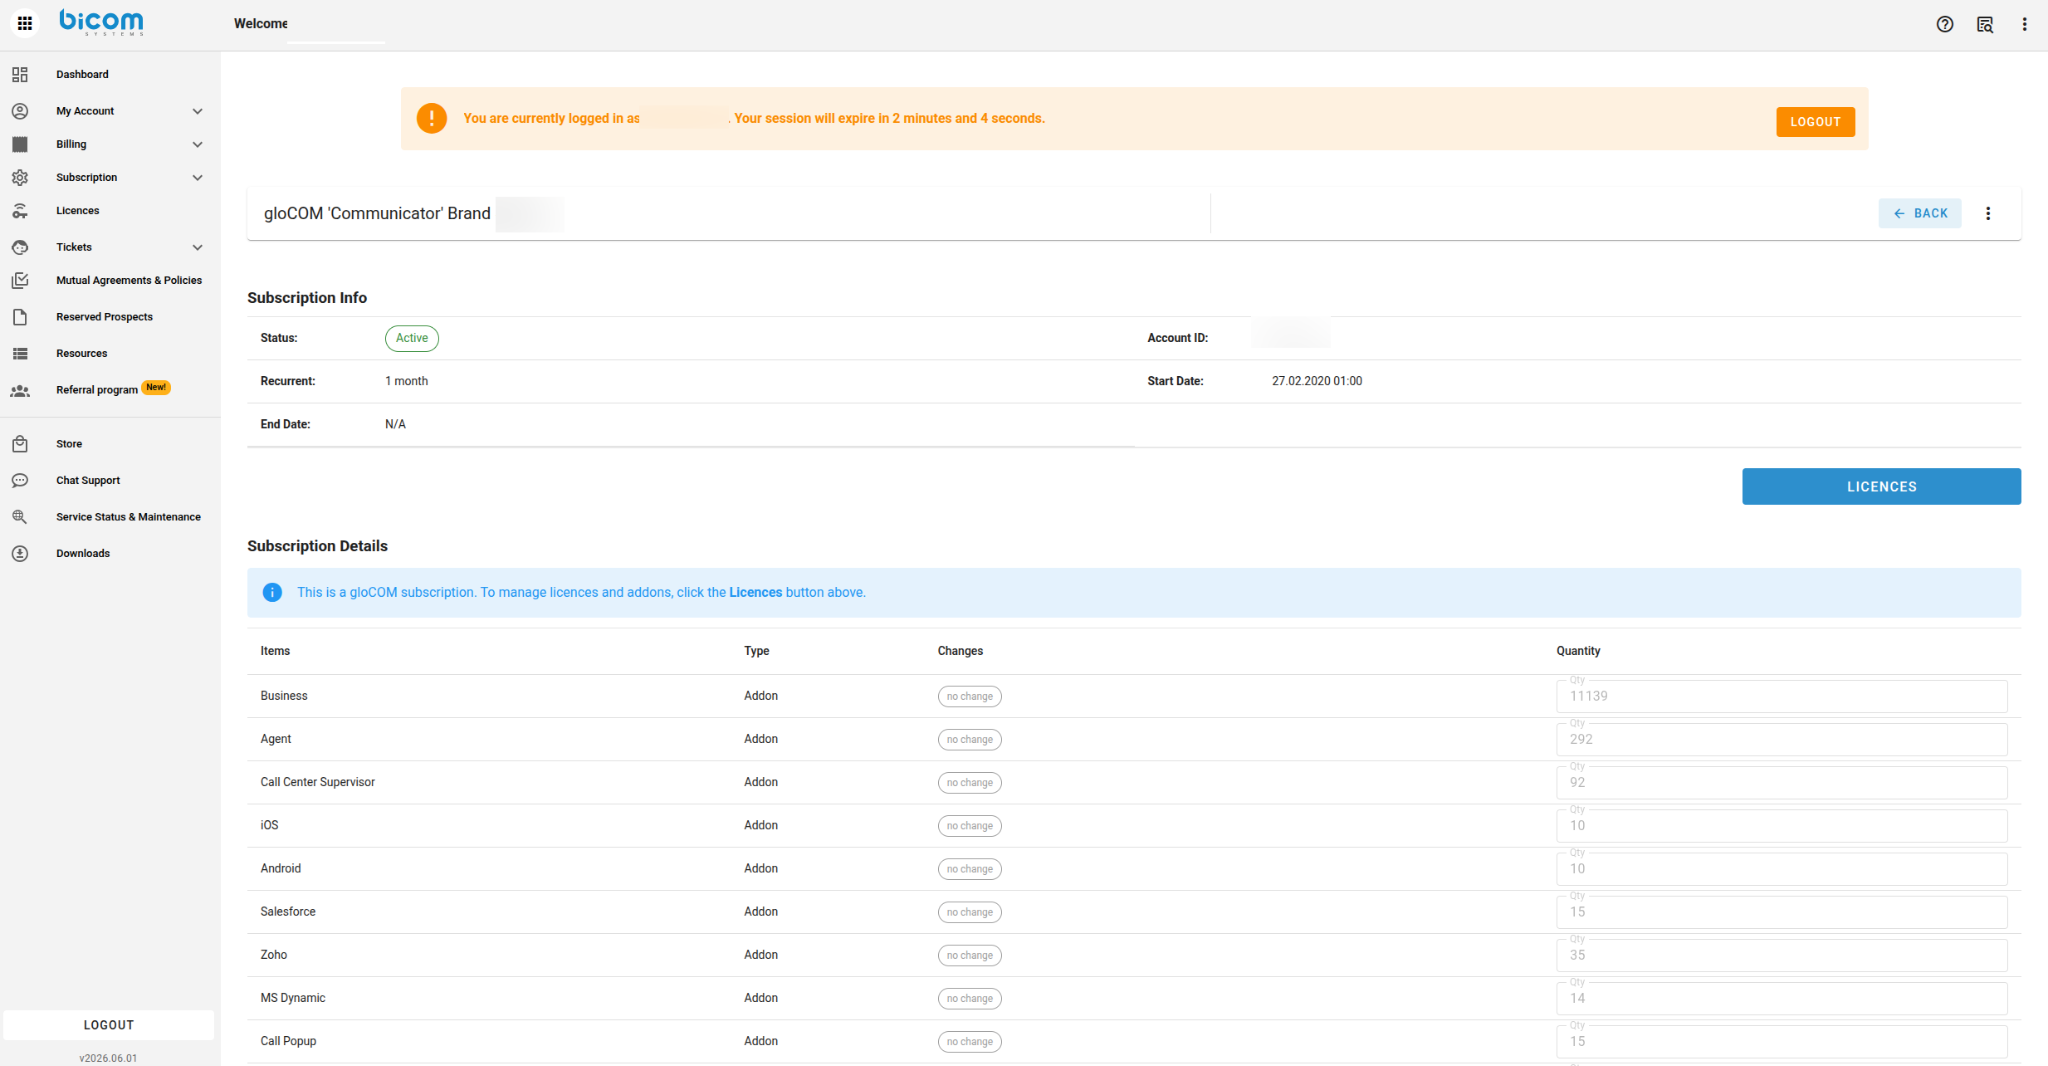
Figure 9 — The gloCOM 'Communicator' Brand subscription overview.
Click the LICENCES button to continue.
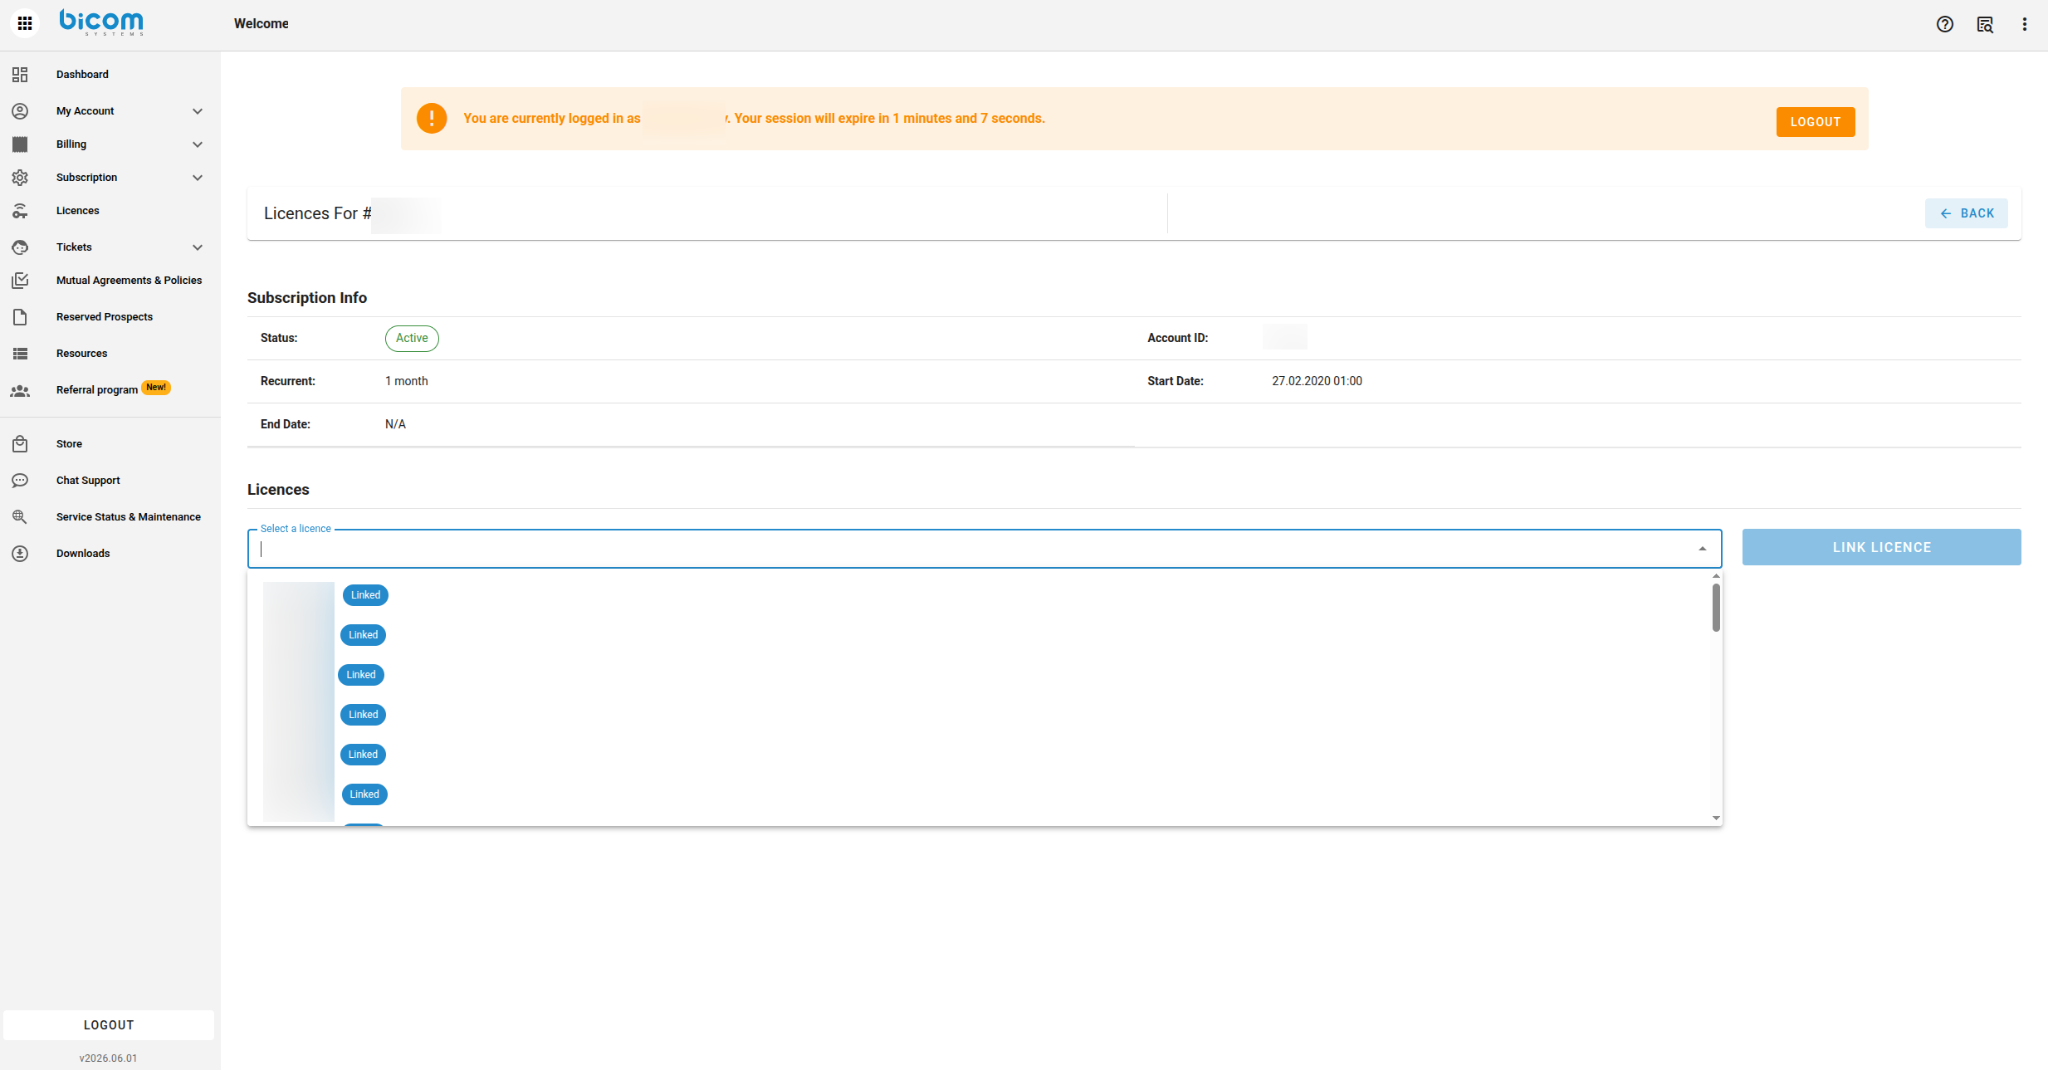
Figure 10 — Selecting an existing license to link additional gloCOM licenses.
From the Select a licence dropdown, choose the license you want to add gloCOM licenses to, then click LINK LICENCE.
For Multi-Tenant systems, the next screen lets you choose which tenant the licenses will be assigned to.
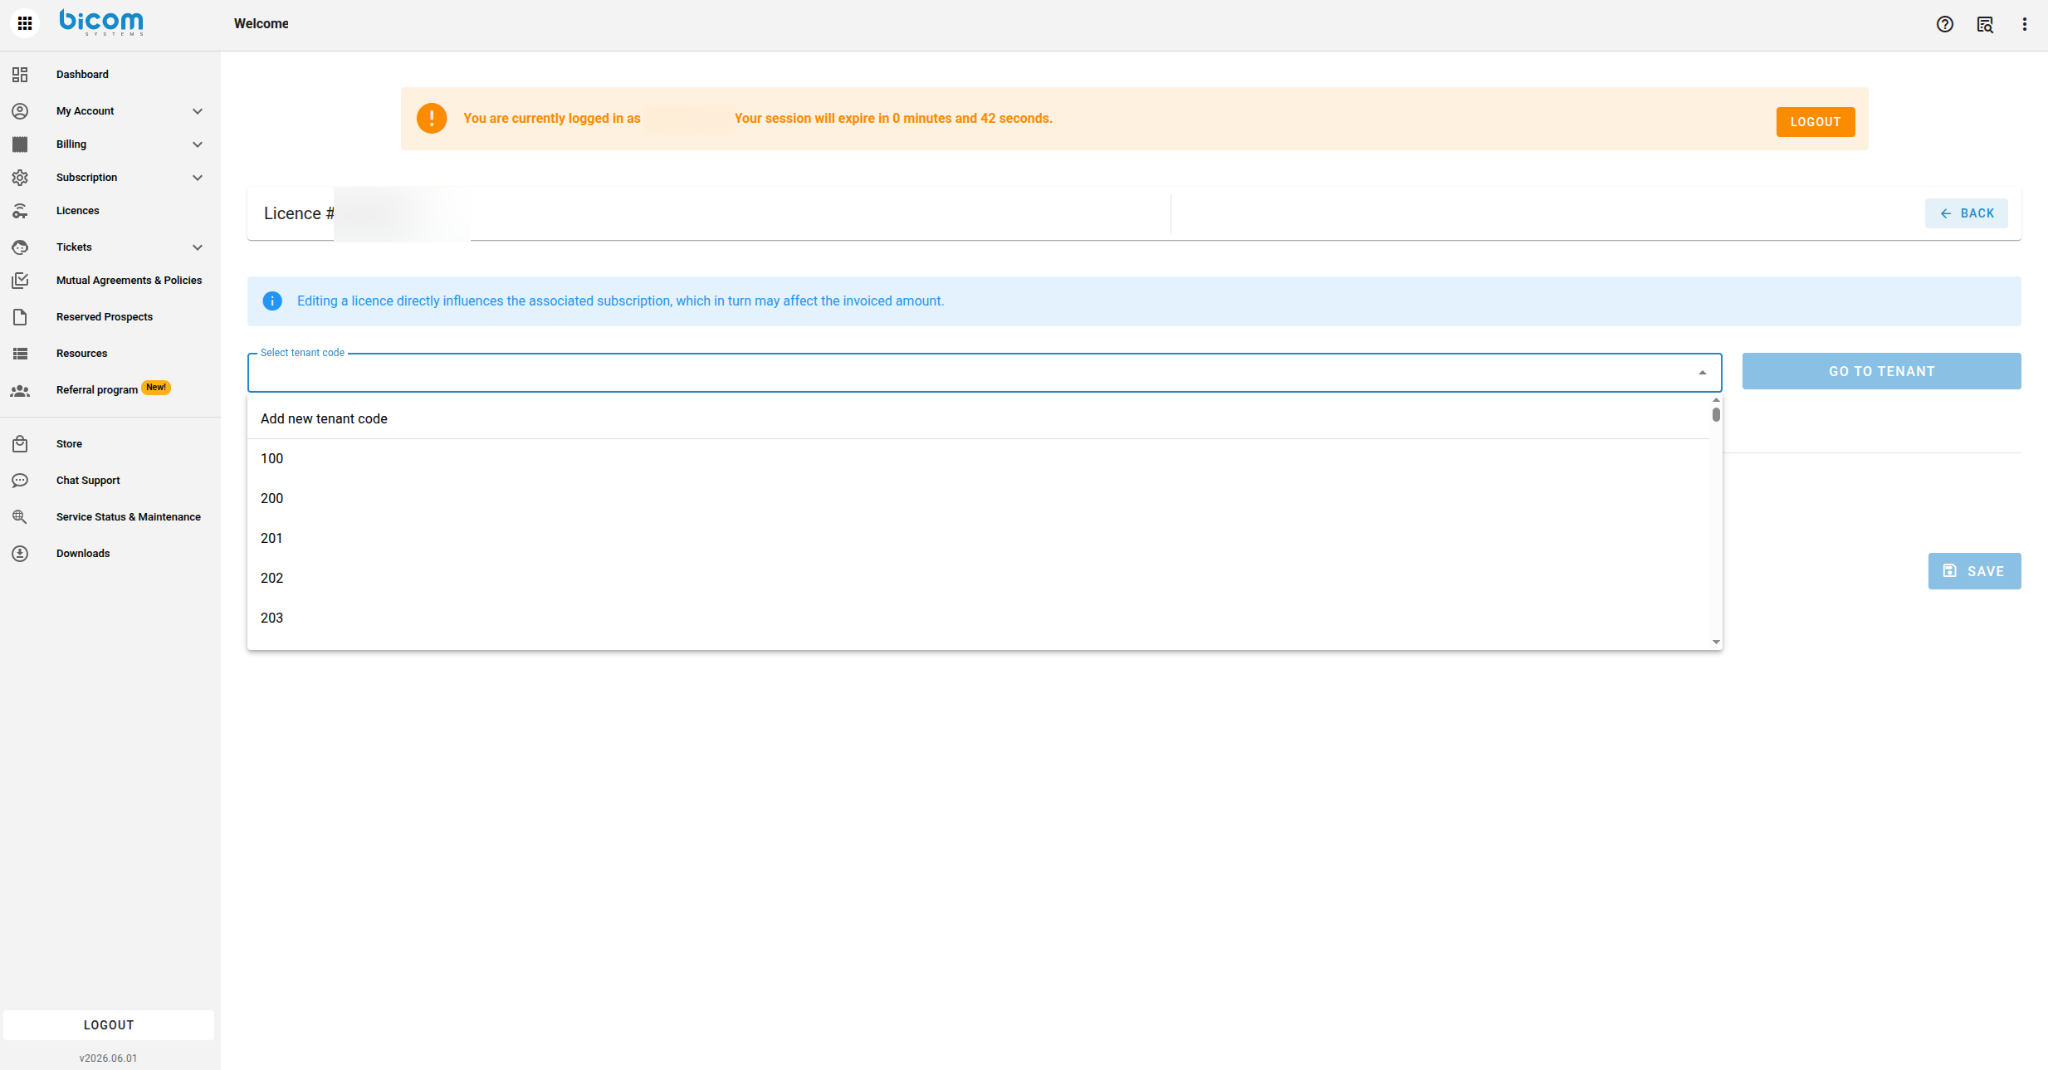
Figure 11 — Selecting or adding a tenant code before assigning gloCOM licenses.
If the tenant is newly created or does not yet have gloCOM assigned to the particular tenant, select Add new tenant code, enter the tenant number, and assign the desired license to that tenant.
After selecting or creating a tenant, you will be redirected to the feature assignment page:
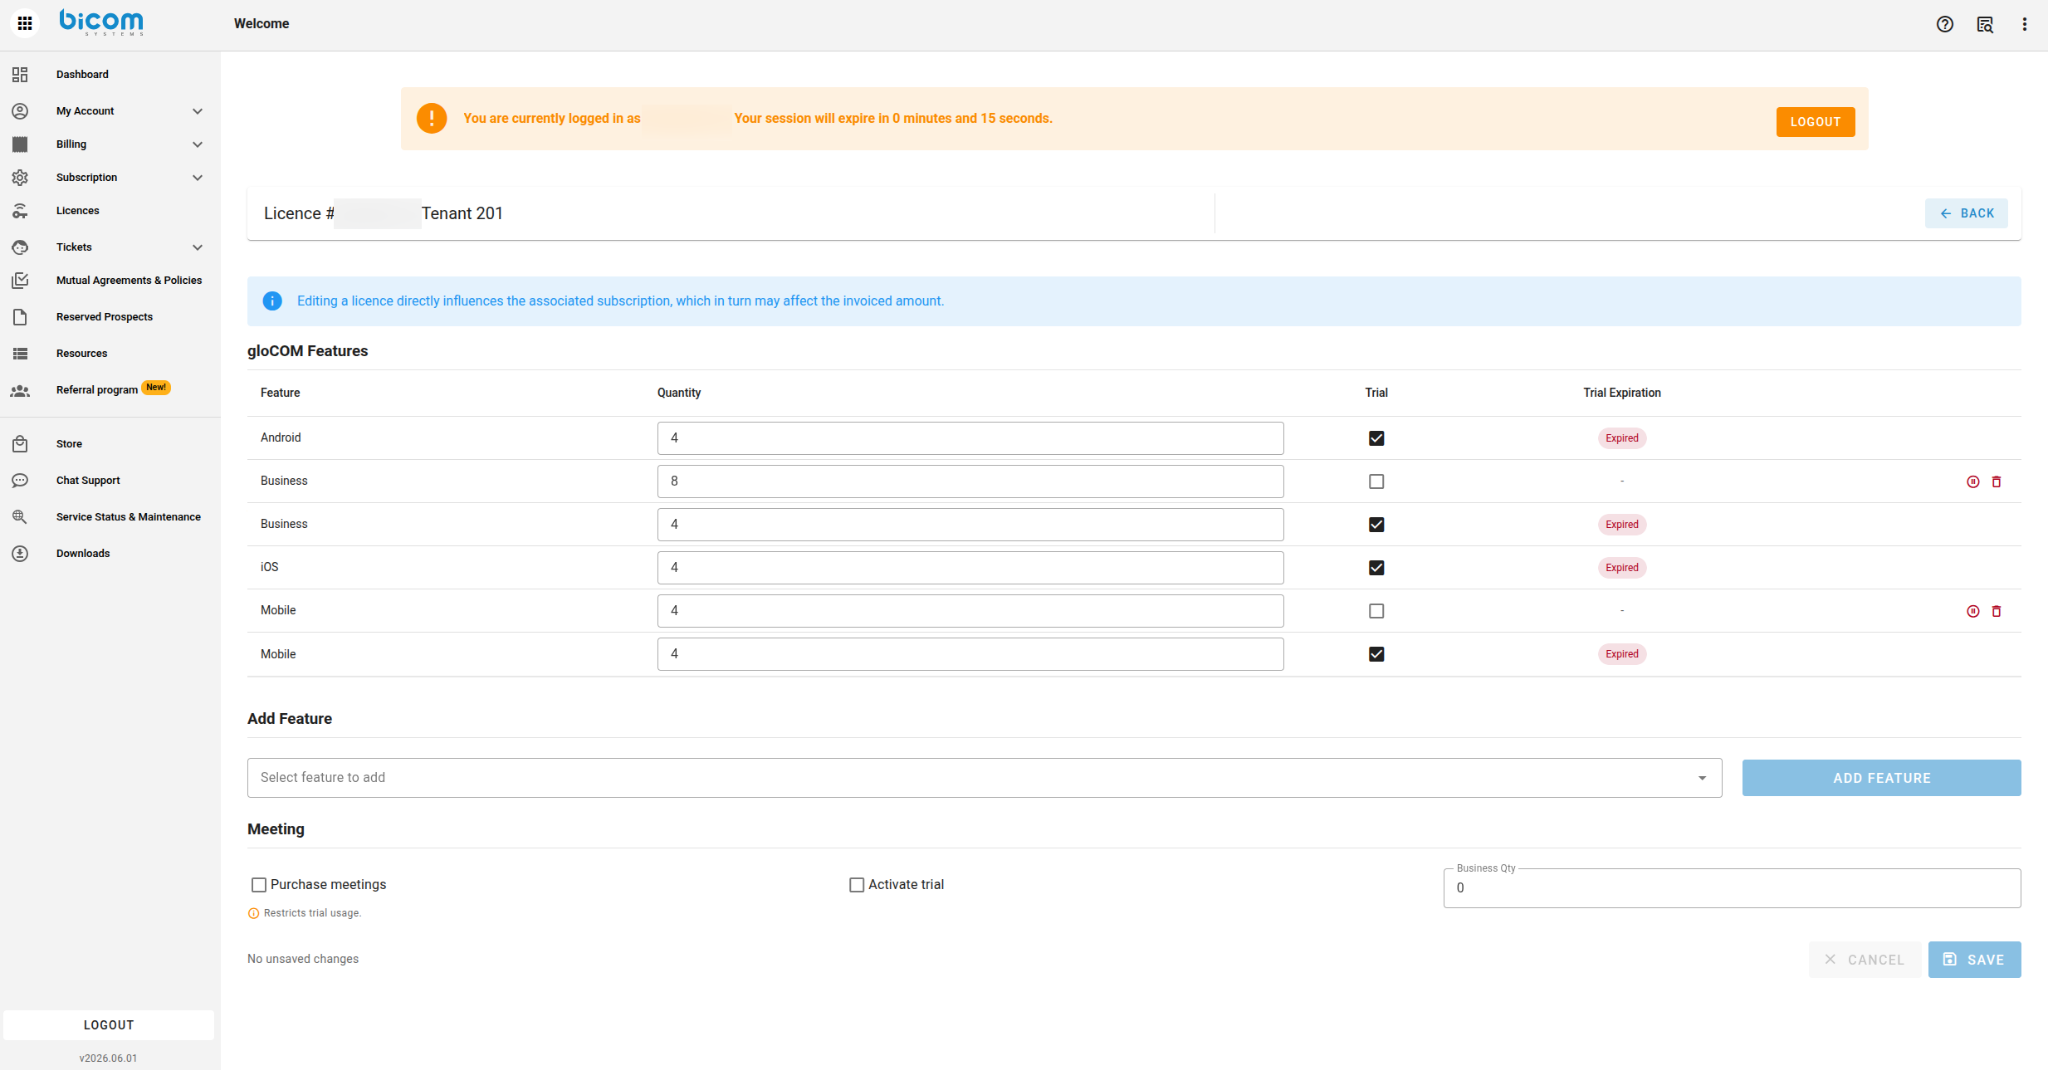
Figure 12 — Adjusting gloCOM feature quantities or adding a new feature for a specific tenant.
To change an existing quantity — update the number in the corresponding Quantity field.
To add a new feature — select it from the Select feature to add dropdown and click ADD FEATURE. This adds the feature to the tenant with the license count you specify.
Click SAVE to apply your changes.
NOTE
Editing a license directly influences its associated subscription, which may in turn affect the invoiced amount. Review quantities carefully before saving.
4.5 Increasing Contact Center Extensions
The process for Contact Center (CC) licenses follows the same overall navigation pattern as Multi-Tenant licenses.
Go to Licences and select the Contact Center license you want to edit.
Open the linked Hosted/Rented subscription for that license.
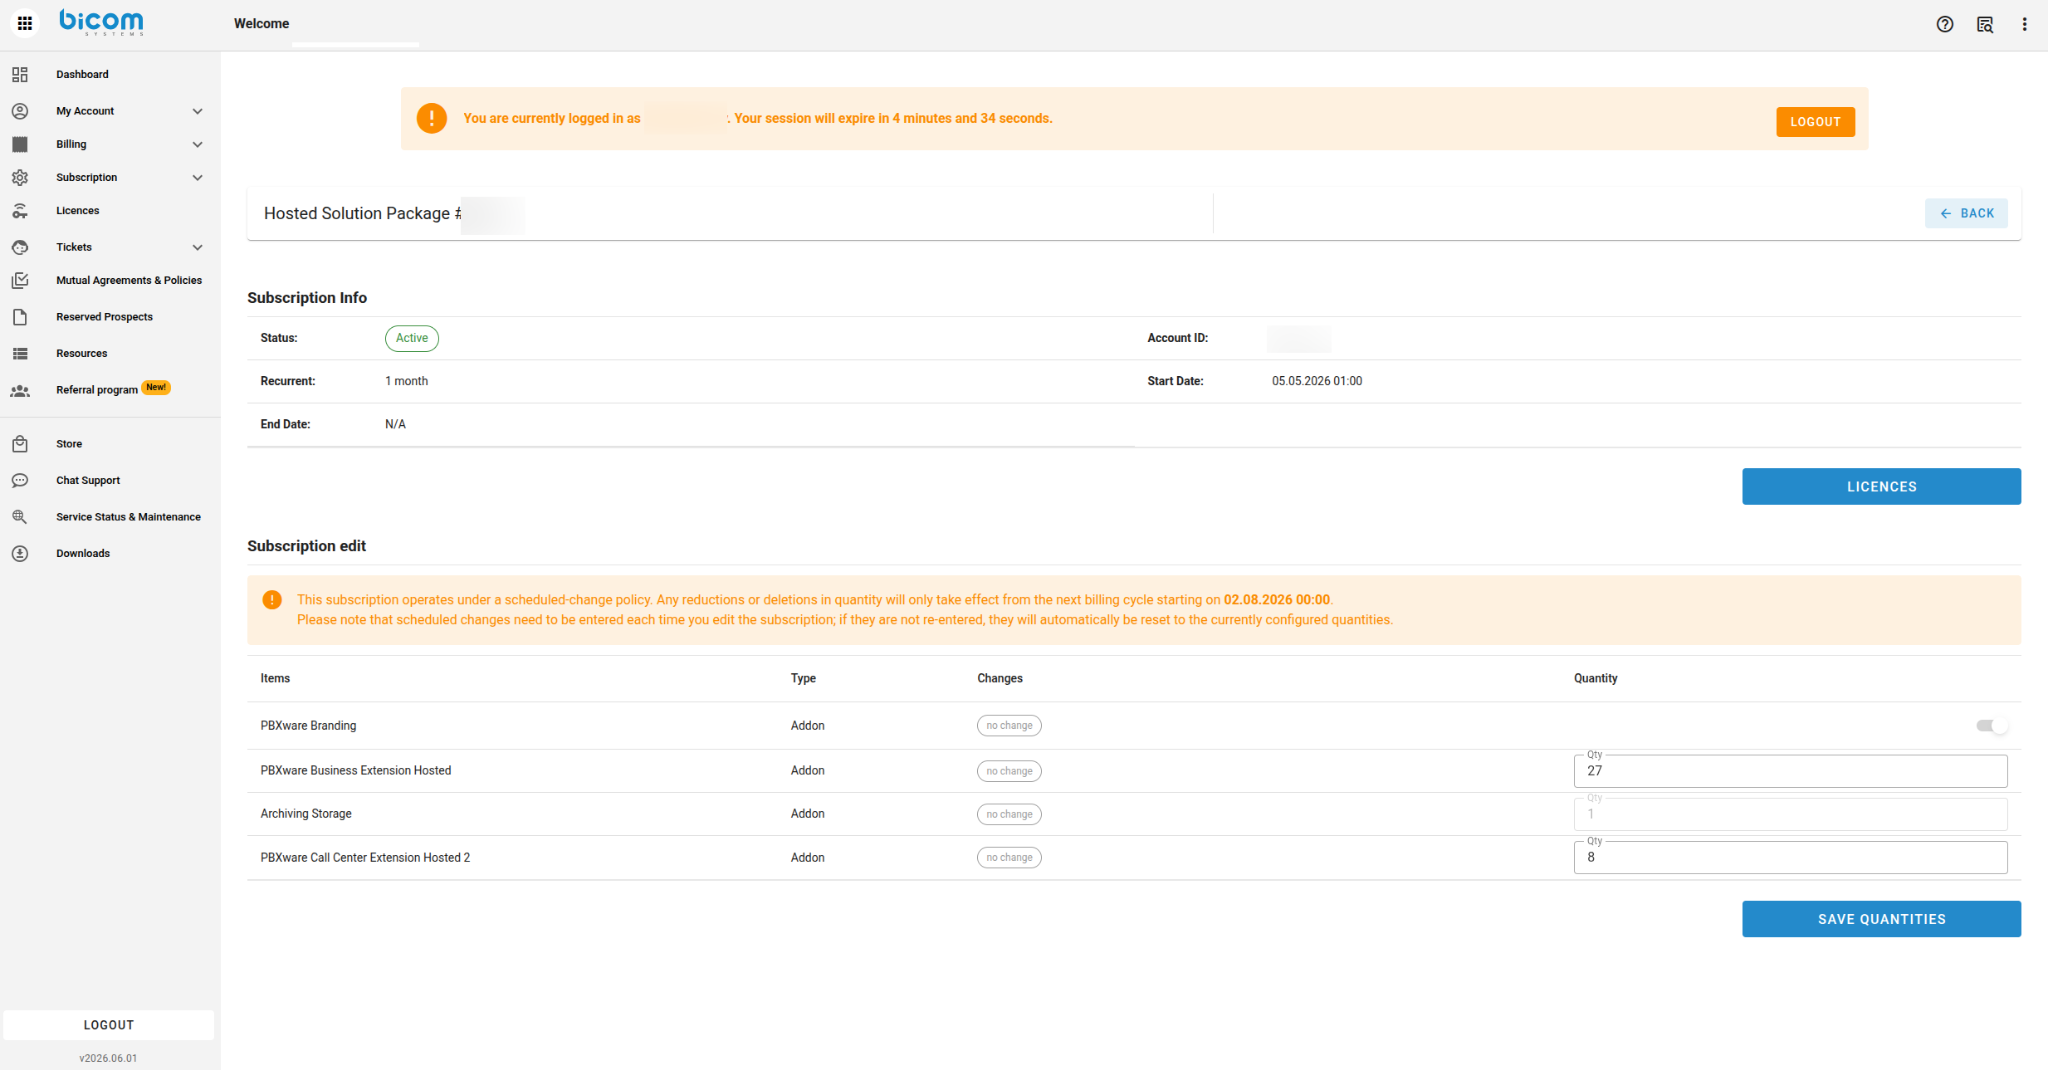
Figure 13 — Editing Contact Center extension quantities on a Hosted Solution Package subscription.
Update the PBXware Call Center Extension field with the new quantity.
Click SAVE QUANTITIES to confirm the change.
The updated extension count will be reflected under License Details > Modules & Apps, in the Call Center Extensions field.
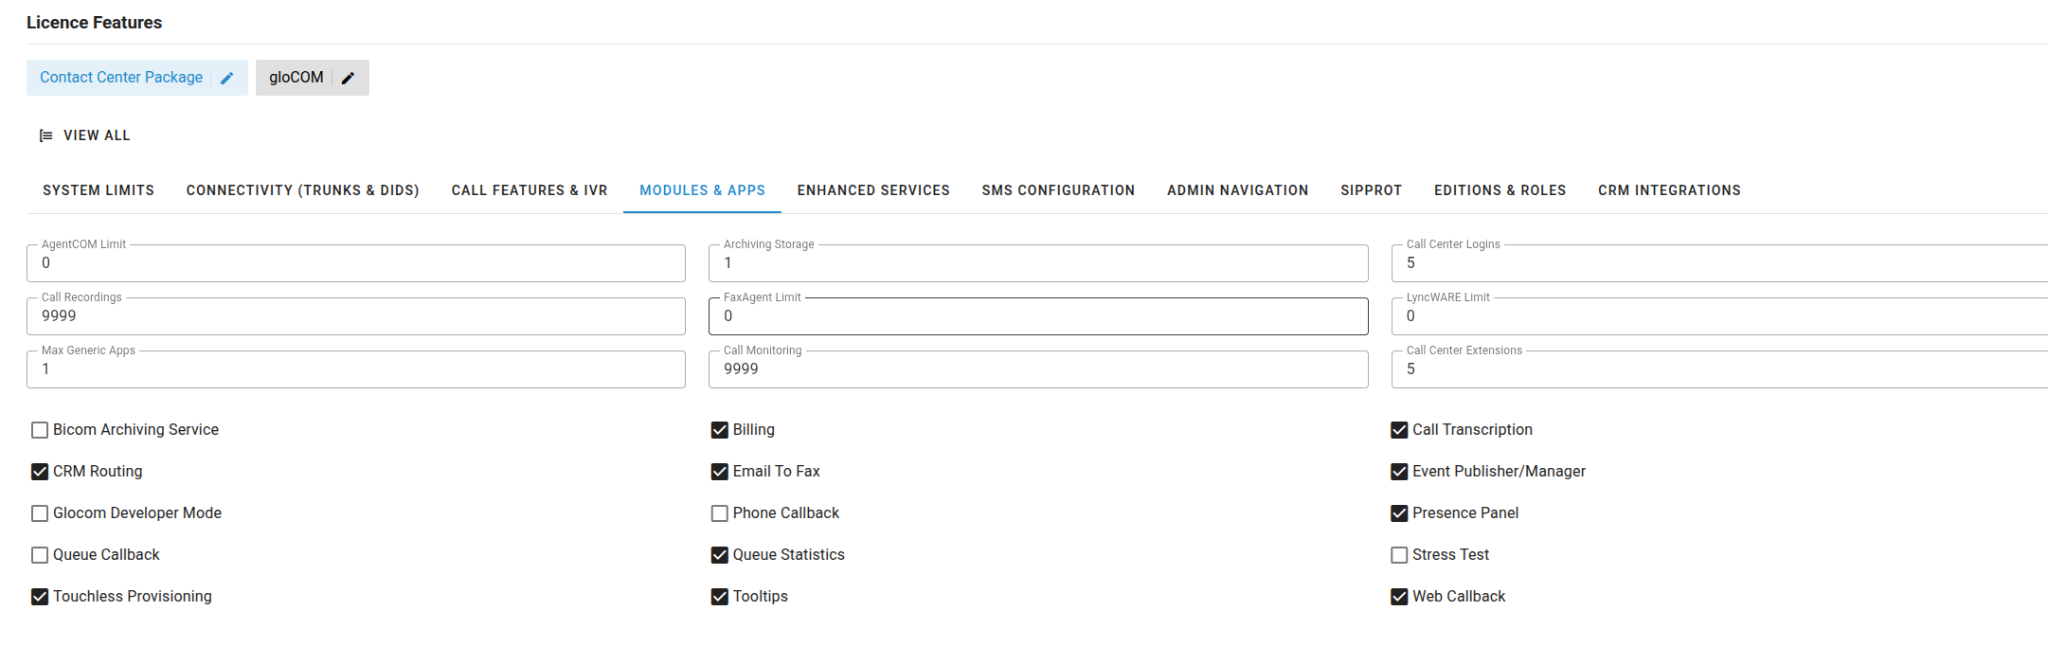
Figure 14 — Confirming the updated Call Center Extensions count under Modules & Apps.
4.6 Re-Licensing Your PBXware System
Increasing a license quantity in the Customer Portal updates your entitlement, but the change must also be applied to your live PBXware system before it becomes active. To do this, re-license your PBXware system by following the official guide: General How-To: Re-licensing System PBX 6.x and 7.x.
NOTE
This step applies to both Multi-Tenant and Contact Center license changes. If you need assistance, contact Bicom Systems Support.
5. Purchasing a New License
The steps in Section 4 cover increasing extensions or licenses on an existing license (VPS). To purchase a brand-new license — for example, a new virtual server for a new deployment — this is not currently self-service in the portal.
IMPORTANT
To purchase a new license (new VPS), please contact your Partner Success representative directly, or email partnersuccess@bicomsystems.com.
If you do not know who your Partner Success representative is, you can find their name under My Account > Account Settings > Account Details.
6. Invoices and Payments (Billing)
The Billing section in the left-hand menu is where you manage everything related to invoices, payments, credit notes, and statements. It is organized into three groups: Invoices (Invoices, Legacy Invoices, Unbilled Charges), Payments (Payments, Legacy Payments, Payment Methods), and Credit Notes / Statements.
6.1 Viewing Invoices
To see your invoices, navigate to Billing > Invoices in the left-hand menu.
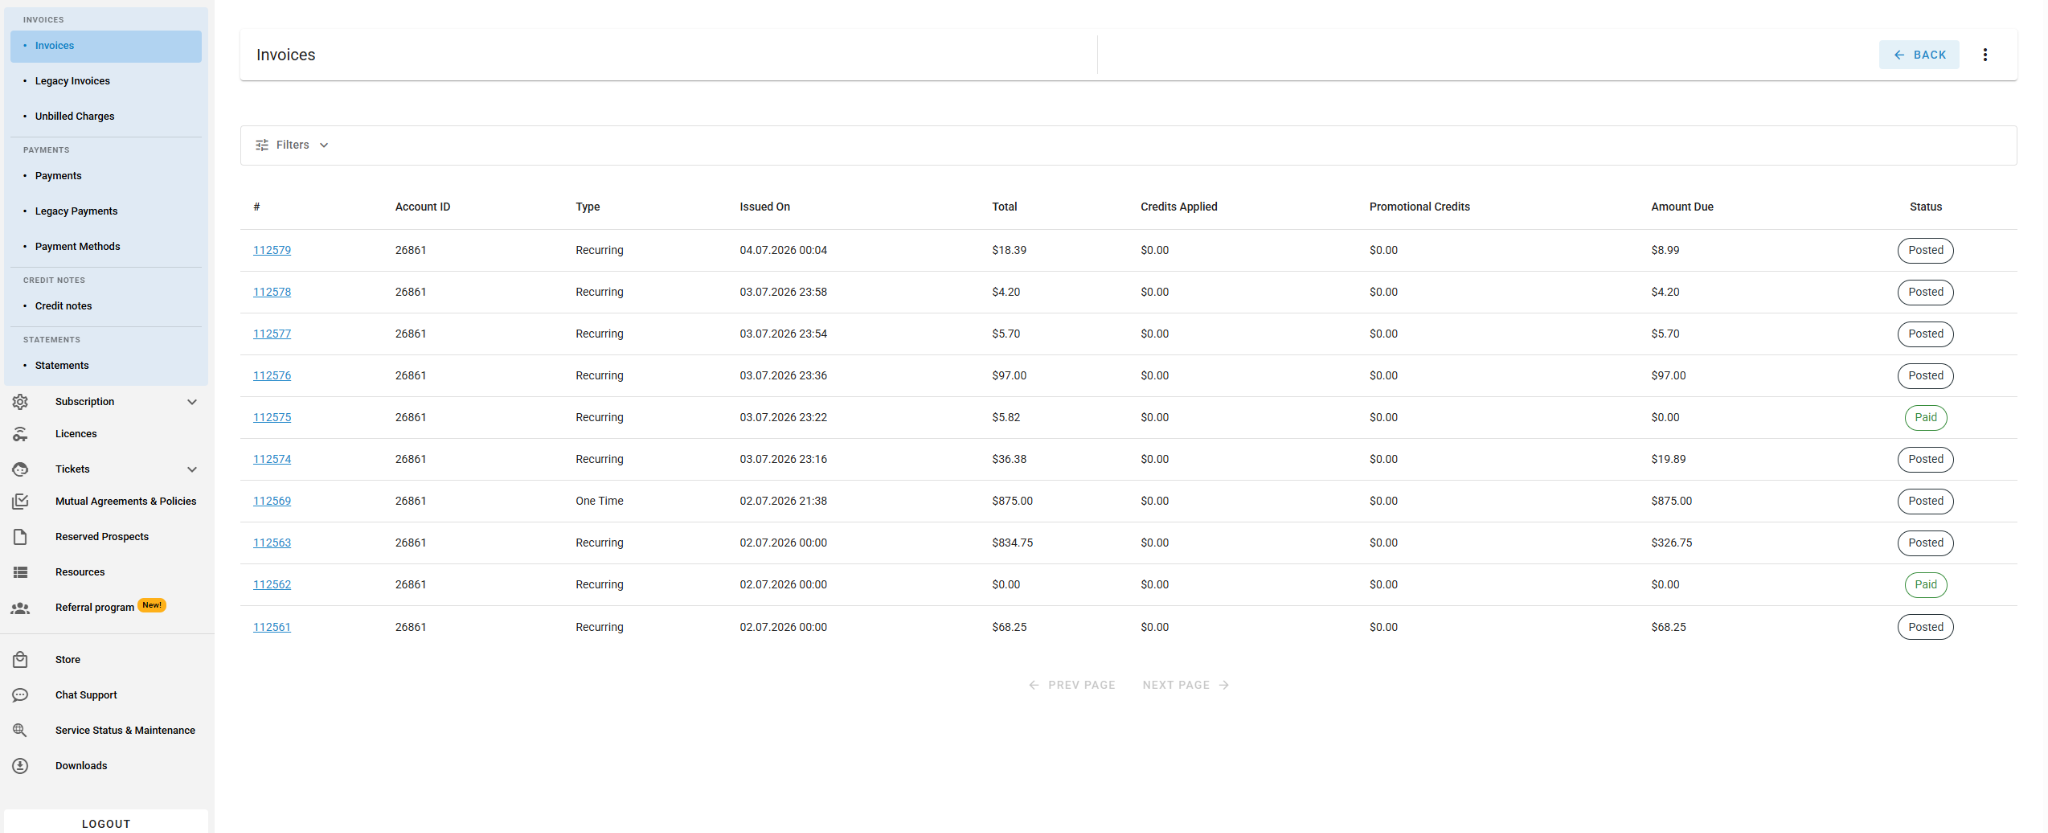
Figure 15 — The Invoices list, with the navigation sub-menu for Invoices, Payments, Credit Notes, and Statements.
The invoice list includes the following columns:
# — the invoice number.
Account ID — the number associated with your account.
Type — indicates whether the invoice is tied to a subscription (Recurring) or is a one-time payment (One Time).
Issued On — the date the invoice was issued.
Status — the current status of the invoice (for example, Posted or Paid).
The remaining fields show the Total, any Credits Applied or Promotional Credits, and the final Amount Due.
To download a CSV file listing all invoices, click the three-dot menu in the upper-right corner and select Invoices CSV.
6.2 Invoice Details and Adjustments
Click any invoice number to open a detailed view showing the invoice items, unit price, and total amount.
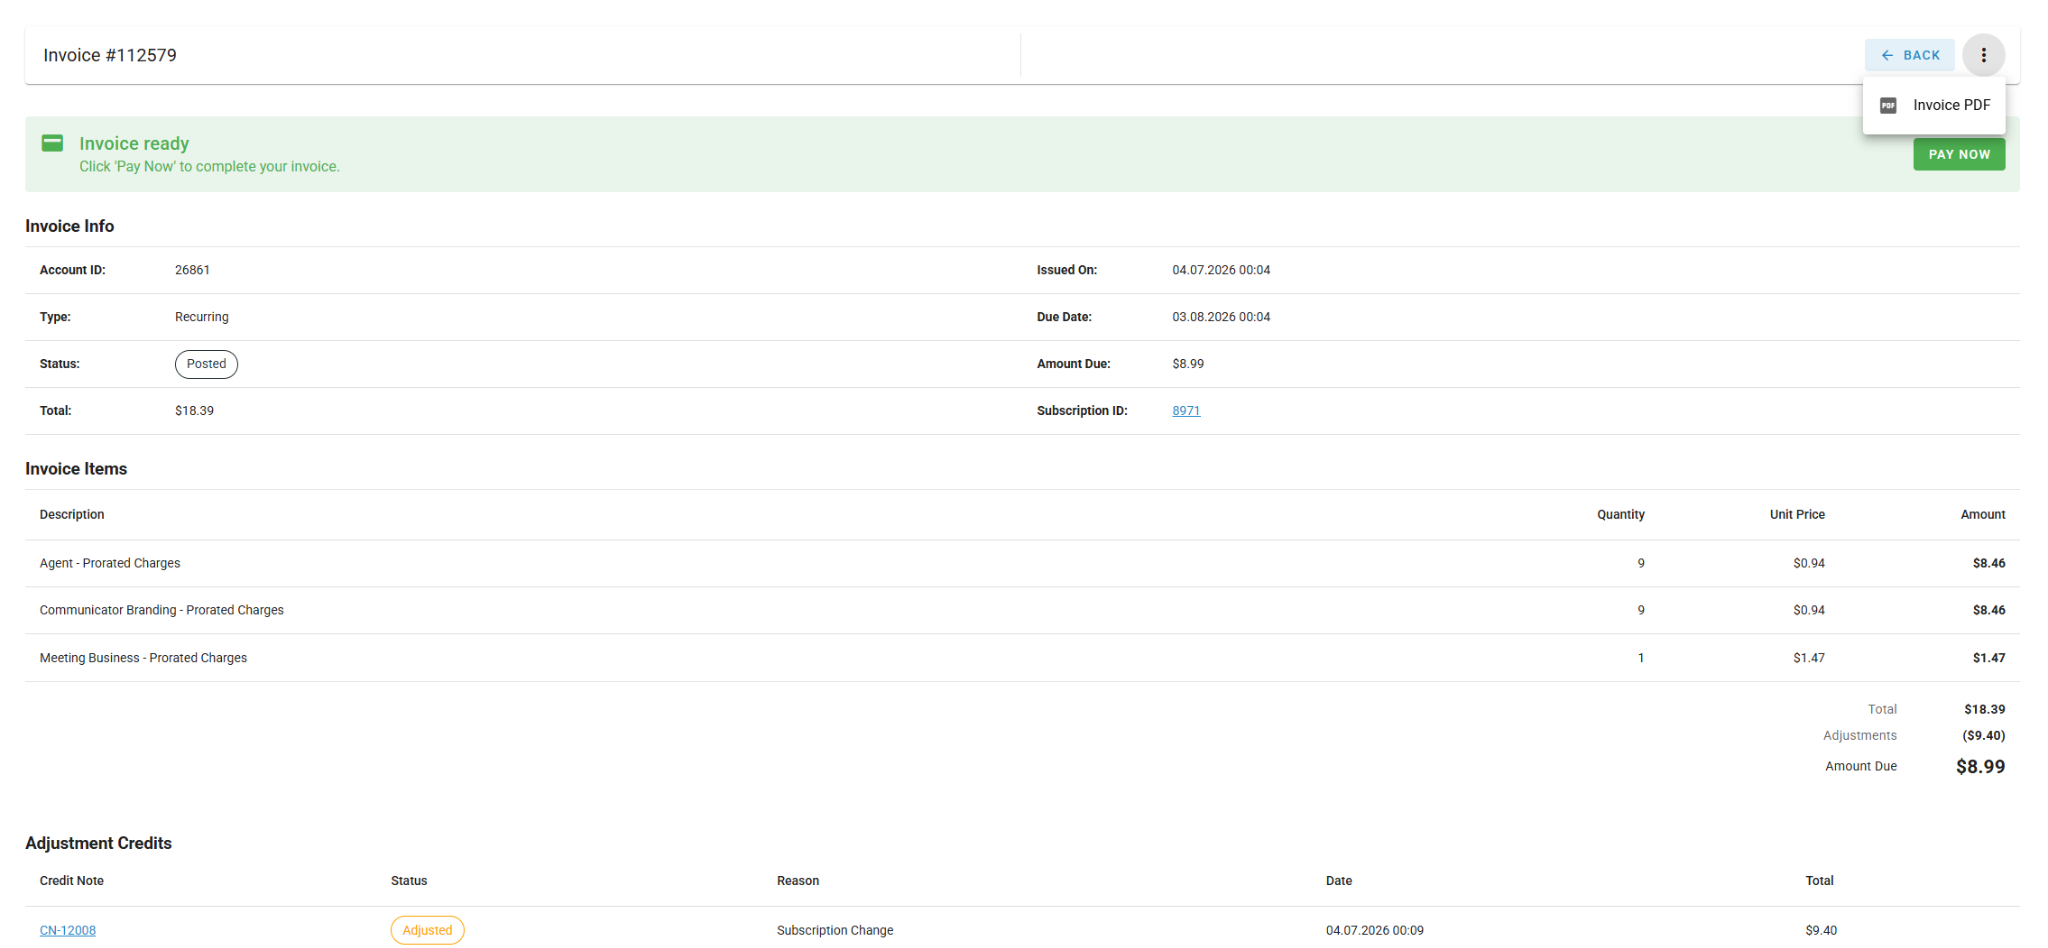
Figure 16 — Invoice detail view, showing invoice items, totals, and any adjustments.
On the invoice detail page you can also:
Review the Adjustments section, which lists any prorata adjustments or credit notes applied to that invoice.
Click Pay Now if the invoice is still outstanding.
Open the three-dot menu to download the Invoice PDF.
Click on an Adjustment Credit entry to open the related credit note for more detail.
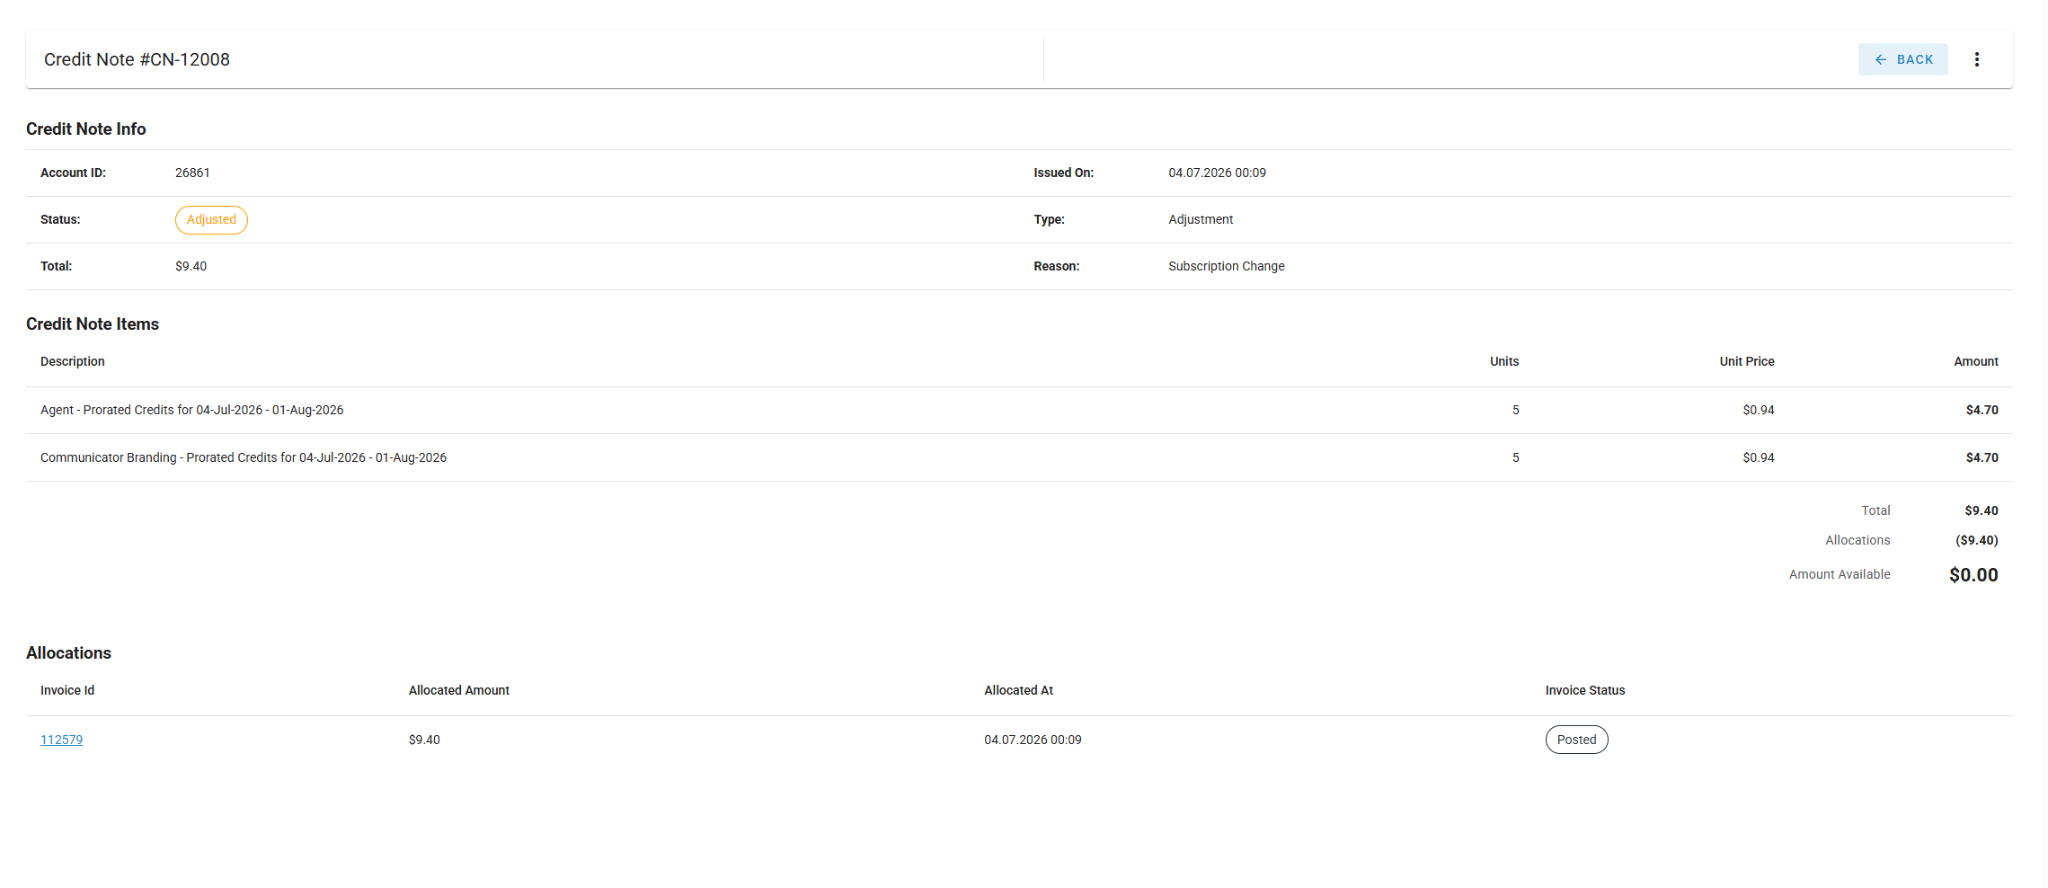
Figure 17 — A credit note opened from an invoice's Adjustment Credits section, showing credit items and allocations.
6.3 Credit Notes
To see all credit notes on your account, navigate to Billing > Invoices > Credit Notes in the left-hand sub-menu.
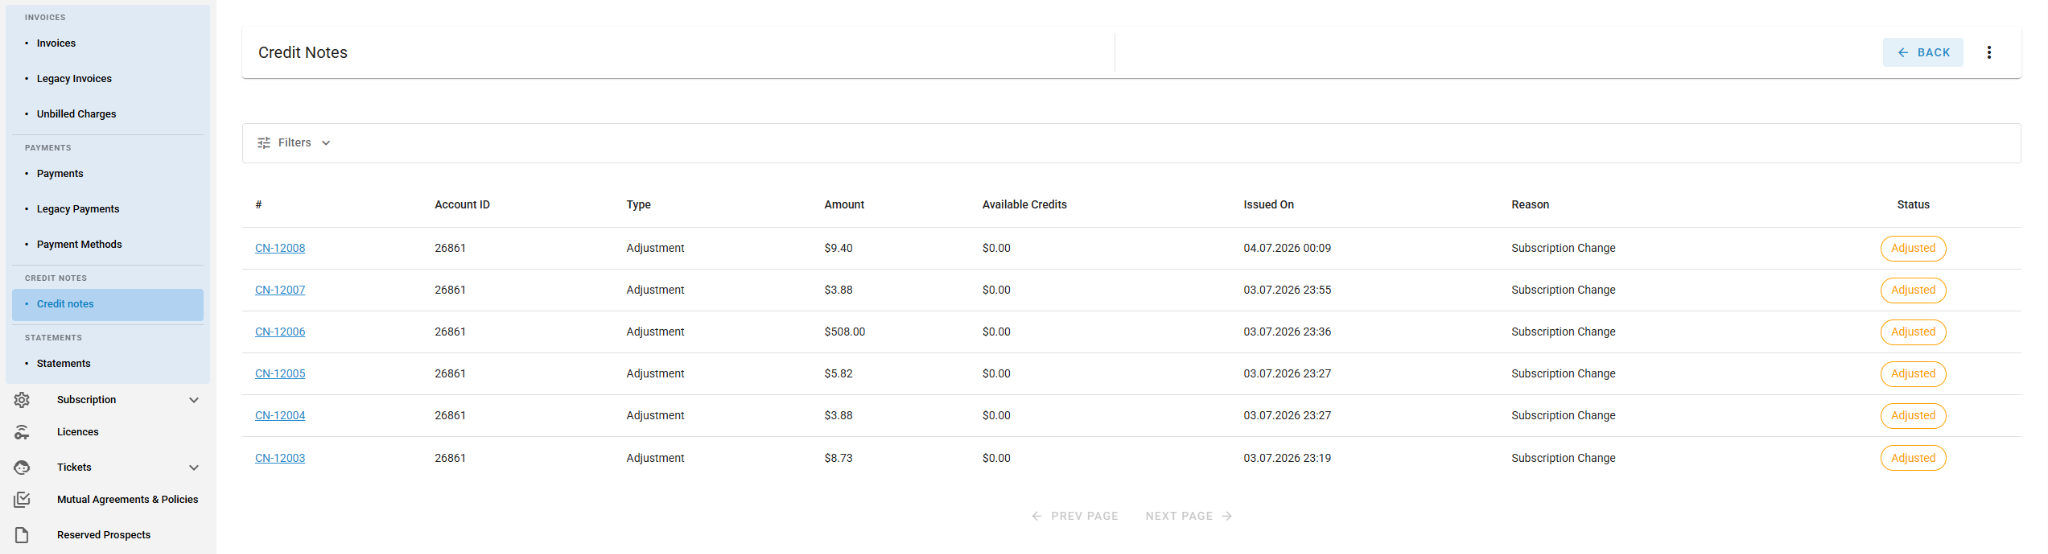
Figure 18 — The Credit Notes list, showing amount, available credit, issue date, reason, and status for each note.
As with invoices, clicking a specific credit note number opens a page with more detailed information, including which invoice(s) the credit was allocated to.
6.4 Statements
To see a consolidated view of all your financial documents, navigate to Billing > Invoices > Statements.
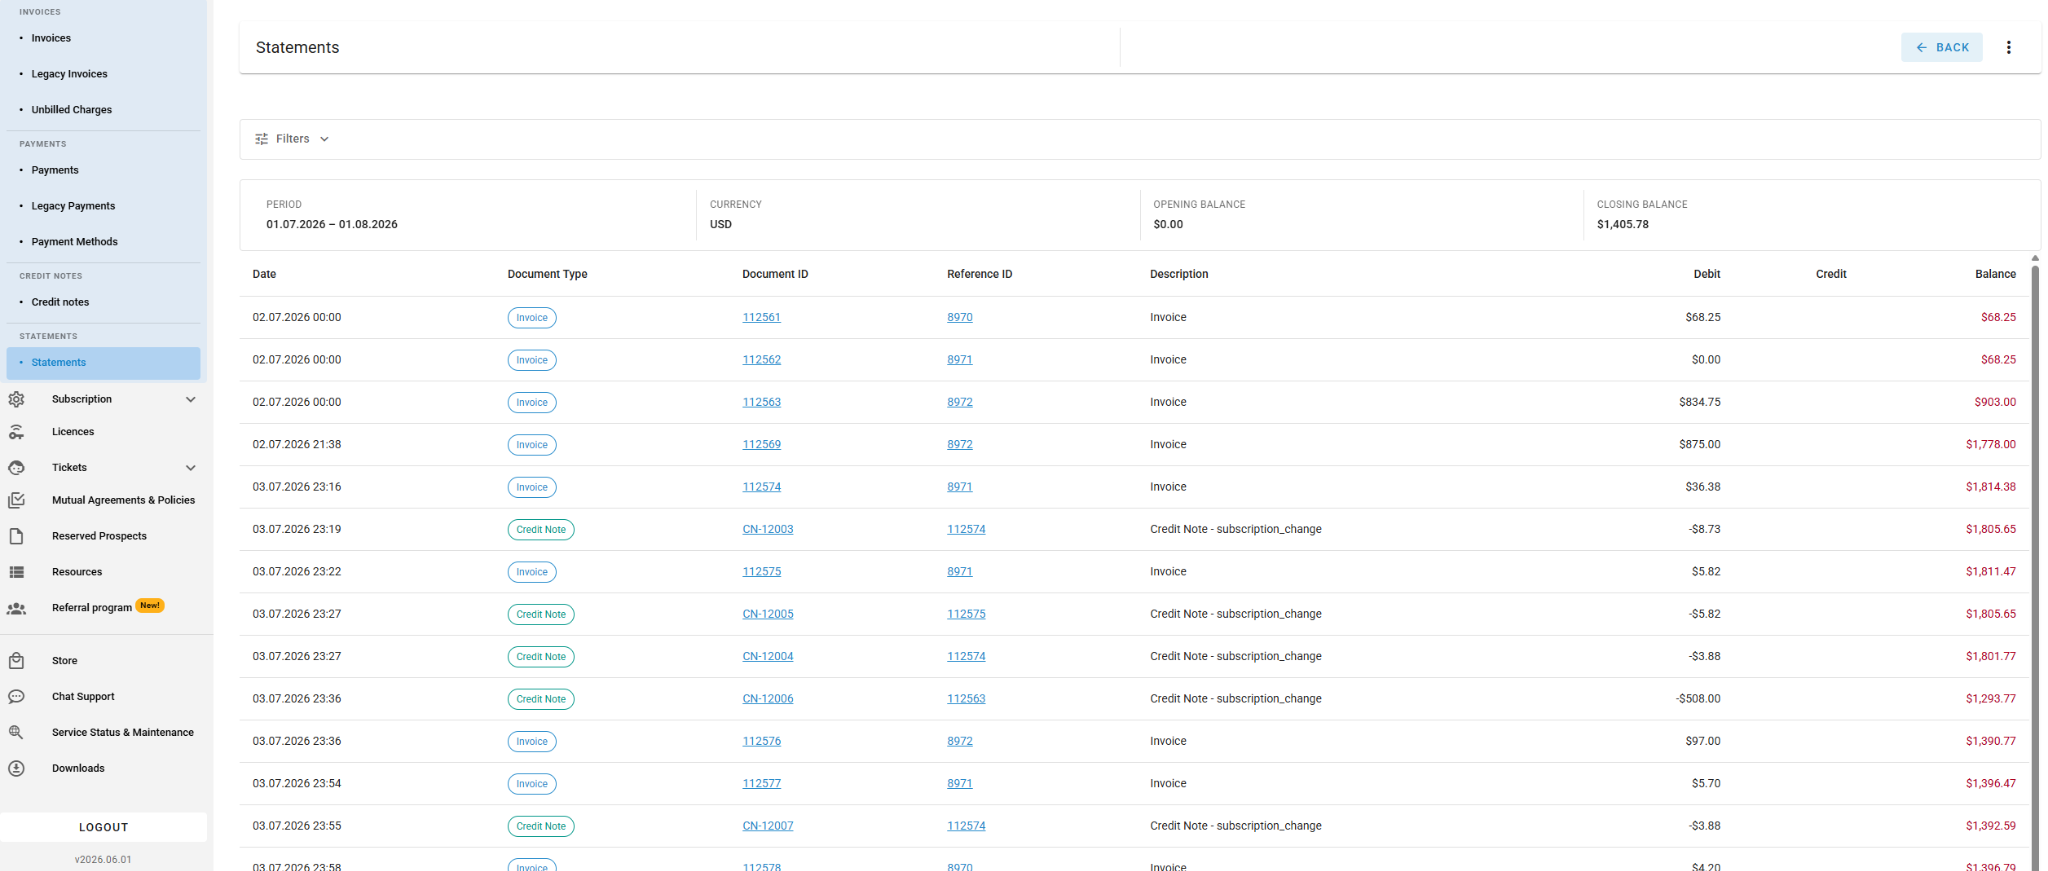
Figure 19 — Statements view, showing invoices and credit notes chronologically with running Debit, Credit, and Balance columns.
The Statements page lists every invoice and credit note for the selected period in chronological order, along with Debit, Credit, and a running Balance — useful for reconciling your account over time.
6.5 Payment Methods
To set up a new payment method, navigate to Billing > Payments > Payment Methods.

Figure 20 — The Payment Methods page, with the Add New button highlighted.
Click ADD NEW in the upper-right corner.
In the Add Payment Method dialog, enter your card details — name, card number, expiration date, CVV, and billing address.
Click SAVE to store the payment method on your account.
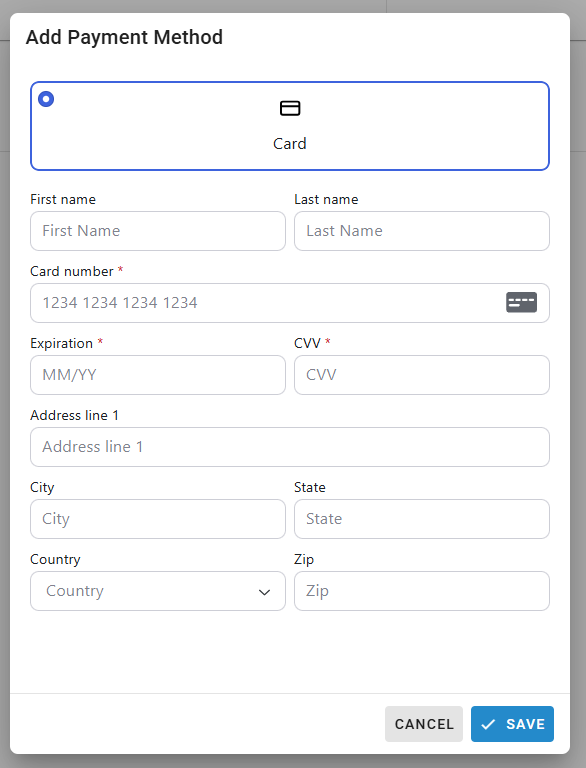
Figure 21 — The Add Payment Method dialog for entering card details.
7. Contacting Support and Viewing Tickets
There are two ways to contact Bicom Systems Support: opening a ticket through the Support Portal, or opening a chat directly from the Customer Portal.
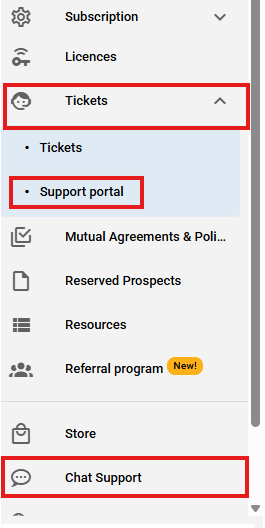
Figure 22 — The left-hand navigation showing Tickets > Support Portal, and the Chat Support option.
7.1 Opening a Support Ticket
To open a ticket, navigate to Tickets > Support Portal and log in.
NOTE
Support Portal credentials are sometimes different from your My Account credentials — this is configured by the customer. If you have any trouble logging in, please contact your Partner Success representative or email partnersuccess@bicomsystems.com.
7.2 Opening a Support Chat
To start a live conversation with the support team, click the Chat Support button in the left-hand navigation menu. This opens a chat window without needing separate Support Portal credentials.
8. Quick Reference
The table below summarizes where to go in the portal for each common task.
9. Troubleshooting
9.1 "Access Denied" When Editing a License or Subscription
This means the account member's profile does not have the required permissions enabled.
Cause: The Licences and/or Subscriptions permissions are not checked for that member.
Resolution: Ask your account holder or an authorized administrator to enable both permissions under My Account > Account Members > Edit (see Section 3.2.1).
9.2 The Store Option No Longer Works
This is expected behavior following the migration to the new billing platform. All purchases and license quantity changes are now handled through the Licences and Subscription sections of the portal, as described in Section 4.
9.3 A License Change Isn't Reflected on My PBXware System
Portal changes update your entitlement immediately, but your PBXware system must be re-licensed before the change is active on the server. See Section 4.6.
9.4 I Can't Log Into the Support Portal
Support Portal credentials can differ from your My Account credentials. Contact your Partner Success representative or email partnersuccess@bicomsystems.com for help regaining access.
9.5 I Don't Know My Subscription Type or PS Representative
Go to My Account > Account Settings > Account Details to view your assigned Partner Success representative and account information.
9.6 Getting Further Help
If you continue to experience issues after following the steps in this guide, please contact Bicom Systems Support through the Chat Support option in the portal, or by raising a support ticket under Tickets > Support Portal.