
SSL Certificate Upload Order and Intermediate Verification
When uploading SSL certificates from a Certificate Authority (CA) through the PBXware GUI, it is crucial to follow the correct order:
1. Upload the main server certificate first (the certificate issued specifically for your domain, e.g., *.rntelecom.net). This should be a separate file provided by your CA.
2. Upload the intermediate certificate second. The intermediate certificate links your server certificate to the root CA and ensures proper trust chain verification.
How to verify whether a certificate is intermediate
Use the following command to inspect any certificate file:
Note
openssl x509 -in cert1.pem -text -noout
Check the output for the Basic Constraints field:
• If the line reads CA:TRUE, this is a CA certificate (can be root or intermediate).
• If the line reads CA:FALSE, this is an end-entity / server certificate.
You can also check the Subject and Issuer fields:
• The Issuer of your server certificate should match the Subject of the intermediate certificate.
• The intermediate certificate’s Issuer will usually point to the root CA.
Handling Certificate Bundles
Sometimes, SSL certificate providers issue a bundle file (also called a .pem or .crt file) that contains multiple certificates. This file can include:
• The main server certificate
• One or more intermediate certificates
• Possibly the root certificate (which should not be uploaded)
Verifying Each Certificate in the Bundle
To check each certificate in a bundle, you can use the following command for each certificate block inside the file:
openssl x509 -in cert_file.pem -text -noout
In the output, look at the Basic Constraints section:
• If you see CA:TRUE, the certificate is a CA (intermediate) certificate.
• If you see CA:FALSE, the certificate is a server certificate.
Uploading the Certificates
1. Extract the main server certificate from the bundle (the one with CA:FALSE) and upload it first in the PBXware GUI.
2. Extract all intermediate certificates (the ones with CA:TRUE) and upload them together as the intermediate certificate chain. Do not include the root certificate.
Note: It is possible to have multiple intermediate certificates. In such casesNote, all intermediate certificates could be uploaded together in the intermediate field in the correct order.
Post-Installation File Verification
Once the SSL certificate has been installed through the GUI, the following files should be present on the PBXware server. You must verify that they have been created and check their validity:
• **NGINX**: Files located in ‘/opt/pbxware/pw/etc/ssl/nginx‘: ‘nginx.key‘, ‘nginx.crt‘, ‘nginx.csr‘
• **PWProxy**: File located in ‘/opt/pbxware/pw/etc/pwproxy‘: ‘pwproxy.key‘
• **Asterisk**: File located in ‘/opt/pbxware/pw/etc/asterisk‘: ‘asterisk.pem‘
• **HTTPD (Setup Wizard GUI)**: File located in ‘/opt/httpd/etc/‘: ‘server.key‘
To check that the files are present, SSH into the PBXware server as root (or with appropriate permissions) and run:
ls -l /opt/pbxware/pw/etc/ssl/nginx
ls -l /opt/pbxware/pw/etc/pwproxy
ls -l /opt/pbxware/pw/etc/asterisk
ls -l /opt/httpd/etc/
If any of the files are missing, corrupted or seem incorrect, this may indicate a problem with the certificate installation.
TLS Troubleshooting: Backend Verification
If TLS-related issues are observed after installing the certificate (for example, registration problems, failed HTTPS
connections, or service errors), you should manually verify several backend aspects to determine whether the certificate was applied successfully.
Backend Certificate Verification and Service Restart
After uploading an SSL certificate through the PBXware GUI, perform the following checks:
• The file nginx.crt (located in /opt/pbxware/pw/etc/ssl/nginx/) should contain the server(main) certificate and intermediate certificate that was uploaded via the GUI. Verify that it matches the uploaded certificates.
• In the file asterisk.pem (located in /opt/pbxware/pw/etc/asterisk/):
1. The first certificate block should correspond to the private key in nginx.key.
2. The second certificate block should correspond to the nginx.crt certificate.
• Once verification is complete and all certificates match, restart the services to apply
changes:
– Restart only NGINX and Asterisk, or
– Restart the entire PBXware system using:
/opt/pbxware/sh/pbxware restart
This ensures that the certificates are correctly applied and that TLS services are running with the proper configuration.
Troubleshooting Certificate Issues in nginx.crt
If you experience TLS-related problems (for example, SMS functionality is not working), check the contents of the nginx.crt file:
cat /opt/pbxware/pw/etc/ssl/nginx/nginx.crt
• The file should contain the main server certificate first, followed by any intermediate certificates.
• If the nginx.crt file only contains the main certificate, append the intermediate certificate(s) after the main certificate.
• If the nginx.crt file only contains the intermediate certificate(s) and the main certificate is missing, insert the main
certificate at the top of the file, before the intermediate certificates.
• Do not include the root certificate in nginx.crt.
Example: The nginx.crt file should be structured as follows:
-----BEGIN CERTIFICATE-----
... main server certificate ...
-----END CERTIFICATE-----
-----BEGIN CERTIFICATE-----
... intermediate certificate 1 ...
-----END CERTIFICATE-----
-----BEGIN CERTIFICATE-----
... intermediate certificate 2 ...
-----END CERTIFICATE-----
After updating nginx.crt, restart NGINX and Asterisk or the entire system to apply the changes:
/opt/pbxware/sh/pbxware restart
Example: SMS Not Working After Certificate Upload
A customer reported that SMS functionality was not working after uploading an SSL certificate through the PBXware GUI.
Scenario: The CA provided a bundle file containing 3 certificates:
• Certificate 1: Intermediate certificate
• Certificate 2: Root certificate
• Certificate 3: Root certificate
Received files: Below is a screenshot of the folder containing the bundle file and related certificates:
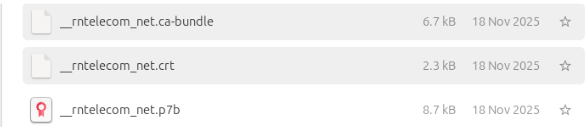 Figure 1: Folder contents showing the bundle file with 3 certificates.
The customer mistakenly uploaded the entire bundle file in the Intermediate Certificate field in the GUI.
Steps to resolve:
1. Inspect each certificate in the bundle using:
openssl x509 -in bundle.pem -text -noout
2. Identify which certificate(s) are intermediate (CA:TRUE and not root). In this case, only the first certificate in the bundle was intermediate.
3. Manually edit nginx.crt:
• If nginx.crt contains only the main server certificate, append the intermediate certificate(s) after the main certificate.
• Do not include any root certificates in nginx.crt.
4. After updating nginx.crt, restart the PBXware system to apply changes:
/opt/pbxware/sh/pbxware restart
Result: Once the correct intermediate certificate was added to nginx.crt above the root certificates (excluded), SMS functionality resumed normally.
Note: Always verify each certificate in a bundle before uploading, and only upload the intermediate certificate(s) in the intermediate section.