
As a part of every engineer's progress and development, we must use Jira as a part of the company's agile principle. Jira tasks should be created for every assignment such as:
- Writing a new document or a procedure
- Onboarding new members
- Contributing to the team's quality and performance
To create a TS Task, we choose the option 'Create' on Jira:
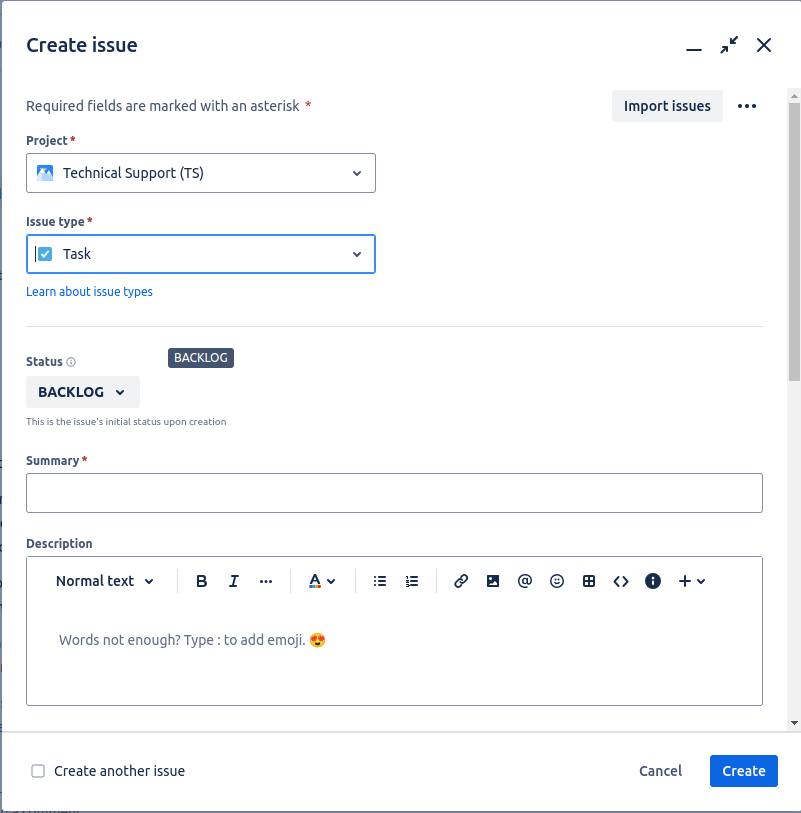
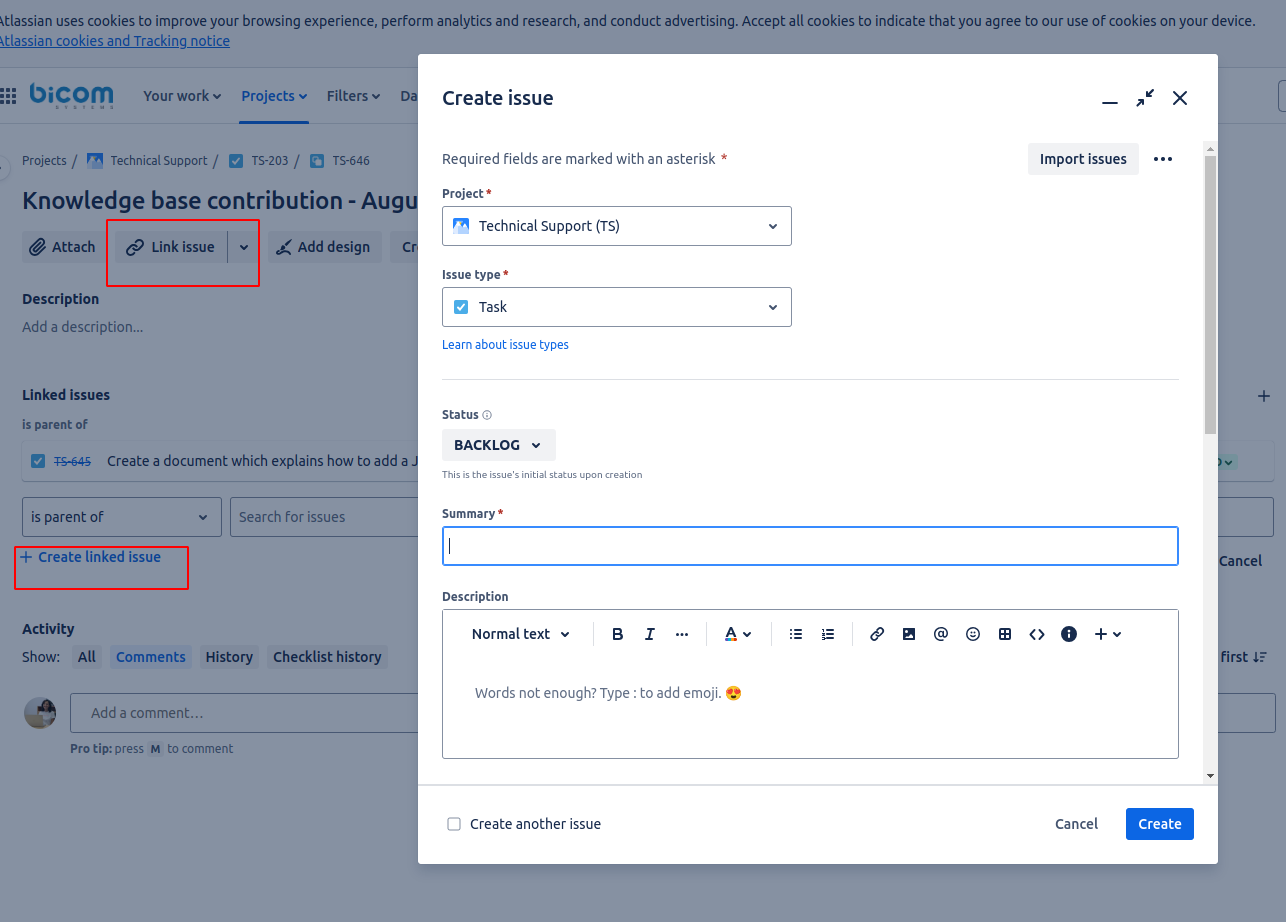
Project - Technical Support (TS)
Issue type - Task
Status - Change accordingly, 'To Do' is suggested.
Summary - The summary should contain the task title such as 'gloCOM Troubleshooting guide'
Description - The description field should contain detailed information regarding the task such as task purpose, summary, and brief table of contents.
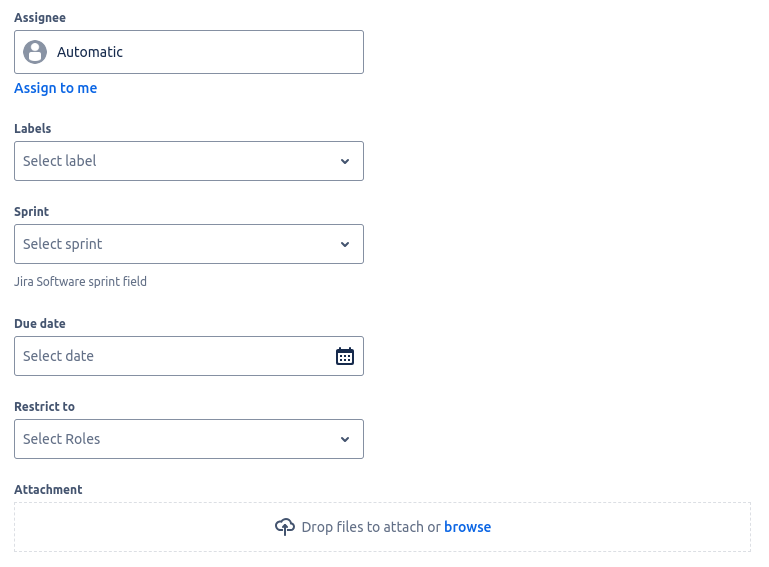
Assignee - If creating a task for another engineer, we should choose that engineer in the list. If creating a task for ourselves, we would choose 'Assign to me'.
Labels - Should be skipped.
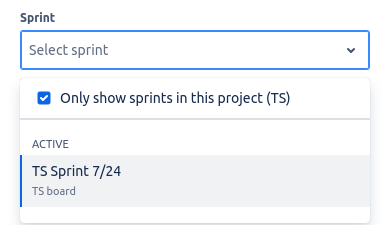
Sprint - Choose the current TS sprint. For example:
Due date - If needed, set the due date for the task accomplishment.
Restrict to - Should be skipped.
Attachment - Add attachments (images, documents) if needed.
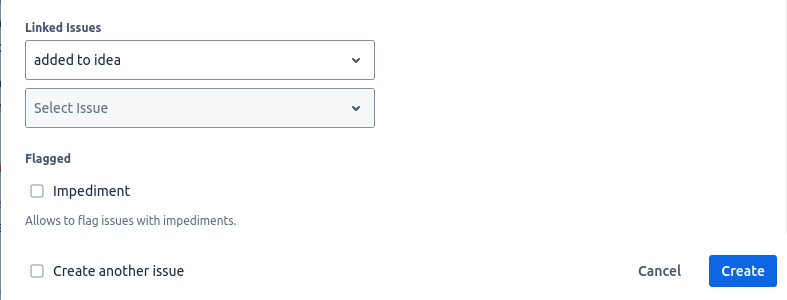
The above can be skipped, unless we want to directly link the new task to the existing one. The boxes for 'Impediment' and 'Create another issue' can be left unchecked.
We click on the 'Create' button.
Link multiple Jira tasks
In Jira, tasks can have various relationships with each other to indicate how they are connected. These relationships help in organizing and understanding the structure of work items within a project. Here's an explanation of some common link types in Jira:
1. Child of / Parent of
Child of: This link type indicates that the current task (child issue) is a sub-task or a more specific part of a broader parent task.
Parent of: The inverse of "Child of," indicates that the current task (parent issue) has one or more sub-tasks or specific parts associated with it.
Example: If you have a parent task called "Monthly reporting - July" and it has a child task called "Contribute to KB" the "Contribute to KB" would be a child of "Monthly reporting - July"
2. Blocks / Is Blocked by
Blocks: The current task is preventing another task from being started or completed.
Is Blocked by: The current task cannot be started or completed until another task is finished.
Example: If "Task A" is blocked by "Task B," then "Task A" cannot proceed until "Task B" is completed.
3. Relates to
This is a more general link that indicates a relationship between tasks without specifying the nature of the dependency. It's often used to show that the tasks are somehow connected, but not necessarily in a hierarchical or blocking manner.
Example: "Task C" relates to "Task D," meaning they have some connection, but one does not necessarily depend on the other.
4. Duplicates / Is Duplicated by
Duplicates: The current task is a duplicate of another task.
Is Duplicated by: Another task is a duplicate of the current task.
Example: If "Bug A" is duplicated by "Bug B," then both bugs represent the same issue, and addressing one would resolve the other.
5. Cloners / Is Cloned by
Cloners: The current task has been cloned to create another similar task.
Is Cloned by: Another task has been created by cloning the current task.
Example: "Task E" is cloned by "Task F," meaning "Task F" was created as a duplicate or similar task to "Task E."
How to link a task?
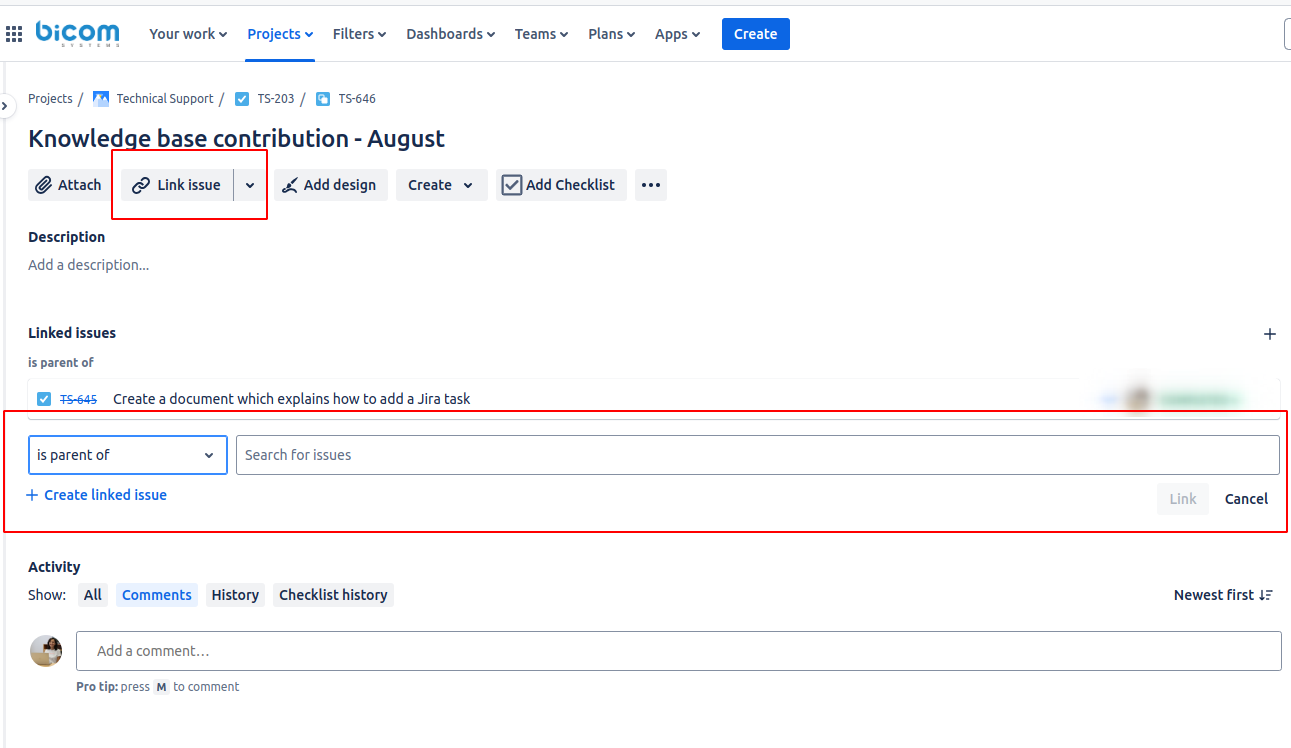
To link two existing tasks, we navigate to one of the tasks. Here, we click on 'Link issue' and a text window will appear as per the screenshot below. Here, we choose a relation and search for the task in question.
If we want to link an existing task with a new one, we would navigate to the existing task, click on 'Link issue' and then on 'Create linked issue':
Add a child issue
On tasks that do not have a child issue already, we will see the option 'Add a child issue'. Here, if we enter the title in the text box that will appear, we will automatically create a new task.
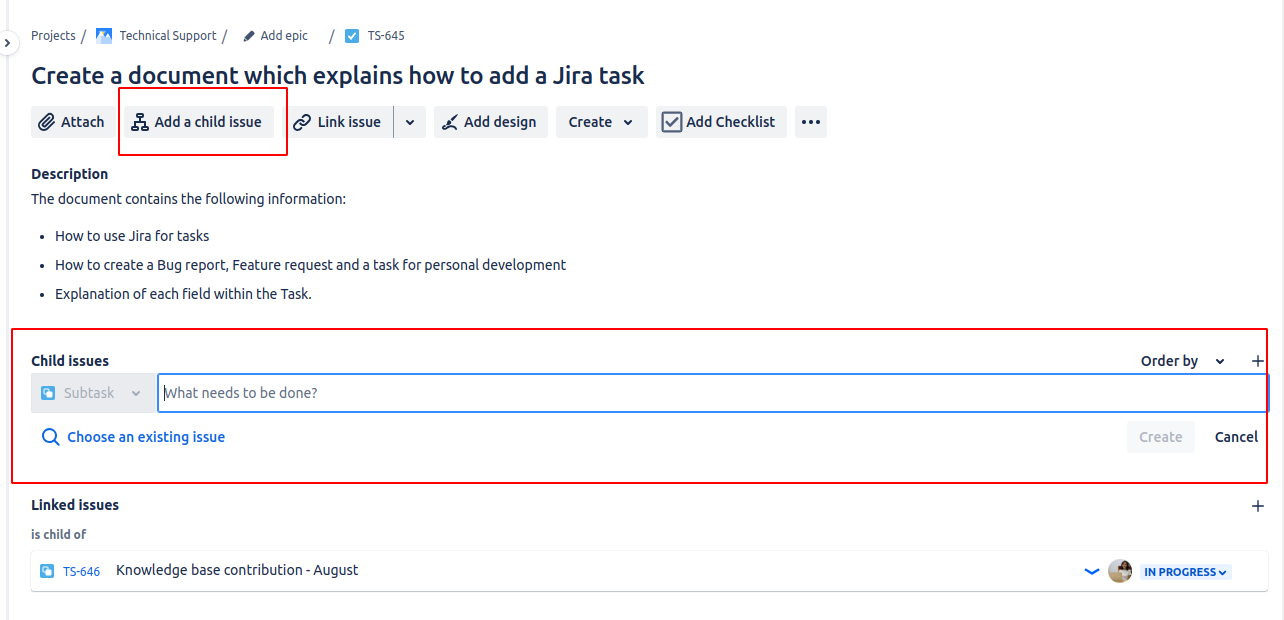
If we do not want to create a new task this way automatically, we can link an existing issue created regularly.
Checklist
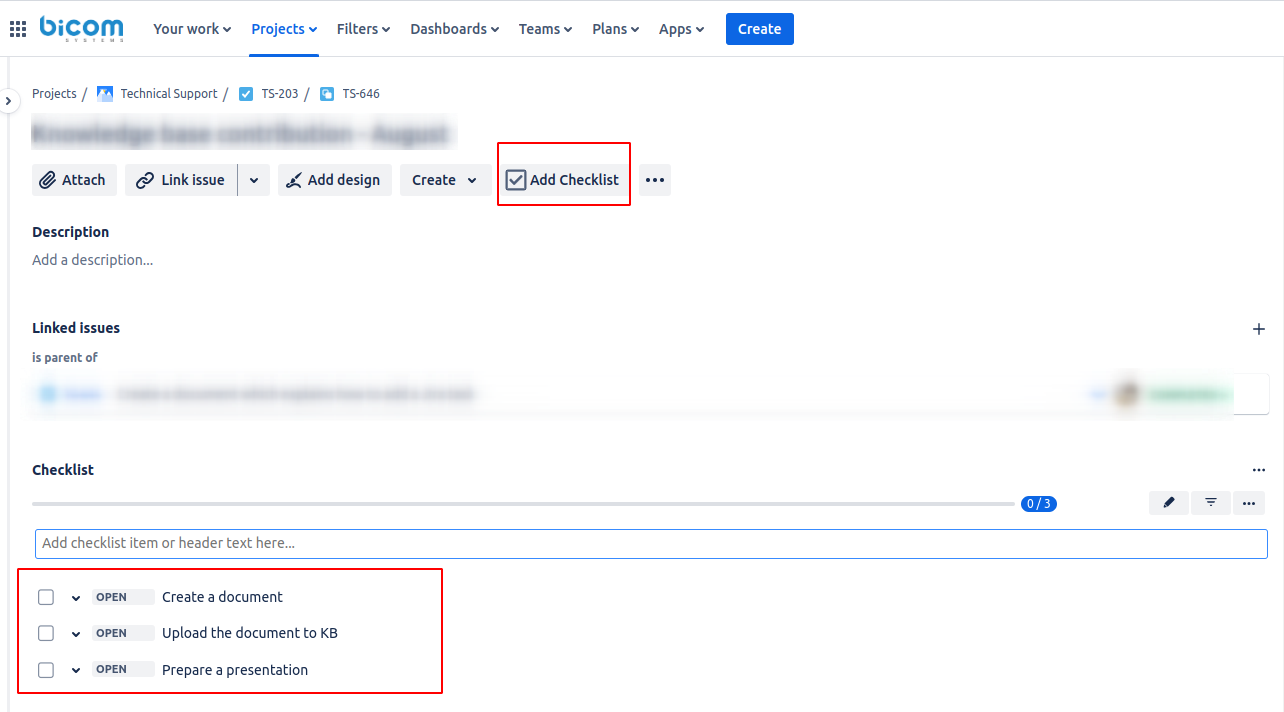
As per the screenshot below, we can use the Checklist for better progress tracking. Here, we can add all the task assignments that need to be fulfilled for a task to be considered 'Completed'.
Task Status
is createdOnce the task iscreated, its progress needs to be tracked accordingly.
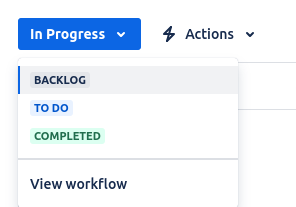
BACKLOG - There is no specified due date or sprint to finalize this task. In this specific case, there is no ETA on when this could be done as it might not be started any time soon.
TO DO - Tasks or issues that have been prioritized and are ready to be worked on. These items have clear requirements and are planned for the current sprint or project cycle.
IN PROGRESS - The task is currently in progress and it is actively being worked on.
COMPLETED - The task is completed.
Delete a task
If we created a task by mistake or the task created in the past does not align anymore with current goals, that task should be removed from our board. However, as we do not have permission to remove tasks, we would need to rename task instead as a workaround.
When renaming a task, we need to ensure that linked tasks are removed from the task and that the proper sprint is chosen.