TABLE OF CONTENTS
HOWTO Service Plans

- Log in to the system administration
- Navigate to ‘Home' -> 'Service Plans' -> 'Service Plans --> Add Service Plan’
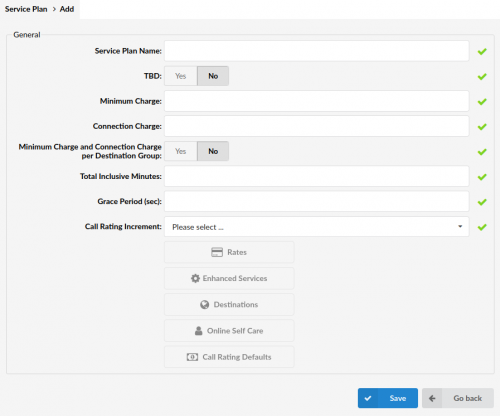
Service Plans
General
- Service Plan Name:
- Enter a name of a Service Plan
- TBD:
- Select whether 'Time-Based Dialing' will be applied to this Service Plan. Time Based Dialing is used in case users want to charge calls differently depending on the period of time. For example, users can set different prices for mornings or weekends, etc. More information about timed based dialing can be found later in the document.
- Minimum Charge:
- Set the minimum charge amount
- NOTE: When a call is made, no matter how long it lasted, this 'Minimum Charge' will be applied.
- Connection Charge:
- Set the connection charge amount
- NOTE: The connection charge is applied to any call that leaves the system (only in case the other party answers).
- NOTE: Please note that if both 'Connection Charge' and 'Minimum Charge' are set, their sum will be charged after the other party answers the call. Also, this sum will not be charged immediately if 'Grace Period (sec)' is set.
- Minimum Charge and Connection Charge per Destination Group:
- Set the minimum and connection charge per a Destination group
- NOTE: If set to 'Yes', users can define 'Minimum Charge and Connection Charge per Destination Group'. If set to 'No', 'Minimum Charge' and 'Connection Charge' will be applied from the Service Plan.
- Total Inclusive Minutes:
- Set total inclusive minutes amount
- For example, each extension assigned to this Service Plan will have X amount of free minutes of a call time to a location to which these inclusive minutes apply.
- NOTE: 'Minimum Charge' and 'Connection Charge' will be applied if set.
- Grace Period(sec):
- Set a grace period in seconds. For example, you set here a value 10.
- In that case, every call that lasts ten seconds or less will not be charged.
- Call Rating Increment:
- Set a call rating increment, options available:

- EXAMPLE: John made a call that lasted 12 seconds. It will be billed as if he made a 30-second call. If the call lasted for 39 seconds, then it will be billed as if the call lasted 42 seconds.
- The first number (E.g. '30') defines how many seconds will be charged immediately after the beginning of a call.
- The second number (E.g. '6') defines at which rate the call will be charged after the time from the first number expires.
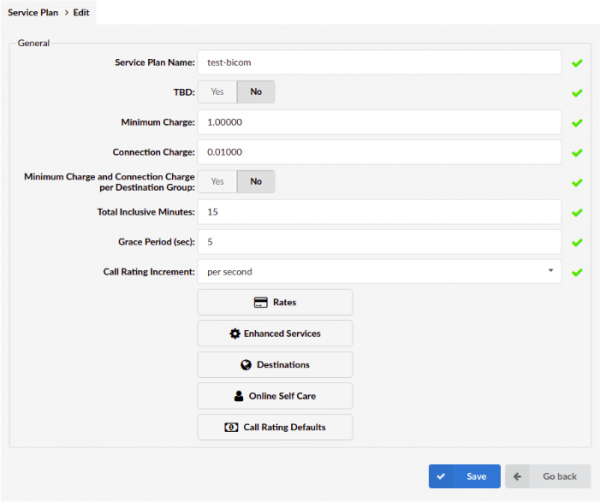
After clicking ‘Save’, other options will be available for editing. Please refer to the screenshot showing an example of the configuration.
Rates
- Set incoming/outgoing rates per each known Destination. Specify prices for each desired destination.

Configuration for E.164 Routing
For example, to set a price for United Kingdom Destination Proper:
- 1. Click the 'Rates' button
- 2. Navigate to the letter ‘u’ under the 'Remote Destinations' section
- 3. Click 'United Kingdom of Great Britain and Northern Ireland'
- 4. Click the 'Edit' button next to 'Proper'
Please refer to the screenshot.

- Outbound (per minute)
- In this case, the '5.00000' rate will be applied to all calls made to the 'Proper' Destination.
- Inbound (per minute)
- In this case, the rate '1.00000' will be applied to all calls made to the 'Proper' Destination.
- Minimum charge
- If set on Service Plans, it will be inherited. However, users can set it differently for the desired Destination.
- Connection charge
- If set on Service Plans, it will be inherited. However, users can set it differently for the desired Destination.
- Call Rating
- Select the call rating type
- NOTE: For more on how 'Call Rating' works, please refer to the example documented above this section.
- Inclusive minutes
- Check this field to include 'Inclusive Minutes' to this Destination

To upload Destination Group rates by using a CSV file, users have to do the following:
- 1. Click the 'CSV Upload' button
- 2. Click the ‘Browse’ button to find the desired file (optional)
- 3. Select the file
- 4. Click the ‘Upload’ button
NOTE: The CSV file must have the following format: “Code”,”Route”,”Destination”,”Outbound”,”Inbound”,”Inclusive”,”Call Rating”,”Minimum Charge”,”Connection Charge”
Please refer to the screenshot.
CSV for Simple Routing
All other fields except the CSV file configuration share similar options as for E.164 routing.
In case of Simple Routing, the CSV file format should be as follows: "Route Name","Outbound","Inbound","Inclusive Minutes","Billing","Minimum Charge","Connection Charge"
Enhanced Services
- Set Enhanced Services (ES) that will be applied to all users assigned to this Service Plan
- NOTE: Enhanced Services can be enabled but not edited on Service Plans. Editing can be done on the Extension level.
Please refer to the example of enabling 'Caller ID' as an Enhanced Service.
a) Disabled ES
- To disable ES, click the 'X' icon and save the settings.
b) Enabled ES
- To enable ES, click the '✔' icon and save the settings.
c) Enabled ES and allowed in OSC
- To enable ES and allow it in OSC, click the '✔' and 'Star' icons and save the settings.
Destinations
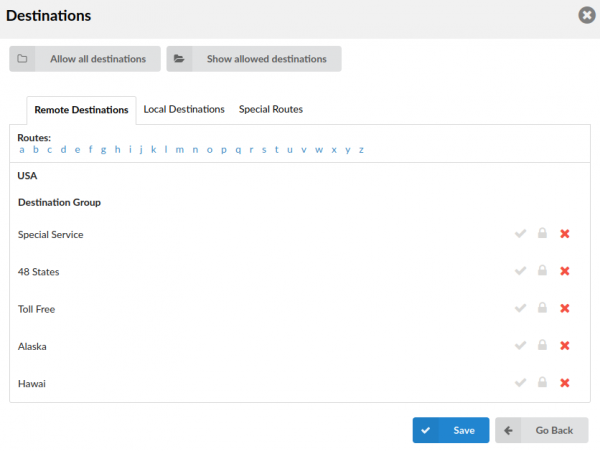
- Set whether to allow or deny certain Destinations
NOTE: A user can here set "PIN Required" Destinations, so when calling them, a user will be prompted to enter a PIN.
- Allow all destinations
- Click this button to allow all Destinations for this Service Plan
- Show allowed destinations
- Click this button to show allowed Destinations for this Service Plan
- NOTE: PIN Required Destinations will not be shown.
Online Self Care
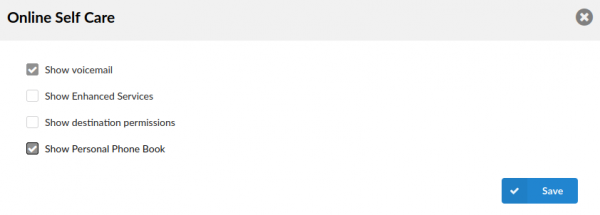
- Set further configuration for Online Self Care (OSC)
NOTE: To show these options in OSC, users can tick the desired option and click ‘Save’ afterwards.
In this example, in OSC of the Extension, 'Voicemail' and 'Personal Phone Book' will be shown.
Call Rating Defaults
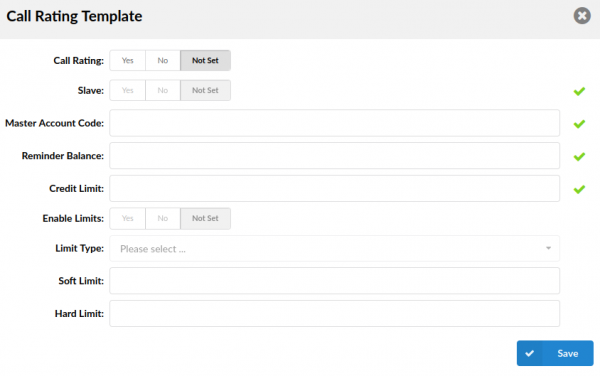
To enable call rating, set the 'Call Rating' field to Yes.
- Slave
- If set to Yes, Extensions will be sharing call rating funds from one Master Extension.
- Master Account Code
- This code represents the number of the Master Extension. All Slave Extensions will be using call rating funds from this Extensions
- NOTE: This option will be grayed out if the ‘Slave’ option is set to ‘No’.
- Reminder Balance
- This value represents the account balance at which a reminder should be sent to the user.
- For example, if set to '15', when a reaches '15' on his account balance, a reminder will be sent to him.)
- NOTE: This option will be grayed out if the ‘Slave’ option is set to ‘Yes’.
- Credit Limit
- Set the maximum amount that the system will extend to the Call Rating account
- For example, if set to '10' and the account balance drops down to '0', the account will still have "10" units in available funds.
- NOTE: This option will be grayed out if the ‘Slave’ option is set to ‘Yes’.
- Enable Limits
- Enable limits by setting this option to ‘Yes'
- Limit Type
- Select the way that limits will be applied.
- Soft Limit
- Set the value of the account balance after which you want to notify the user that he has reached Soft Limit. This is set depending on 'Limit Type'.
- For example, if 'Soft Limit' is set to ‘10’, when the user's account balance reaches this value, he will be notified via e-mail.
- NOTE: This option will be grayed out if the ‘Slave’ option is set to 'Yes' and the 'Enable Limits' option is set to 'No'.
- Hard Limit
- When this value is reached, the system will block this user from making any calls.
- For example, if this value is ‘5’, when the user's account balance reaches this value, the system will block him from making any calls.
- NOTE: This option will be grayed out if the ‘Slave’ option is set to 'Yes' and the 'Enable Limits' option is set to 'No'.
In order for 'Call Rating Template' to work successfully, the default Service Plan must be selected in the Tenant package, on the following path: Master Tenant --> Settings --> Tenants --> Packages --> edit package in question.
To select the default Service Plan, please do the following:
- 1. Navigate to 'Settings'
- 2. Click 'Packages' under the 'Tenants' section
- 3. Click the desired 'Package'
- 4. Select the desired Service Plan under 'Allowed Service Plan' and 'Default Service Plan' under the 'Call Rating' section
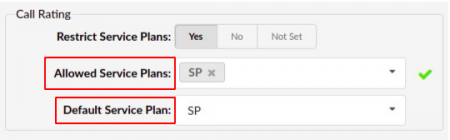
NOTE: The default Call Rating template on Service Plans will be used only when users, without privileges to set and control Call Rating, create new Extensions.
Additional Information About Billing
Looking from the call rating (billing) perspective, Extensions can be set as Slave or Master. The Master Extension has its own credits and users are able to set reminders, for example, a reminder when the balance reaches a certain amount and certain limitations. On one Tenant, users have can multiple Master Extensions or all Extensions can be Master Extensions. Slave Extensions are using funds available under Master Extension. When the Master Extension runs out of funds, none of the Extensions will be able to make any calls until the Tenant administrator adds more funds to the Master Extension. PBXware does not have real-time billing. Instead, once the call is finished, the system will charge for that call based on the call duration and rating for that specific Destination.
Call Rating Info Section
- Account Balance: Displays the available account balance.
- Available Funds: Displays the available account funds (account balance + credit limit).
How Call Rating (Billing) Works
The available funds on the Master Extension will be divided by the number of the Slave Extension’s outgoing channels. Each Slave Extension gets an amount in advance that will define how long the call can last.
Example: We have one Master Extension and two Slave Extensions. 'Account Balance' on Master Extension is set to '100'. The Slave Extension (101) has two outgoing channels. The Slave Extension (102) has three outgoing channels. When making a call:
- The Extension (101) will have available funds in the amount of 50 per call (100/2 outgoing channels).
- The Extension (102) will have available funds in the amount of 33,333333333 per call (100/3 outgoing channels).
Adding Funds to Master Extension

- 1. Navigate to the desired ‘Tenant'
- 2. Go to 'System' under the 'Extensions' section
- 3. Select the Extension that you have set to be Master
- 4. Click 'Show Advanced Options'
- 5. Scroll down to the 'Call Rating Info' section
- 6. Click the 'Card' icon next to ‘Account Balance’
Once users click the 'Card' icon, they will be prompted to a different page where they can set further configuration.
Please refer to the screenshot.

Once on this page, users can do the following:
- 1. Select 'Type' of the payment (Credit/Debit)
- 2. Add the desired number of funds
NOTE: All the fields, Amount, Ref No, and Notes, must be populated to add the funds.

Time-Based Dialing
It is possible to enable call charging by specific time-based dialing (TBD) rule. Users first need to create a TBD rule, and then set the 'TBD' option to Yes on the Service Plan settings.
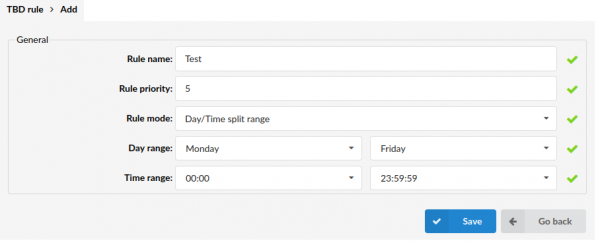
To create a TBD rule, please do the following:
- 1. Navigate to ‘Home' -> 'Service Plans' -> 'Time Based Dialing'
- 2. Click the 'Add TBD rule' button
- Rule name
- Set the Rule name, any name
- Rule priority
- Set the Rule priority, for example 5
NOTE: If there is more than one TBD rule and the dates and times of the rules are overlapping, the rule with a higher number will have a higher priority.
- Rule mode
- Set a Rule mode, for example --> Day/Time split range
TBD rules can have one of the following options:
- Day/Time split range - Users can set the day range (start and end day) as well as the time range (start and end time) for which this TBD rule will be applied.
- Day and Time range - Users can set the start day/time and the end date/time for which this TBD rule will be applied.
- Date range - Users can set the date range for which this TBD rule will be applied.
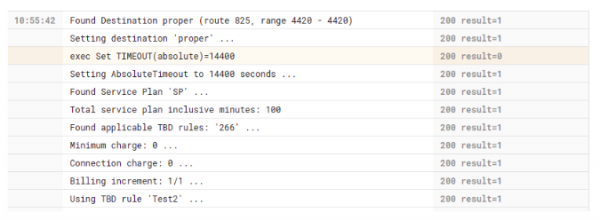
Example of using TBD

If a user has the 'TBD' option set to 'Yes', they will need to set rates for every TBD rule.
As it is shown in the example of 'Destination Group ‘Proper’ for United Kingdom', there are two TBD rules set on the system. This is an example of the configuration for the first TBD rule, ('Test2').

This is an example of the configuration for the second TBD rule, ('Test').

We can see, from the configuration, that the TBD rule, 'Test2', has priority when the time is overlapping.
Please refer to the screenshot of the call example.