
Upgrade Procedure
Table of contents
Checking Bicom sites availability 4
Working Environment
First thing to do when conducting any checks on the PBXware you are trying to upgrade is to understand the environment you will be working with. Meaning, to acknowledge whether the PBXware is standalone, either on a single host or running in some virtual environment that is not SERVERware virtualization.
This is an important distinction due to differences in the backup procedure on standalone environments in comparison to the PBXware running on the SERVERware environment. Backup procedures will be explained later in this document.
In case the PBXware is standalone (running on a single physical host) and is on v4.x or older, a new deployment is necessary due to the differences in kernel versions between v4.x PBXware and newer versions from v5.x onward. You need to advise the client to buy additional hardware (new deployment) before proceeding with the system upgrade. Instruct the client to the DT team (Deployment & Training team) for this procedure.
Precheck Procedure
Before any upgrade procedure, especially one from v4 systems, one should download the precheck script that will provide you useful information about what are next steps and how to proceed further.
To download a precheck script please make sure to execute the following command
→ wget https://downloads.bicomsystems.com/support-group/mirza/precheck.sh
Once done, we need to make sure that script is executable and to do so, run the following command → chmod +x precheck.sh
Further, we can run the script where you can specify two arguments, check or tools.
Since we need to inspect (check) the system for the upgrade we would use check argument in this case
→ ./precheck.sh check v7.0
You can also execute like this → ./precheck.sh, to see all available options.
Once you have run the script with the check argument, you will get information that is useful for checking the system. All information presented is explained further in the document.
Checking Bicom sites availability
First section of the output is related to the Bicom site’s availability, where 5 ping requests are sent to the following IPs:
bicomsystems.com (185.59.92.181)
downloads.bicomsystems.com (157.90.90.217)
pw-updates.bicomsystems.com (157.90.90.218)
It is important to confirm that each of the mentioned sites is reachable with no packet loss:
5 packets transmitted, 5 received, 0% packet loss, time 35ms
If either site is not reachable, please make sure to instruct the client to allow access to the sites listed above.
Commit check
Next section provides information about commits for sitemanager, pbxware and crm respectively, which are also important in order to confirm whether the system in question has any custom patches that will be overwritten after the upgrade. If that is the case, the same patch needs to be applied after the upgrade procedure in order to ensure a fully functional system as it was before the upgrade. Seek advice from the devs if needed for the patch availability.
To check whether there is a custom patch on the system one should copy the last commit number shown on each section, as shown on the screenshot below.
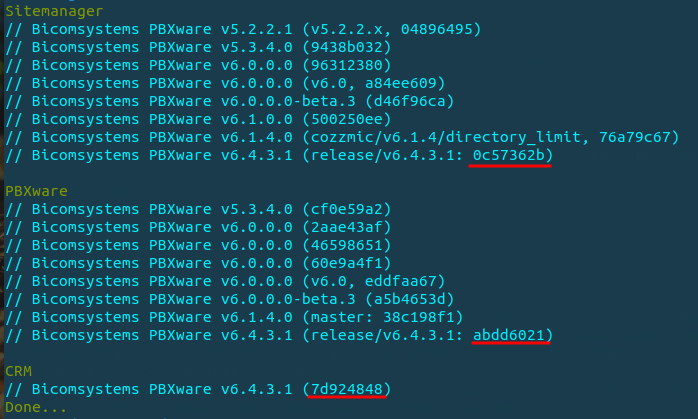
Then, you will compare these commits, ignoring the last character, on the following sites:
Sitemanager and PBXware on the attached link.
And CRM on the following link:
Custom Dial Plan
Another important section to check is the extensions.conf for any custom dial plans. This is important when upgrading from v4, as the older asterisk version is used, where chan_sip is utilized whilst on the newer PBXware versions, v5 and above, chan_pjsip is used. One would need to adjust a dial plan configuration from sip to pjsip.
Note: This is rarely the case as there are not many v4 systems left with the custom dial plan. But, in case there is any, above is a must since this will impact the system’s functionality greatly, depending on the dial plan.
Codec g729
The script also checks for codec g729 and if the same was available before the upgrade procedure the codec needs to be manually installed afterwards. Installation instructions can be found on the attached link.
CDR Table Size
Another important, system affecting step, is to confirm how large the cdr table is and whether there is enough space on the PBXware for the alter procedure to be completed. After an upgrade procedure, altering the CDR table takes place immediately after the services are started. In case there is not enough space for the alter procedure to finish, the system will crash due to the insufficient space on the same.
Note: If upgrading from v4.x, please make sure that the alter process is completed fully before stopping the services again should you need to do so.
One can also manually check the CDR table size by ssh-ing to the PBXware in question and running the following query:
/opt/pbxware/sh/mysql -e 'SELECT table_name AS "Table Name", ROUND(((data_length + index_length) / 1024 / 1024), 2) AS "Table Size (MB)" FROM information_schema.TABLES WHERE table_schema = "pbxware" AND table_name = "cdr";'
Furthermore, to double check the size of the CDR table please run the following command as well
→ du -sh /opt/pbxware/pw/var/lib/mysql/pbxware
This will check the size of the specified folder, for example, the output should look like this:
4.9G /opt/pbxware/pw/var/lib/mysql/pbxware
It is a must to have double the amount of free space in comparison to the CDR table. So, in the case above where the CDR table is ~ 5GB, one should have at least 10GB of free space. Also, it is recommended to always leave a small margin additionally, so in this case at least 11GB.
Other v4 information
Other options that needs to be addressed in case the system if upgraded from the v4 are the following:
Checking Hot Desking devices
In case there are some hotdesking devices, the client needs to be advised to purchase additional licenses, per hot desking device as this has been changed from v4.1.2 and above.
Confirm app usage
Further, in case the client is using our applications, if they are below v4.1.1, we need to instruct them to purchase additional licenses.
Checking for +desktop, +ios, +android usage
Next one is the hack that was used only on v4 which is no longer needed on the v5 and above so instruct the client in case there are some extensions using the hack above to remove the same.
Check whether multi-user extensions are used
If this is the case, please instruct the client to adjust the multi-user configuration, by providing instructions on the multi-user extension configuration.
Grandstream phones
The script will also list all the grandstream phones that are available on the PBXware and if there are any, please make sure to instruct the client to change the protocol from UDP to TCP on the phones themselves, or to have just a couple of codecs available on that particular phone/extension.
Reason for this is the MTU size limit that is 1500 by default and packets may be over the mentioned size which may result in packets being stripped down hence uncomplete which would result in registration failure for example.
Other important information
Once the script is finished running, you will be prompted whether you want to check for the polycom firmware files that are currently available on the PBXware. In case there is a need for a new firmware pack you can perform the installation of the same by using instructions on the attached link.
–
In case the client is behind the firewall, please make sure to instruct the client about necessary ports that need to be opened. Please find a link attached related to this matter that you can share with the client.
–
In case the client is using gloCOM/Communicator desktop applications, please make sure to instruct the client to have the same update to the latest current possible version in order for them to receive a prompt for an automatic update of the application.
Also, instruct the client that mobile applications would need to be downloaded from the app/play store.
–
If you are performing an upgrade of the CC (Contact-Center) system, please make sure to instruct the client that ext. number and agent number cannot be the same.
For example, a client is using 4-digit extensions and has an extension 1000 and also the agent with the same number. From the v6, this is not advisable and will cause potential issues so the client needs to change either the agent or extension number.
–
In order to ensure that nothing has been missed from the above, please find the attached google form for the upgrade precheck that contains all information on what needs to be done before the procedure.
Scheduling procedure
Once the upgrade request has been received, the first thing to do is send a canned response called “PBXware upgrade – first response”. Canned responses can be used by typing “/c” when replying to the ticket, please refer to the screenshot below on how this looks.
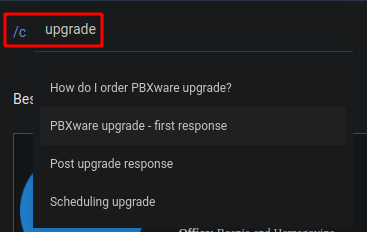
More information on how to use canned responses can be found on the attached link.
Next thing to do is to perform a precheck of the system in question using information described earlier in the document. Once that has been completed, you will contact the client and ask which date/time is suitable for this procedure to be completed.
Note: Upgrades should NOT be performed on Friday.
Once the client specifies their off-hours and potential date you will then check whether you are able to complete the procedure and if that is the case, you will proceed with scheduling as you see fit meaning when you have a free time to complete the procedure.
In case the client’s off-hours are not covered during your working hours, you will then need to transfer the upgrade to some engineer working in the shift that is suitable to complete such a procedure. To transfer the upgrade, simply put a note on the ticket in question, tag a coordinator from the corresponding shift and state that such upgrade needs to be completed during those hours. Coordinator will then further assign the ticket to another engineer who will proceed with the scheduling.
Note: Please do NOT schedule a date/time for another engineer without their confirmation.
In case you manage to arrange a suitable date/time with the client, please suggest that one join the live chat and ask for you during the procedure so one can test the calls immediately after the procedure has been completed. That would be the best case scenario.
However, if that is not possible for the client, as the procedure will be conducted during their off-hours, you can perform some tests yourself to ensure that the procedure was successful and also to not cause any inconvenience to the client.
Backup Procedure
To create a backup of the PBXware that is running on a standalone server, you should create a backup manually of the “pbxware” & “httpd” folders inside the /opt directory.
Full procedure is described on how to backup from the shell guide.
In case you would need to restore backed up files, for whatever reason, please check detailed instructions on how to restore from the shell guide.
–
In case the PBXware is running as standalone but on the VM instance that is not SERVERware, you would need to instruct the client to create a valid snapshot of the PBXware prior to the upgrade procedure.
Note: Please make sure that client confirms that they have a valid backup created before conducting an upgrade procedure.
–
In case the client is PBXware as the VPS in the SERVERware environment, please make sure to create a clone prior to the upgrade procedure.
Upgrade procedure
After all the pre-checks and scheduling has been done and you have a scheduled date/time for the procedure, here are the steps to complete the upgrade procedure successfully.
For systems before v4.1.4, i.e. v4.0:
Perform sh/update from v4.x to v4.1.4 first.
For systems that are on the v4.1.4:
For Multi-Tenant systems:
Run the script to upgrade to v6 → upgrade_v4x.sh
For Contact-Center systems:
Run the script to upgrade to v6 → upgrade_cc_4-6.sh
For systems that are on v5.x:
For Multi-Tenant systems:
Upgrade to v6: Perform sh/update to v6.7.x
Upgrade to v7: Run the script → upgrade.sh
For Contact-Center systems:
Upgrade to v6: Run the script → upgrade_cc_5-6.sh
Upgrade to v7: step above then run the script → upgrade.sh
Note: All the mentioned scripts above are contained in the precheck script and will be downloaded automatically as soon as the precheck script is run.
Post Upgrade procedure
Once you have completed the upgrade procedure (all of the above), the final step is to conduct last checks on the system ensuring that everything is running properly as it was before.
To ensure that everything is checked, there is a post upgrade check google form that you will need to fill out with the requested information. The form is attached above which contains all information that needs to be populated. Once the same is filled, one should submit and that would mark the upgrade as completed.
One thing to mention, that is also listed in the form above, is that you should advise the client with the canned response “Post upgrade response” after the procedure has been completed.