HOWTO Configure the Telnyx Provider

Telnyx is a next-gen communications platform that provides carrier-grades services. Universal communications are made possible by Telnyx as it offers easy configuration via user portal or developer API. It allows for easy integration, management, and analysis of all of the voice and messaging needs.
The SMS feature on PBXware allows users to select Telnyx as a provider in their configuration so that messaging service is fully utilized. In order to successfully set up Telnyx on PBXware, a number of steps must be followed beforehand. A user must first obtain the Telnyx account, and afterward, login to set up additional configuration.
| Get Started with Telnyx Services |
|---|
1. Purchase Numbers With Telnyx
- Telnyx enables users to search for and purchase numbers while ensuring easy management of the orders.
- For more information on how to purchase numbers, please refer to the next section of this document.
2. Port Numbers to Telnyx
- Number porting to Telnyx can be completed by following a series of steps that will result in numbers being used for SMS capabilities and voice functionality.
- For more information on how to port numbers to Telnyx and use its services, please refer to this link
3. Set up Hosted SMS with Telnyx
- Hosted SMS allows numbers that are on a different voice provider to use Telnyx for SMS without affecting the voice functionality. This enables users to keep the voice operations with their other provider, but to transfer only the SMS portion to Telnyx.
- For more information on how to set up Hosted SMS with Telnyx, please refer to this link
Accepting an Invite to Telnyx

The first step in creating a sub-account is accepting an invitation that comes to e-mail. After clicking the link in the invitation, users will be prompted to a different page where they can create their Telnyx account.
- An example message of an invite can be seen in the screenshot.
For more on how to complete the procedure, please refer to the explanation below.
Creating a Telnyx Account

Once a user accepts an invite and clicks the link, they can finish creating their Telnyx account. By creating a Telnyx account, a user gains access to the system and can easily manage configuration and all other details.
In order to complete creating a profile, a user has to enter the following information:
- Full Name
- Enter a full name that will be displayed on the profile
- Password
- Enter a password
- NOTE: It is recommended to tick the checkbox to receive additional information and e-mails from Telnyx.
- Before clicking the 'Create my Account' button, please check whether the data entered is correct.
Purchasing a Number


To purchase numbers, please do the following:
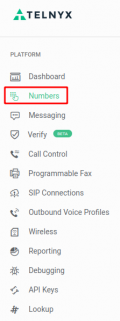
- 1. Navigate to 'Numbers' on the side menu on the Telnyx portal.
- 2. Click the 'Search & Buy Numbers' tab.
- 3. Users will be prompted to a different window where they can configure details regarding numbers.

Once Local Numbers is selected, users may start with the number search by selecting a specific 'Search Type', 'Region', and 'Number Features'.
- Search Type

Select a region type
- Region

- Number Features

- Select the 'SMS' option as suggested

Once the configuration is complete, it should look as shown in the example. To search numbers, a user should click the 'Search Numbers' button. After clicking the button, a list of available numbers will appear together with all other necessary data:
- Location/Rate Center
- Features
- Upfront Price
- Monthly Price
The next step would be to add desired numbers to the cart. This is done by pressing the 'Add to Cart' button as shown in the screenshot.
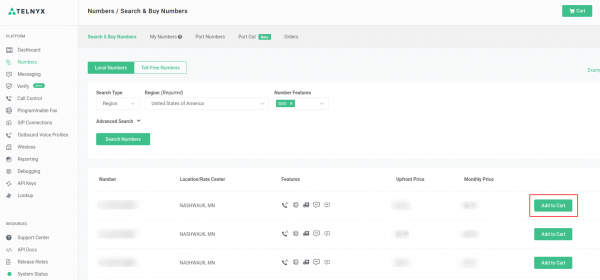
After the number has been successfully added, the following message should appear:

To finalize the process of number purchasing, a user should click the 'Cart' button at the top right corner of the page and check his/her number of orders.

My Cart allows users to check any additional details before placing an order. Please note that once purchasing is completed, the list of numbers can be seen under the 'Numbers' section on the side menu on the Telnyx portal.
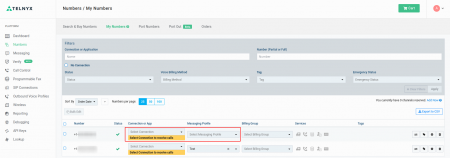
Except for purchasing numbers, a user can also define to which Messaging Profile and Connection these numbers belong, however, those actions can be completed later on. Users may add a 'Connection' and 'Messaging Profile' once they click the 'Numbers' tab and have access to the list of purchased numbers.
To see how to add a 'Connection' and 'Messaging Profile', please refer to the screenshot.
Creating a Messaging Profile on Telnyx

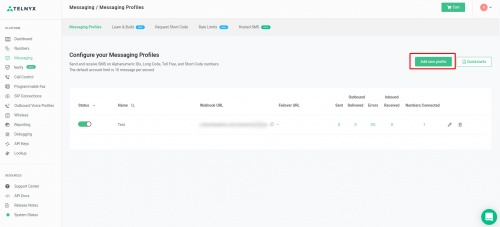
To create a Messaging Profile on Telnyx, please do the following:
- 1. Navigate to the 'Messaging' tab on the side menu on the Telnyx portal.
- 2. Click the 'Add new profile' button.
- 3. Users will be prompted to a different window where they can configure their Messaging Profile.
Profile Info

The Profile Info section allows users to successfully set up a Messaging Profile. The following data needs to be provided:
- Profile Name
- Enter a profile name will be used to distinguish this Messaging Profile from others
- API Version
- Select the API Version
- NOTE: It is recommended to select API V2 due to the fact that using API V2 makes it easier to utilize messaging capabilities.
Inbound Settings

The Inbound Settings section allows users to control how their profile handles incoming messages. In order to set up inbound settings correctly, a valid URL has to be entered. A webhook address is the address that Telnyx uses to send inbound SMS messages. - https://%YOURPBXDOMAIN%/smsservice/telnyx
- Send a webhook to this URL
- Enter a valid URL
- NOTE: To prevent any security issues, it is highly recommended to use the 'https' protocol. Please refer to the example above.
- If the primary URL fails, send webhook to
- If needed, enter a secondary URL in case the primary one fails
Outbound Settings

The Outbound Settings section allows users to control how their profile sends messages.

To see how to manage this list, please refer to the following possible options:
1. Adding all regions and countries
- In order to add all regions and countries at once, a user just has to press the 'Add all Regions and Countries' button. All added regions and countries will appear in the 'Selected Regions and Countries' section on the right.
- DELETION: The deletion action can be performed by clicking the 'Remove all Regions and Countries' button. This button appears only after some countries or regions are added to the list.
2. Adding one/many countries
- In order to add one or many countries, a user has to hover over the country name, and a plus sign should appear. By pressing the plus sign, a user can add the country with all its regions.
- DELETION: The deletion action can be performed by hovering over the country's name and clicking the minus sign. The country will be deleted together with its regions.
3. Adding one/many regions
- In order to add one or many regions, a user has to click the down arrow that can be found on the right side next to the country's name. From there, a user can select specific Destinations.
- DELETION: The deletion action can be performed by clicking the down arrow, after which the list of all regions will appear. Following this, a user may delete regions that s(he) does want to be listed.
For more information on Number Pool and Short Codes, please visit: https://developers.telnyx.com/docs/v2/messaging
Creating a Connection on Telnyx

SIP connections on the Telnyx portal are used to receive calls but are not necessarily needed for SMS. However, if a user wants to receive calls and use the voice service, they may add a 'Connection'.
For more information on how to add a 'Connection', please visit: https://developers.telnyx.com/docs/v2/sip-trunking
Generating an API Key on Telnyx


To generate an API Key, please do the following:
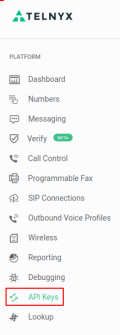
- 1. Navigate to the 'API Keys' section on the side menu on the Telnyx portal.
- 2. Please make sure that API Keys version is API v2.
- 3. Create the API key by clicking the 'Create API Key' button.
- 4. Copy the API Key.
Obtaining a Public Key on Telnyx

To obtain a Public Key, please do the following:
- 1. Navigate to the 'API Keys' section on the side menu on the Telnyx portal.
- 2. Click the 'Public Key' tab.
- 3. Copy the Public Key.
Adding an API and Public Key to PBXware

To add an API and Public Key to PBXware, please do the following:
- For Multi-Tenant:
1. Navigate to 'Master Tenant' -> 'SMS' -> 'Trunks' -> 'Add SMS Trunk'
- For Contact Center:
1. Navigate to 'Home' -> 'SMS' -> 'Trunks' -> 'Add SMS Trunk'
- 2. Select 'Telnyx' as a provider
- 3. Paste the API Key in the 'API Key' field
- 4. Paste the Public Key in the 'Public Key' field
- 5. Save the settings
SMS Trunks

To add a SMS Trunk to PBXware, please do the following:
- For Multi-Tenant:
1. Navigate to 'Master Tenant' -> 'SMS' -> 'Trunks' -> 'Add SMS Trunk'
- For Contact Center:
1. Navigate to 'Home' -> 'SMS' -> 'Trunks' -> 'Add SMS Trunk'
- 2. Enable the SMS Trunk
- 3. (For MT) Enter a name of the provider that is relevant only for easier navigation in the GUI
- 4. Select 'Telnyx' as a provider
- 5. Paste the API and Public Key
- 6. Enter a suitable description regarding this Trunk (optional)
- 7. Save the settings
SMS Trunks and Tenants

To assign a specific SMS Trunk to a Tenant that has been previously created, please do the following:
- For Multi-Tenant:
- 1. Navigate to 'Master Tenant' -> 'SMS' -> 'Trunks and Tenants'
- 2. Click the Tenant's name to edit the configuration or click the 'Edit' button
- 3. Select a specific Trunk from the drop-down menu
- 4. Save the settings
Exporting Numbers to CSV on Telnyx
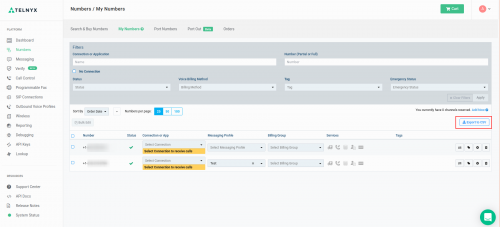
To export numbers from Telnyx, please do the following:
- 1. Navigate to 'Numbers' on the side menu on the Telnyx portal.
- 2. Click 'Export to CSV'.
- 3. Save the CSV file.
Adding Numbers to PBXware Automatically
To automatically add numbers to PBXware, please do the following:
- For Multi-Tenant:
1. Navigate to a specific 'Tenant' -> 'SMS' -> 'Numbers'
- For Contact Center:
1. Navigate to 'Home' -> 'SMS' -> 'Numbers'
- 2. Click the 'CSV Upload' button.
- 3. Upload the CSV file that is exported from Telnyx to PBXware.
Adding Numbers to PBXware Manually


To manually add numbers to PBXware, please do the following:
- For Multi-Tenant:
1. Navigate to a specific 'Tenant' -> 'SMS' -> 'Numbers'
- For Contact Center:
1. Navigate to 'Home' -> 'SMS' -> 'Numbers'
- 2. Click the 'Add SMS Numbers' button.
- 3. Add numbers purchased from Telnyx.
NOTE: Please use E.164 formatted phone numbers, such as '1-xxxxxxxxxx' or '44-xxxxxxxxxx' when adding them manually.